Up next in 10



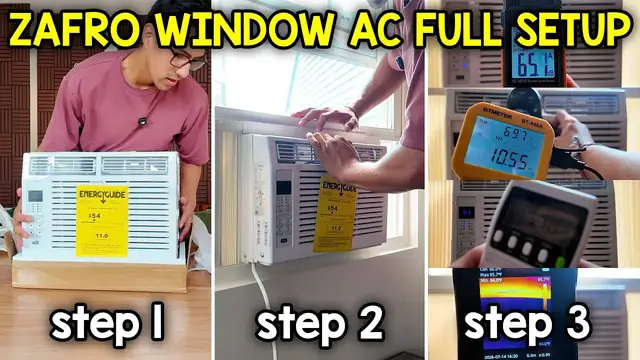
In this video, I go over the full setup and testing of the Zafro 6000 BTU Window Air Conditioner. Check it out here https://geni.us/xg36 Want FREE Shipping With Amazon Prime? Get a 30-DAY FREE TRIAL by signing up here http://www.amazon.com/tryprimefree?tag=thechrisreview-20 DISCLAIMER: This video and description contains affiliate links, which means that if you click on one of the product links, I’ll receive a small commission. This helps support the channel and allows us to continue to make videos like this. Thank you for the support!
Show More Show Less View Video Transcript
0:00
This is the 6000 BTU window air conditioner by Zafro
0:02
So in this video, I'm gonna do a quick unboxing and installation and test some things out with these gadgets
0:07
So let's start with the unboxing. And also in case you're curious, the size of this box is gonna be 18 and a quarter inches
0:13
by 15 and a quarter by 17. And I'll start right at the top over here
0:30
and and the first thing I see is going to be this booklet it's going to be instructions on how to use
0:39
it oh and then actually this will be easier if I put it down here and it's got some plastics that
0:49
I can raise the whole thing up from. And there it is. And right over here is going to be that
1:02
top piece, the bracket. There's some styrofoam all over here. And then here we have the window
1:11
sash. Oh, and actually there's a little bit more stuff at the bottom too
1:25
So there's all the hardware. This is to attach it to the window. There's the remote control
1:35
Followed by the window shutters and the adhesive foam piece. Alright so now it's time for installation and we're gonna start on the top here and we wanna grab the top rail and it's gonna be this right here
1:48
We're gonna have the sponge at the bottom and then this face plate should face towards the outside like this
1:53
And then on the top there's gonna be four holes where you can screw it in and I'm gonna be grabbing the smallest 3-8 screws
2:00
And here's a better look at this. There, just like that. And now it's time to install the shutters so here's a better angle
2:11
and there they are so keep in mind that there's going to be a right and a wrong way to place these
2:18
so right over here we're going to see label the right this is going to go on the right side
2:23
this one will go on the left and to put it in we just want to stretch the according part out
2:28
and make sure it's uh past these two parts and that's so we can actually slide it right through
2:35
these four holes
2:56
And this can go right in here. And then the same thing on this other side
3:04
I'll give it this angle so you can get a better, a different view. The same thing, just stretch
3:10
this out and there just like that and now i going to pick my spot which is actually going to be right over here
3:31
There. That looks about centered. So I can close that off and just make sure this is
3:53
position correctly
4:09
oh i see i think i put this a little bit too low this should go a little bit higher up
4:14
there. And honestly, the way this is made is a little bit strange, because I can't get this
4:27
quite right. So if you take a look over here, at the bottom, let's see, right over here
4:37
there's this metal part, and this can actually only go and sew inside
4:41
so this is as close to as I can get it and when I put it here I'm not able to close it and if I
4:48
bring it more inside it kind of defeats the purpose of this because this should be like right over
4:53
here so I can attach to the window so this is made a bit strange so I guess this won't be the most
4:57
efficient of the ones I'm testing out but that's fine for now I'll leave it as is
5:02
I'll remove this paper and also all these stickies that are on it
5:11
and then it's time to test this unit out. Actually, I forgot there's still a few more things to do
5:17
one of which is to add the adhesive strip. So this one's going to go on the top here
5:22
so you do have to open up the window again and stick this to the bottom. This is just to give
5:26
it a little bit more of a seal, and then we also have this seal, and this is going to go all the
5:31
way at the top. This just pushes in just like so, and then there's also going to be some brackets
5:37
to install. So we have this L bracket and this is going to install right over here. And this is
5:44
going to be for that window sash. There, just like that. And it's also time to attach this
5:49
but it's not really going to fit here. And that's because of my window cell. If I had a window cell
5:54
like all the way against it, I can actually screw this in here. So this is kind of useless and it
5:58
doesn't come with the other options for this type of window. So I can't really do much about it
6:03
but that's about it. That's, yeah, it comes with two of these
6:07
But anyway, yeah, that's about it. So now time to test the unit out. All right, now that this is installed, let's go over everything starting with the top
6:12
So there's gonna be two individual sections, which you can move up and down, and then we can also move these little fins left to right
6:19
Now, all the way on the right side, this is where the air filter is gonna be. So this just comes off just like so
6:24
And we're gonna have several buttons. So I'll start with power. This is gonna turn it on
6:29
And it does take a few seconds for this to actually start working. and I'm going to..
6:38
Yeah let me change fan speed to low So now let go over the buttons themselves With fan speed it going to dictate how fast the fan is spinning whether it be low medium high
6:47
Or we can set it to automatic so it'll just automatically adjust
6:50
There's also going to be three different modes plus an auto mode which will automatically change
6:55
Cool mode, this will be the actual air conditioner itself. We have dry mode, this is going to help reduce some humidity in the air
7:03
then fan mode with the wind just blowing and then automatic so it just does whatever it
7:08
thinks it needs. Then we can set the temperature with these two buttons over here
7:12
And let's see how low this goes. If I hold it, yeah I can't hold it
7:17
Alright, if I go to cool this will let me go all the way to 61
7:25
And that can go as high as 88. We also do have a timer, so when I press the timer it starts in increments of half an hour
7:37
or 30 minutes and then we can set this up to 24 hours
7:47
There's also sleep mode. In sleep mode, lights are going to turn off besides this light right over here
7:53
With eco mode, the AC is going to automatically turn off once it reaches the desired temperature
7:57
and then turn back on once it drops below it or above it in that case
8:02
similarly we also have the same controls on this remote control here. Now it does
8:06
come with batteries included and it's fairly lightweight but now time to
8:10
actually do some measurements. We're gonna start off with the decibel reader to see how loud it is so let me just turn this on so you know what like a
8:16
bass level is in this room currently. So the ambient reading sits at around 45
8:20
decibels and then moving the fan speed to low is increasing the noise to around
8:29
64 and a half decibels. Moving it to medium it's gonna slowly start creeping
8:35
up reaching just about 66 decibels and now at high speed we're getting around
8:41
70 decibels but turning it off slowly brings it back down to under 44 decibels
8:47
Alright now similarly let's check out wind speed and I'll start with low
8:52
Oh, oops. All right, there
9:07
About 9.7 or so miles per hour. There, you can see it a little bit better
9:20
Yeah, actually, you know what? around 9.4 ish miles per hour and this is for low
9:25
Now let's head over to medium. This goes up to about 96
9:42
Oh, looks like it did drop a little bit too. And now let's go to high
9:52
This is around 10 10 10 And one thing I will say during this test that I'm noticing is that it does take a while
10:17
for things to load up. So like when I press the power button, there's a delay
10:21
When I press the fan speed from low to medium to high, there's going to be delay as well too
10:25
but with that out of the way now let's go on to the next test and that's going to be measuring
10:30
the temperature and also checking out the wattage so while this loads up let me turn
10:36
actually no let me not turn it on just so you can see what kind of a baseline looks like now keep in
10:41
mind I did have this on for a little bit so it is still going to be a little bit cool and then you
10:45
can also see it here it is still blue and so there yeah right in the center this is going to be 80
10:55
oh no, about 81 and change. Yeah, 81 and a half degrees Fahrenheit
11:01
That's gonna be the coolest setting when I go down over here, about 84
11:06
And then now let's go to the shutters. The shutters are 94
11:11
Yeah, it's much hotter. And the way this test is gonna work is I'm gonna keep it at a consistent medium fan speed
11:17
And I'm gonna keep the mode at cool. And we're gonna go all the way to the highest setting
11:22
So we'll go to 88 and see how cool this gets. 10 minutes, I'll do that
11:28
And after 10 minutes, I'll change it to 78 and then go down to the lowest setting
11:33
So I'll be back in 10 minutes. All right, so it's been over 10 minutes, it's 13
11:38
and we can see that the wattage changed to 553. And now let's check the temperature
11:45
Now everything is basically blue around over here, but I think at the vents it's gonna be the coldest
11:52
And right here it's at 87.1 degrees Fahrenheit. So it's gonna be a little bit cooler
11:58
than what the goal here is of 88. Now let's go down to 77
12:05
and I'll be back in another 10 minutes. All right, so it's been over 20 minutes now
12:10
We're at 580 watts. And let's see what the temperature reading says
12:18
This one's now at 53.1 degrees Fahrenheit. Very cool. And then you can clearly see a big difference between it
12:25
So now let's go another 10 degrees or 11 degrees. And I'll be back in another 10 or so minutes
12:32
All right. So it's been over 10 more minutes. And now let's take a look at this. We got the wattage at 578
12:38
And now for the temperature. Oh, and one more thing. I actually ended up changing this to 61 degrees
12:44
And this is the lowest setting it's at. And here we have it's at 52.5 degrees Fahrenheit
12:53
And then let's take a look at the shutters again. Shutters are at 92.7
12:58
So overall using this AC was pretty simple. It also does come with the remote control. The only issue about this is the fact that right over here are the gaps
13:06
That's one thing I didn't like about it. And then also the fact that whenever you do press the buttons
13:10
there's like a little bit of a lag, but that's kind of it. The biggest gripe would be here
13:14
And this part here, now you saw that it changed. It took a few seconds to change
13:20
But yeah, that's a quick look at the AC
#Computers & Electronics