Up next in 10

Build a Google Maps Clone to Track Location & Geolocation With Autocomplete Using Leaflet.js in JS
Dec 10, 2025
Buy the full source code of the application here:
https://procodestore.com/index.php/product/build-a-google-maps-clone-to-track-location-geolocation-with-autocomplete-using-leaflet-js-in-js/
Show More Show Less View Video Transcript
0:00
Uh hello guys. Today in this tutorial I
0:03
will basically show you a new tool that
0:05
I added on my free media tools website.
0:08
And uh this tool basically guys is a
0:10
clone of Google maps. You have used
0:13
Google maps in your day-to-day life to
0:16
actually track the location of someone.
0:18
And basically I made our my own Google
0:21
map. And I haven't used Google map
0:24
official API. I made this with my own
0:27
JavaScript code and it runs in the
0:29
browser. You can basically check out the
0:31
live demo. I have given the link in the
0:33
description of the video. This tool is
0:36
deployed on free mediatools.com
0:39
and/find
0:40
latitude longitude. This is actually the
0:43
URL or address. You can check out the
0:45
tool. The link is given in the
0:47
description of the video. So this is
0:49
similar to Google maps guys. So you have
0:51
Google maps Android app installed on
0:53
your p mobile phone or you can visit uh
0:56
Google [snorts] maps on PC as well. So
0:59
this is quite a similar interface. You
1:01
will see a autocomplete field will be
1:03
there. You can basically write any
1:05
address around the globe. And let's
1:07
suppose I write any address right here.
1:10
Let's suppose I write here Tokyo. And
1:13
you will basically see guys autocomplete
1:15
will be there. As you just write here,
1:17
autocomplete suggestions will come right
1:19
here. So you will see Tokyo, Japan. So
1:22
Tokyo is a city in Japan. So all these
1:24
autocompletes are coming similar to we
1:26
have Google autocomplete as well for
1:28
Google maps. If I select any location
1:30
right here, as I select the location
1:32
guys, you will see that automatically
1:34
that marker will be added right pinpoint
1:36
at the location which is there in the
1:39
map. And we will also be getting this uh
1:42
geol location which is latitude and
1:44
longitude. uh latitude, longitude. As
1:46
you all know guys, every location on a
1:48
map has a latitude and longitude
1:51
coordinate. This is called as geocoding.
1:54
We basically convert a physical address
1:56
to a latitude longitude coordinates. And
2:00
that's exactly what we are doing right
2:01
here. We are simply allowing the user to
2:04
enter the location and after entering
2:06
the location we basically giving the
2:08
latitude and longitude to the user and
2:10
also pinpointing the location in the map
2:12
as well. So this is a full application
2:14
guys similar to Google map and if you
2:16
have used Google map you will be uh
2:19
interface will quite look similar to
2:21
that we can even zoom in zoom out these
2:24
controls are there here you will see
2:26
that and the nice thing about this tool
2:28
guys I will show you how to code this
2:30
tool step by step in this video and the
2:33
nice thing is that we don't need to pay
2:35
anything to the Google map API I haven't
2:37
used that Google map API it's completely
2:40
free solution that I'm going to tell you
2:43
I written this code with my full
2:45
dedication hard work. So I will tell you
2:47
how I coded this application. So let's
2:50
suppose I take any other examples Texas
2:52
I take Texas you will see it's a city in
2:55
US and you will see auto suggestions are
2:58
coming and now you will see it will
3:00
pinpoint the location. You can just
3:02
scroll down with your mouse as well. So
3:04
it will pinpoint the location and it
3:06
will give you this latitude and
3:08
longitude. So you can see it will give
3:10
you this latitude longitude and uh
3:13
that's exactly what we want and uh if
3:17
you want the full source code guys of
3:18
this tool yeah I have given the full
3:20
source code you can purchase it on
3:22
PayPal in United States dollar or you
3:25
can go to stripe and make the payment in
3:27
Indian rupees. So both the payment links
3:29
are given in the description of the
3:30
video and after you purchase it you will
3:33
actually get a zip file which will
3:34
contain the actual directory structure
3:36
of the code. Right here we actually have
3:38
the HTML code, CSS code, JavaScript code
3:41
and the actual images which are used. I
3:44
will show you step by step how I written
3:46
this.
3:47
So this is actual uh interface guys. I
3:51
just show you basically you just need to
3:53
enter the location any point location
3:57
as you just write here all the
3:59
suggestions will come. If you select any
4:01
location then you can just select it and
4:04
automatically it will pinpoint the
4:06
location which you selected right here.
4:08
So now let's get started. You can visit
4:12
the full before payment you can
4:14
basically use this tool get a c a custom
4:18
to and then you can make the payment. So
4:20
this is actual tool. I have given the
4:21
link in the description of the video. So
4:23
now let's get started. So first of all
4:25
guys I will include all the CDNs which
4:28
are there.
4:30
This CDN will you will get after you
4:32
purchase the source code and I already
4:35
included we are using bootstrap for
4:37
making the user interface of the
4:39
application. We are also using jQuery as
4:41
well. These two libraries we are using
4:43
and then you can see we are including
4:45
the base library that I included which
4:48
is map dot css map.js js and geooder
4:53
cssjs. So these libraries we are
4:55
including and we are basically using uh
4:59
uh leaflet js to actually do the
5:03
rendering of the map in the background.
5:05
We are using leaflet js is a free
5:08
solution and also we are using open
5:10
street map API to actually convert the
5:14
physical address to location. So I will
5:17
basically just delete this HTML code and
5:20
start from scratch and also delete this
5:22
JavaScript code as well.
5:25
This will be a long video. So just watch
5:28
the full video guys if you want to learn
5:30
this how to create this. So first of all
5:32
in the HTML what we will do is that
5:35
we will have some interface right here.
5:39
So just wait here
5:43
we will have basically this div tag
5:46
which we will give it an ID to it of
5:48
address form. So here we will allow the
5:51
user to actually write the address.
5:55
Enter address.
5:58
This will be the field where the user
6:00
will enter the address. So there this
6:03
will be input field. Input type text.
6:07
We will give it an ID to it of address
6:09
and placeholder. Simply just allowing
6:13
the user what to write here. Enter
6:16
address dot dot dot. it is required
6:23
and then uh we will also be having this
6:25
autocomplete here. Uh basically as you
6:27
type inside this suggestions will come
6:30
to you in the address field. So for that
6:33
we will have separate div tag. We will
6:35
give it id to address suggestions.
6:42
We'll give it a bootstrap class of list
6:44
group.
6:46
And here the suggestions will
6:48
dynamically come. So just write this div
6:50
here. And lastly we will be basically be
6:53
having a div with an id of map. Here we
6:56
will actually load our actual map. So
6:59
first of all what I will do I will
7:01
actually load the map. So I [snorts]
7:03
will uh include the script js. So I will
7:06
in the root directory we will create a
7:07
new file script.js. So here we will
7:09
write all the javascript code which is
7:11
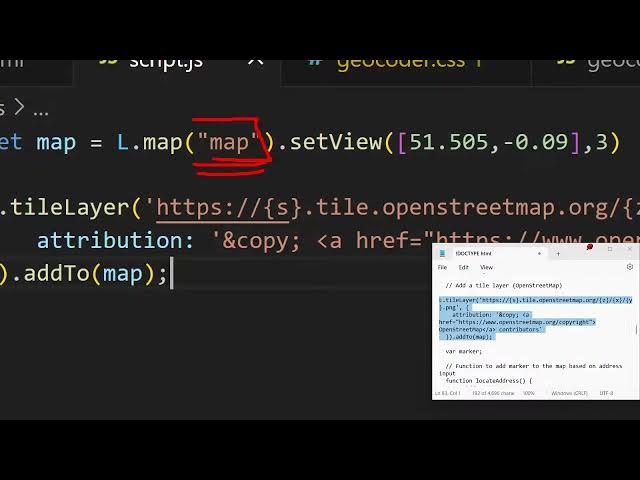
required. So first of all guys what we
7:14
need to do we need to initialize the
7:15
map. So now to initialize the map you
7:17
will use l dot we are using leaflet js
7:21
and we are basically getting the
7:22
reference of the map we are setting the
7:24
view
7:27
here we need to pass the latitude so
7:29
once you load the page this will be you
7:32
can pass any latitude longitude we are
7:34
passing this latitude and minus0.09 09.
7:37
This is the value of longitude. And then
7:40
this is a zoom level. This can be any
7:43
value but I am setting the zoom level of
7:46
the map to be three. This is the default
7:48
value. Now we will actually set a tile
7:50
layer. Now to set a tile layer we will
7:52
use this method and this image will be
7:56
coming from the internet. So
7:59
we will use this
8:02
back tick symbol right here.
8:10
tile dot open street.
8:14
So we are using open street map API guys
8:17
which is open-source library
8:20
for embedding maps in the application.
8:23
So this URL we are using
8:28
X [snorts]
8:33
Y and uh this is actually a PNG image.
8:36
So we are just embedding this PNG image
8:38
and the second option is takes is an
8:41
object uh this contains attribution
8:45
value. So what I will do I will simply
8:48
paste it. That's all.
8:56
So [snorts]
8:57
the very first line guys what we did we
8:59
basically initialize a map by passing a
9:03
latitude and longitude and the zoom
9:05
level. So here you need to basically
9:07
give the ID. So whatever ID that you
9:10
have given in the HTML to your map
9:13
you have given basically in the HTML you
9:15
will see we have given this ID. So we
9:18
are actually passing this map reference
9:20
to this to initialize a map here and
9:23
then we are adding a picture from open
9:26
street map API. So if you just refresh
9:29
now this application you will hopefully
9:32
you will see this address field but you
9:34
will not see the map for now to see the
9:37
map guys we just need to add some CSS
9:40
right here just to see the map on the
9:43
screen. So we will basically write a
9:46
very basic we will target the map
9:49
element and we will give it a height of
9:51
500 500 pixel. So if you if we refresh
9:56
you will basically see now the map is
9:58
showing guys basically. So this is first
10:02
thing that we able to render out the
10:05
map. But if you use Google map API guys,
10:08
you need to basically create a account,
10:10
add your credit card and hopefully you
10:13
also need to pay for Google map as well.
10:15
But this is a completely free solution
10:17
that I have given you. And with this
10:19
help of solution, you can basically
10:21
embed Google [snorts] maps inside your
10:24
third party applications. Various
10:26
applications required to basically
10:27
render out the map. So this is a perfect
10:30
solution, perfect solution to Google
10:33
map. You don't need any API key or any
10:35
sort of uh money to pay. It's completely
10:39
free solution
10:41
and you can basically find out all the
10:43
source code and purchase it. So after
10:46
doing this guys, we will also be styling
10:49
the address form. This video is not
10:51
about CSS guys. So I will simply copy
10:54
paste it.
10:56
You will get all the source code after
10:59
you purchase it. So we are just uh
11:01
targeting the address form just aligning
11:03
this address field perfectly. So now it
11:05
is appearing right at the top left top
11:08
left corner of the screen in the map. So
11:11
here you will write your address. So
11:14
nothing is doing but still we need to
11:16
write something here.
11:18
So after this guys we also need to write
11:21
uh we need to style the address
11:22
suggestions. We have given this ID right
11:24
here. Just add this CSS as well.
11:28
So we are just styling the suggestions
11:30
which will come. So nothing will happen.
11:34
So some more suggestion item. So we just
11:37
need to add this CSS
11:40
for the application to work. So that's
11:41
all.
11:44
So after this guys we go to script.js.
11:51
After we add the basically the map, we
11:54
need to now
11:57
uh whenever we uh basically
12:02
write something inside our input field,
12:05
we can basically attach a onchange. So
12:08
whenever the value changes inside this
12:10
input field, we can basically trigger a
12:13
function which will automatically run
12:15
whenever the value changes inside this
12:18
input field. So we are basically binding
12:21
a function which is locate address which
12:25
will automatically run whenever the
12:27
value will change. So now in the
12:30
JavaScript function we will define this
12:32
function which is locate address and
12:35
inside this function what we will do we
12:38
will basically convert the address to a
12:42
actual location in the map. So we will
12:44
actually take the address we will target
12:47
it by using document dot getelement id.
12:52
We have given the id to the address
12:54
field. We will extract the value dot
12:57
value. So now we will use geocoding guys
13:01
to actually convert the address to
13:03
latitude and longitude. So how we can do
13:07
that? We can basically make a fetch call
13:09
to this API which is https
13:15
with this API. We have made this API. We
13:18
are making this call.
13:21
After you purchase it, you will able to
13:23
make this request open street map.org/
13:28
search and here question mark and format
13:31
is equal to JSON and the Q parameter
13:34
which is query is equal to the address
13:37
which is passed and basically this
13:40
returns a promise guys. So we need to
13:42
convert this response first of all to
13:44
JSON
13:46
and then again this response data will
13:49
be returned for us and here we can
13:52
simply check if the data is there and
13:54
data.length is equal is greater than
13:57
equal to zero in that case
14:00
coordinates are returned. So we can
14:02
basically store the latitude like this
14:05
data.0
14:06
dot latit and the longitude
14:10
data dot 0 dot long. So you can
14:13
basically console log uh the data
14:17
you can just check out these values how
14:20
we are extracting it just to check if it
14:22
is working or not.
14:26
So if you basically now now write guys
14:30
let's suppose I write here Delhi enter
14:32
it. So what you will basically see a six
14:37
suggestions are returned to us. Each
14:39
suggestion has this display name you
14:42
will see Delhi India. This is latitude
14:44
of this longitude. We are basically
14:47
capturing these two values which is
14:49
latitude and longitude. We have all this
14:52
information. Place ID, place rank,
14:54
awesome type, awesome ID, license,
14:57
display name, importance, all this
14:59
information is also there guys. You can
15:02
basically do this. And uh now what we
15:05
need to do is that we just need to here
15:09
uh put a marker on the map using the
15:13
latitude and longitude that we got. So
15:16
we will basically remove first of all
15:18
the existing marker. If the marker exist
15:20
in that case we will remove it by using
15:23
this function remove layer. We will
15:25
remove the marker. If the marker is not
15:27
there then we will simply add the
15:29
marker. By adding this marker we can
15:32
simply say L dot marker. We will pass
15:35
the latitude and longitude.
15:38
These two arguments we will pass.
15:42
And uh we will basically use the add to
15:45
method to actually add it to the map.
15:48
That's all. Now we will simply set the
15:50
view of the map to this coordinates
15:53
which is we will pass latitude
15:57
longitude and the zoom level I will set
15:59
it to 13. So it will simply zoom to that
16:02
location that we find out. And now we
16:06
can simply update coordinates
16:09
table. So first of all just see if it is
16:12
able to just refresh. Let me write Delhi
16:16
here and enter. You'll basically see
16:19
what will happen.
16:27
It is saying that marker is not defined.
16:29
Let me check guys. Uh I haven't declared
16:32
mark. Oh, sorry. We need to declare a
16:34
variable. So just declare it at a global
16:37
variable. So let marker. This is a
16:39
global variable. So just declare it. Now
16:42
write deli. Enter. You will see that
16:45
longitude is not defined. Lol. Uh let me
16:49
check. Sorry, just need to
16:53
change this right now. Delhi. Enter. You
16:58
will see that guys automatically it will
17:00
pinpoint to that location which is you
17:02
can zoom in. This is Delhi right here.
17:04
You will see that it is located in New
17:06
Delhi which is India. So you can put any
17:09
location. Let's suppose I put Auckland
17:11
which is in New Zealand. So if I you
17:13
will see that it will pinpoint to
17:15
Oakland. Let's suppose I change this to
17:18
Texas. You will see that it is there in
17:21
Texas. You will see that
17:25
let's suppose I say here London
17:30
you can see that. So in this way guys
17:32
now we simply need to display the
17:34
latitude and longitude just in a table
17:37
like structure which is very easy.
17:40
So we just need to go to HTML and right
17:43
inside
17:46
after we basically give embedding the
17:49
map here we can basically have a table
17:52
which is has a id of coordinates table
17:56
and a class of table
17:58
and table head.
18:02
So we will basically have uh two columns
18:05
which is latitude and uh longitude.
18:15
So inside this guys we will have the
18:17
table body. We will give it an id
18:20
coordinates body.
18:23
So here we will basically insert the
18:25
information in this table body. Just go
18:28
to script.js JS and right here we will
18:31
basically make a function after this
18:34
in order to update this information in a
18:36
table. So update coordinates table we
18:40
will pass the latitude and longitude.
18:43
So here we will make a function function
18:46
of date
18:52
latitude longitude.
18:55
So this is basically the function guys
18:58
and now inside this function what we
19:00
need to do we need to declare a
19:02
coordinates body and uh we will say that
19:07
uh document dot
19:10
get element by id
19:15
coordinates body we will get the
19:17
reference. After getting the reference
19:19
we will manipulate the inner HTML.
19:25
So now basically we will say tr.
19:34
So we will basically bind this uh
19:36
latitude and longitude
19:45
l. That's all. So after you did this
19:49
guys, so now you will also see if I
19:51
write some location and press enter. You
19:54
will see now this latitude and longitude
19:57
will also get printed out. This is
19:59
exactly the information that we want.
20:02
We're converting an address to a
20:03
latitude longitude and also pointing it
20:05
in the map as well. So it's a complete
20:08
application that we built guys and this
20:10
feature is missing which is autocomplete
20:12
feature. Let me also tackle this also.
20:15
We can basically bind a oninput event
20:18
handler
20:21
to the
20:24
we have in jQuery. Basically will select
20:26
this from the ID we have given and there
20:30
is a function here which is called as
20:31
dot on all. We will listen to this input
20:33
event. So when the value changes right
20:36
here we will basically bind a function
20:38
right here.
20:40
So this function we will take the value
20:43
like this
20:45
this dot val after taking the value we
20:49
will simply compare that input.length is
20:52
greater than two in that case we will
20:55
also make a fetch call.
21:00
[snorts]
21:01
This will be the same fetch call that we
21:03
made guys to actually get the
21:05
coordinates latitude and longitude.
21:25
Just close it, I think.
21:32
It returns a promise
21:34
data is returned right here.
21:38
Now we will get the suggestions. So for
21:41
having the suggestions guys we will
21:43
actually use uh for each loop this will
21:48
be empty.
21:50
So data dot for each.
21:57
So data basically is a array of
21:59
suggestions which are coming from the
22:01
JSON API. And for each suggestion what
22:04
we will do for each item
22:08
what we will do suggestions HTML we will
22:11
concatenate plus is equal to.
22:15
So we are basically add this uh code
22:18
right here for the suggestions.
22:26
Just copy this.
22:39
You'll basically find all the source
22:41
code guys. So don't worry about it.
22:46
So
22:47
in the if log we are simply checking
22:49
that if the data is present or not. If
22:53
input length is greater than or equal to
22:55
two characters here we are simply
22:57
checking that if the user has entered
22:59
more than two characters then we will
23:01
actually show the suggestions by making
23:02
a simple fetch call to this API and uh
23:06
we will basically use the for each loop
23:07
to actually show the suggestions which
23:09
is we using the list group item class of
23:12
bootstrap list action suggestion item we
23:15
are item dot display name we are putting
23:18
the suggestion and adding it to the DOM
23:21
and uh if no input is there we will
23:24
simply remove the suggestions empty. So
23:27
if you basically now refresh try to
23:30
enter two characters Delhi you will see
23:32
the suggestions coming right here. All
23:35
these suggestions will come and now if I
23:38
select any of these sele suggestions
23:40
right here nothing happens. Why nothing
23:43
happens? We also need to bind a on click
23:46
to this. Uh how we can do that in
23:48
jQuery? It makes it very much easy. We
23:51
can say here document dot on click and
23:56
here we will give it the uh class which
24:00
we have assigned to each suggestion
24:01
which is suggestion item. So we are
24:04
simply binding this onclick listener. So
24:06
jQuery makes it very much easy. We are
24:09
simply searching for this element having
24:11
this class which is suggestion item and
24:13
binding a onclick on it. So we have
24:15
given if you see to the suggestion we
24:18
have given this class which is
24:19
suggestion item. So we are simply
24:22
binding it on click by searching this
24:24
class. First of all we will prevent the
24:27
auto submission e.prevent default. We
24:29
will get the address by
24:34
dollar this dot value this do.ext text
24:39
and then
24:41
we will bind this value to the address
24:44
field
24:47
trigger input
24:50
and we will again call the same function
24:53
locate address which will convert this
24:55
to latitude longitude and basically
24:57
point it to the map. Now let's suppose
24:59
if I type here Wellington and various
25:02
suggestions are there guys. If you see
25:06
if I put now you can see that
25:09
it will give the suggestions you will
25:12
see.
25:22
So in this way guys basically you can do
25:25
this and uh
25:28
this is a full application. Hopefully
25:30
you will like this guys. You can see
25:33
that
25:36
if I just type here Delhi.
25:40
So now you can see it will point and it
25:42
will give you this.
25:45
Let me just paste this full source code
25:48
and show to you once again. So this is
25:51
actual HTML code
26:06
and this is actual JavaScript code. So
26:09
very simple application guys which makes
26:12
it very much easy. If you are interested
26:15
guys, you can purchase it.
26:27
So if you just write Delhi,
26:30
so all these suggestions are coming and
26:32
you will basically see it will point.
26:36
You can see that. So in this way guys,
26:39
you can do that any location you can
26:41
write. You can basically check out my
26:43
tool which is deployed right here
26:48
you can see that.
26:51
So thank you very much guys. In this way
26:53
we can we have built Google map clone in
26:55
the browser using HTML CSS JavaScript.
26:58
We have used autocomplete API uh
27:00
geocoding API as well to actually make
27:02
it inside the browser which is a Google
27:05
maps clone. All the source code is
27:06
given. You can purchase it
27:09
from PayPal in USD or stripe in Indian
27:12
rupees. Both the payment links are
27:14
given. Please hit that like button,
27:16
subscribe the channel and I will be
27:17
seeing you in the next video.