Up next in 10

Angular 13 ngx-captcha Example to Add Google reCAPTCHA Widget in Website Using TypeScript
Dec 22, 2025
Buy the full source code of application here:
https://buy.stripe.com/7sI2bs8NjaoUdDW7Y1
Show More Show Less View Video Transcript
0:07
Uh hello friends, today in this tutorial
0:09
I will be showing you that how to add a
0:12
capture like Google recapture inside
0:16
your angular 13 application. So whenever
0:19
you visit any sort of website which
0:22
requires any sort of authentication, you
0:24
will see this uh recapture box here. You
0:27
need to manually check this uh I am not
0:29
a robot box this check box. So once it
0:32
is done you will see that you can
0:35
progress inside your operation. So we
0:38
will try to replicate this widget. We
0:40
will try to insert this widget inside
0:42
our angular 13 application. So basically
0:46
if you again refresh it, it will again
0:48
convert it to a recapture. So again you
0:51
need to refill this. So every time you
0:54
visit a website this will be
0:56
automatically
0:57
available for the user to trigger like
1:01
this. So you have seen these recaptures
1:04
on various websites. This is primarily
1:08
this is uh used in many ways to prevent
1:11
spam spammy users which come to the
1:14
website to spam. So it is very good uh
1:18
widget for security purposes. So you
1:22
need to manually select this and then
1:24
select this part of I am not a robot. So
1:27
we will try to add this widget inside
1:29
our angular 13 application.
1:32
So this will be a very easy tutorial. So
1:36
in the background we are using a library
1:38
which comes which is called as ngx
1:43
capture.
1:44
So if you just search for this library,
1:47
this is the library which is used to
1:50
build recaptures inside angular
1:53
application. [snorts] So it's a very
1:55
popular library. Almost 20,000 weekly
1:58
downloads are there. And uh this is a
2:01
simpler command here which is used to
2:04
install this module which is npm install
2:07
ngx capture.
2:09
So this is a command which is you can
2:12
see here.
2:14
So if I show you the live demo, this is
2:16
the official documentation about this
2:18
plug-in. So you can also change the
2:22
theme of this to dark also. Dark, you
2:26
can see that now it has changed to you
2:29
can just toggle it based upon which
2:32
color you like. If you like the dark
2:35
color, you will switch to the dark theme
2:37
or if you like the light theme, you will
2:39
switch to the white color. You can also
2:42
change the language to
2:46
any language of your choice. So if you
2:48
now set the language which will be
2:50
changed. So this is ES for Spanish. So
2:54
this is inside Spanish here
2:57
and uh EN is for English. So you just
3:00
need to set the two letter ISO code. So
3:03
then it will change to that particular
3:06
language. So it has language support for
3:09
various languages. You will see this is
3:12
for Hindi language.
3:15
So you [snorts] just need to find out
3:17
the two letter code for the language.
3:23
You will see that.
3:29
So you can see that it has various
3:31
languages support.
3:35
So also it has image sport uh image
3:38
capture also available by default it is
3:41
image you can also have audio capture as
3:45
well you will see that.
3:49
So this is all the options that you can
3:51
perform guys. So let's start building
3:53
this application. So I have given all
3:56
the source code in the video
3:57
description. So if you want to find out
4:00
the source code you can go to the video
4:01
description link. So inside the live
4:04
stream I have given this link in the
4:07
video description. So simply go to the
4:10
link and download all the source code
4:13
and the very first thing guys you need
4:15
to do is that I have shown you you need
4:17
to go to this URL and you need to get
4:20
your side keys. So here you need to
4:22
register a domain name for which you
4:24
need to add these recapture boxes. So
4:27
basically these are provided by
4:29
google.com.
4:30
So they will require a certain kind of
4:33
uh side keys. So whichever version you
4:36
are using.
4:39
So let's suppose you are using the
4:40
recapture type to version two. So you
4:44
will select this. So then you can select
4:47
various I am not a robot checkbox or
4:50
invisible or recapture Android. So we
4:54
will select the first one and here you
4:56
need to add your domain name. on which
4:58
domain name you need to add these check
4:59
boxes for building the angular
5:02
application. We will be using this uh
5:05
tool which is quite good tool code
5:08
sandbox. So it comes with uh various
5:12
templates which allows you to build
5:14
angular application in no time. So just
5:17
login inside with your GitHub account. I
5:21
have already logged in. So now this will
5:25
create your application and it will give
5:27
you this live URL for your angular
5:29
application.
5:31
So it's live. So now we can add this
5:34
website inside this capture domain.
5:38
That's it.
5:40
So you need to accept the terms and
5:42
service and uh click on submit. So you
5:46
need to give it a label. I will say
5:48
test.
5:53
Click on submit. So it is saying that
5:57
following a valid domain requires a host
6:00
and must not include any protocol path.
6:03
So you don't need to provide the
6:05
protocol here. So simply write this like
6:08
this.
6:11
So click on submit. And basically guys
6:13
after submitting it your uh site has
6:16
been registered. So you will get your
6:18
own uh these side key and secret key. So
6:22
you need to copy to clayboard these uh
6:24
important details and we will use it
6:27
inside our application on once we get
6:29
started. So you can see that now we need
6:32
to install this dependency which is
6:34
quite similar. So just search for this
6:37
dependency which is ngx capture.
6:42
So simply install this dependency. It
6:44
will install it in the background. Once
6:46
it's complete, we can require this
6:49
dependency.
6:53
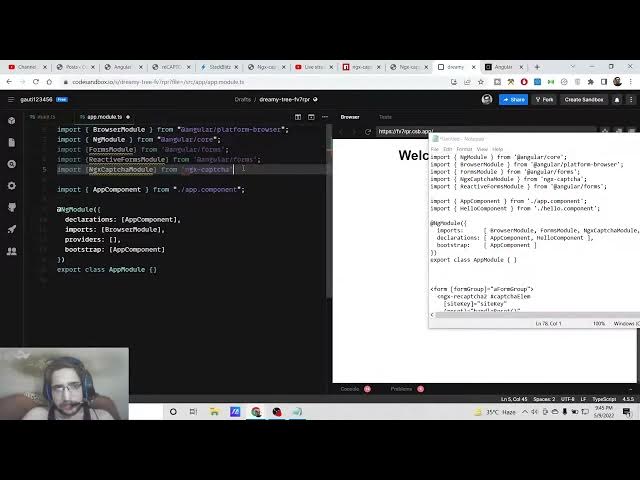
So now it has completed guys. So now in
6:56
order to include this dependency, you
6:58
need to go to your app dot module.ts
7:02
file. So simply here you need to require
7:04
this library. So simply we will first of
7:08
all we need to also require the forms
7:11
module.
7:15
So this is present inside the angular
7:17
forms package
7:22
and also we need to also import the
7:26
reactive forms module.
7:35
So this is also present inside the
7:38
angular forms package.
7:41
And next we need to import the newly
7:44
installed ngx capture module.
7:51
So this is present inside ngx capture.
7:54
So now we need to add all these details
7:56
inside the imports array. So simply put
7:59
a comma just write ngx capture module
8:03
reactive
8:05
forms module and forms module. So just
8:09
now close this file. We don't need this.
8:11
So simply close it. So right here we
8:14
need to go to our uh app dot
8:17
component.html file. So right here just
8:21
delete all this.
8:23
Instead we need to have a simple form.
8:33
So here we will be giving a attribute to
8:35
it of form group.
8:40
a form group.
8:43
So right here inside this guys we will
8:45
have ngx
8:48
recapture
8:49
2 and then we will be giving it a unique
8:52
label so that we can target it inside
8:56
the angular application. So we will say
8:59
capture element.
9:03
So here guys we disrespect various
9:06
arguments here. First is it expect is
9:09
the site key. So the site key is the
9:12
same thing that you got from google.com.
9:14
[gasps and sighs] So simply we have
9:17
successfully copied this. So simply copy
9:20
and paste it your own site key. Don't
9:23
copy my site key. And then we have uh
9:27
reset
9:29
handler. [clears throat]
9:30
So when we click this we will need to
9:32
execute handle reset method.
9:37
one when this uh expire. So we will also
9:42
handle the expire event.
9:46
The next one is onload. So when it is
9:49
loaded on the screen what we what we
9:51
need to do so we will say handle load.
10:01
So the next one is success. So whenever
10:05
the user is successful in solving the
10:08
capture so we will have handle success.
10:15
So in this method we are actually
10:17
passing the event as a argument. So
10:20
event
10:28
so [snorts] the size is uh
10:32
the size which is defined.
10:38
So this needs to be inside
10:42
square brackets because this is the
10:44
options which we are performing. [sighs]
10:51
So these are the languages which it
10:53
support.
10:58
So this language can be anything.
11:01
You can set English, Spanish or any
11:04
language of your choice. Then we have
11:06
the theme option. This can be either
11:10
uh light or dark depending upon which
11:13
theme you use.
11:16
and uh the type parameter.
11:19
So the type parameter will be equal to
11:21
type which is set. And lastly we will
11:24
have the form control name which is
11:28
equal to
11:30
recapture. You can give any name of your
11:33
choice
11:35
recapture.
11:39
So here you need to close it this tag.
11:51
>> [snorts]
11:51
>> So after doing this guys, I will try to
11:54
copy paste this code which is written
11:57
here
11:59
inside uh app.component.ts
12:02
file and try to explain you what is
12:04
happening here.
12:07
So if I paste this code now basically
12:10
guys we are including the dependency
12:12
which is ngs capture we are including
12:15
this component and also we are including
12:17
form group form builder and validators.
12:21
So you [snorts] can see here so this is
12:24
uh theme is set to light size is normal
12:29
language is English type is image or
12:32
audio.
12:35
So if I now basically refresh it.
12:48
So [snorts] if you also try on your own
12:50
website if these details are true then
12:55
hopefully your
12:58
application will work
13:01
because it takes some time before you
13:03
can see here. Now you need to select all
13:06
the motorcycles here which are present
13:08
here and once it is done click on next.
13:13
Simply select the capture, solve it,
13:18
verify. And now you can see I'm not a
13:20
robot. So it is successful. So in this
13:23
way guys, you can embed the recapture
13:26
widget inside your Angular 13
13:27
application using NGS
13:30
capture library. All the source code
13:33
will be there inside video description.
13:34
Please hit the like button, subscribe
13:36
the channel and I will be seeing you in
13:39
the next video.