Up next in 10

Build a Vue.js 3 Google Maps API to Embed Google Map & Add Markers Using vue3-google-map in TS
Dec 10, 2025
Get the full source code of application here:
https://codingshiksha.com/vue/build-a-vue-js-3-google-maps-api-to-embed-google-map-add-markers-using-vue3-google-map-in-typescript/
Show More Show Less View Video Transcript
0:00
Uh hello guys, welcome to this video. So
0:02
in this video I will show you a package
0:04
inside Vue.js3
0:07
which is used to display the Google maps
0:09
inside your application and you will be
0:11
able to add markers as well. So if I
0:13
click on a particular location inside
0:16
Google map I will be able to add these
0:18
red markers.
0:20
So I will show you a package here which
0:22
is open-source package in Vue.js3 JS3
0:25
the latest version which allows you to
0:28
embed this Google maps using the Google
0:30
maps API.
0:32
So if you search for the map package
0:34
here which is called as view3-
0:38
Google
0:40
map. So this is actually the package
0:42
here. If you go to npmj.com
0:45
uh just search for this package. The
0:47
command is simple. I've already
0:49
installed it. So it's almost got 42,000
0:52
weekly downloads. So they also have a
0:55
official website as well. So you can go
0:57
to this website to check out their
0:59
documentation. Uh lot more examples are
1:02
given. So I have given all the source
1:06
code in the description of this video.
1:07
So you can check out the source code. So
1:09
now to get started you need to edit your
1:12
app dot view file of your project. So
1:14
simply go to this file and we will
1:17
simply first of all write the typescript
1:19
code in the script tag and then our
1:23
template which will be the HTML code. So
1:27
right here we will just add this
1:28
attribute setup and first of all we need
1:32
to require the necessary packages. First
1:34
of all the reference which will be
1:35
coming from view and then the actual
1:38
third party package for embedding Google
1:40
map. Google map plus the marker which
1:44
will be coming from this package view3-
1:47
Google map.
1:49
So using this import statement we first
1:52
of all require this module very simply
1:55
and then here we need to actually tell
1:58
where we need to add the marker or the
2:01
center of the map. So this will be a
2:03
simple object holding two properties
2:06
which is the latitude and the longitude.
2:08
So these are the positions inside the
2:10
map that you need to add or render the
2:14
map. So this is your latitude and then
2:17
we also need to provide the longitude.
2:22
So each location in the map has this
2:25
coordinates.
2:28
So we have provided the center of the
2:30
map. So as we load the map, it will be
2:32
located inside this position. So after
2:36
this we also need to provide the zoom
2:38
level. So I will set it the zoom level
2:40
to be 15. So
2:44
so now to display first of all the map
2:46
here we use this component which is
2:49
Google map directly and it actually
2:51
takes some attributes. First of all it
2:53
takes your API key. So you need to
2:56
replace the API key and for that you
2:59
need to first of all create a Google
3:00
cloud console account. I've already
3:02
created one. And then you need to enable
3:05
the Google maps API. Go to library and
3:08
search for this API which is Google maps
3:11
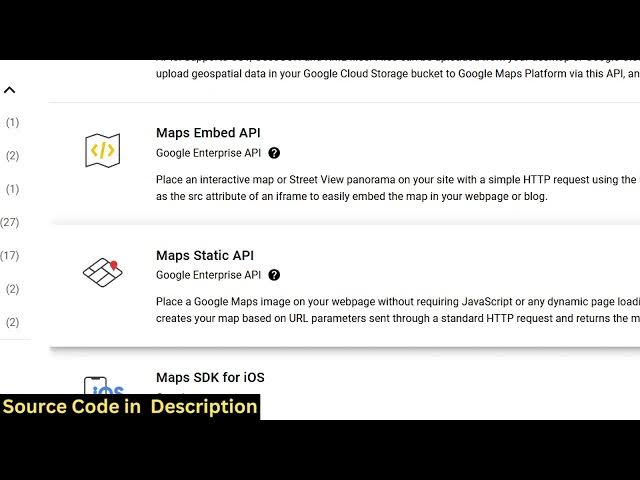
API and just enable this API. I'm
3:15
talking about this API which is maps
3:17
embed API.
3:20
We are embedding the Google map. So you
3:23
need to click on this enable option.
3:31
I think this one is not uh I think this
3:33
one I think maps static API you need to
3:37
enable this API. I want
3:42
I think if I search for Google maps
3:46
yeah so this this one maps JavaScript
3:49
API there are lot lot of versions of map
3:52
Google maps API this one you need to
3:54
enable it because we are simply adding
3:57
the map to the website so I've already
4:00
enabled this API you can see API enabled
4:02
you just need to click the enable button
4:05
so after you enable this API and now we
4:09
just need to create the API key
4:10
credentials. So just
4:16
go to your API services and you will
4:19
find this option credentials and just
4:21
click on that and here you need to paste
4:24
your API key.
4:26
So this will be different for you. So
4:28
don't copy my API key.
4:33
So I have already created one API key.
4:35
So it's very easy to create. You just
4:37
need to go to this is option will pop
4:41
create credentials and then there will
4:43
be this option API key. Simply click
4:46
this and then it will create your API
4:48
key. So just copy the API key that it
4:52
will generate. So simply copy to
4:53
clipboard and simply paste this API key
4:58
and then you need to give it a style
5:00
attribute. So you can give it a fixed
5:03
width to the map here. Let me give full
5:05
screen which is 100% and a height of
5:10
also which is 100 vh view port height
5:15
and then we'll be centering the map to
5:17
the center object we have latitude
5:19
longitude provided and then the zoom
5:22
level we also have this variable
5:27
and these four options it takes API key
5:29
style center and zoom if you refresh
5:31
your application you will see this
5:33
Google map will display
5:36
and you can zoom in zoom out at a
5:38
particular location.
5:41
So it's that easy to add Google map
5:43
inside your website. So now if I click
5:45
on a particular location now to add red
5:48
markers you can bind an onclick listener
5:51
to the Google map simply add this on
5:53
click listener add the red click. So
5:56
when we click the map we will bind this
5:59
custom function which will be add
6:01
marker. So it will add a red marker to
6:03
the
6:06
So we need to define this function here
6:08
which is add marker. So it will add a
6:11
marker.
6:13
This event will automatically be passed
6:16
as you click the map. It will hold
6:18
information and here we need to capture
6:21
the latitude and the longitude
6:23
coordinates from this event. So event
6:26
dot latitude longitude
6:29
and then inside markers we have to push
6:34
and for this we need to create a markers
6:36
array. So just create at the top here
6:39
globally a variable.
6:42
So by default it will be an empty array.
6:45
So we just pushing this value inside the
6:47
markers array. So markers do value
6:49
dotpush.
6:51
So we're pushing a position
6:54
uh property here which will be holding
6:56
our latitude.
7:00
We can easily get the latitude by this
7:02
latitude function and then the longitude
7:05
easily by
7:07
the longitude. So you're pushing this
7:10
inside the markers array the position
7:12
object which gets the latitude and
7:13
longitude using this event parameter.
7:18
And after this you also need to provide
7:20
a label. So we can simply say it's a new
7:24
marker
7:25
and you can give it a title
7:29
marker at this position.
7:40
So mainly these title and label is not
7:43
required but we are just giving it
7:45
optional these properties label and
7:47
title. main property is this position at
7:49
property where we add the marker. So now
7:52
to display those markers because if you
7:54
click it
7:57
the markers will still not display. So
7:59
as I binded this onclick listener the
8:02
markers you will not see. So for
8:04
displaying those markers just outside
8:06
this just inside this Google map
8:10
component we need to now render all the
8:12
markers. For doing this, we use the
8:14
marker component that we imported. And
8:17
uh here we use the V for loop directive.
8:21
And what we do is marker index. And we
8:24
loop through all the markers one by one
8:29
like this.
8:34
And we also provide a key parameter
8:36
which will be the index.
8:39
And then we also provide the options
8:41
here which is contained inside this
8:44
marker.
8:45
So we are running this v for loop. We
8:48
are rendering all the markers providing
8:49
a key and the options as well. So if you
8:52
now click on a particular you will see
8:54
now it is displaying. So if you click
8:59
at a particular location you will see
9:01
you will be able to add markers. So this
9:04
library supports many components info
9:06
windows as well. So they you can check
9:08
out their documentation. It's very
9:11
handy. You can full screen as well. All
9:13
these controls you can change to
9:15
satellite map as well.
9:18
So you can check out their
9:20
documentation. It's pretty well
9:23
documented with all the examples given
9:26
on their
9:31
on their website. So if you need the
9:34
full source code of this example, you
9:36
can go to the description link on my
9:37
website to check out the full source
9:39
code and you can check out their
9:40
documentation. All these
9:44
components are there. So thank you very
9:46
much for watching this video and do
9:48
check out my website as well uh
9:50
freemediatools.com
9:52
uh which contains thousands of tools
9:54
regarding audio, video and image and I
9:57
will be seeing you guys in the next
9:58
video.