Up next in 10

Javascript Google Places API Autocomplete Textbox With Location Filters & Plot on Google Maps
Dec 11, 2025
Buy the full source code of the application here:
https://procodestore.com/index.php/product/javascript-google-places-api-autocomplete-textbox-with-location-filters-plot-on-google-maps/
Show More Show Less View Video Transcript
0:00
Uh hello friends today in this tutorial
0:02
I'll be showing you very simple example
0:04
of Google places API autocomplete field
0:06
out there. So you will see that
0:08
basically we will be having this field
0:10
we will be able I will be showing you
0:12
how basically you can display it and
0:14
with location filters out there. So
0:16
let's suppose you uh have you want to
0:19
create a custom autocomplete where only
0:21
you want to show only the city's name
0:24
only and uh let's suppose I enter
0:29
any letter here you will see it will
0:31
only show the USA autocomplete. So you
0:34
will see it will only as I type G here
0:37
it is showing me all the cities which
0:39
are starting with the letter G in United
0:42
States of America. You can also change
0:44
this country accordingly. So let's
0:46
suppose if I want to tea. So Texas is
0:50
there. Basically it's a city here. Texas
0:53
city. If I now select the city, you will
0:55
see auto automatically it will uh just
0:59
uh place a marker on that location that
1:01
I selected here. So we will be looking
1:04
at this nice little functionality how
1:06
basically we can build it in pure
1:08
JavaScript using the browser. So I can
1:11
even change this address to let's
1:12
suppose this one. Now you will see it
1:15
will automatically place the marker on
1:18
this location. So you can even change
1:21
the country name as well guys. So let's
1:23
suppose inside my source code I can
1:25
change this twoletter code. Let FR
1:28
stands for France or IND stands for
1:31
India, A US stands for Australia, NZ
1:35
stands for New Zealand. So any country
1:37
you can take here. So let's suppose I
1:39
provide a US which is Australia here. So
1:42
now if I type here T you will see all
1:44
the cities will be now be starting with
1:46
Australia. So if I now select this you
1:48
will now see basically it will place
1:50
this. You can scroll it down to zoom in
1:54
and zoom out inside your Google map.
1:56
Here you can see that now if I select
1:58
here Sydney you will see that
2:01
it will place it pinpoint at the
2:04
location that you selected. So it's a
2:06
very nice little application guys.
2:08
Basically with the help of this you will
2:10
be able to make uh custom autocomplete
2:16
which you want. You will now see it will
2:18
only show you New Zealand one. You will
2:20
see that.
2:24
So I will be showing you how to do this
2:27
in pure JavaScript
2:30
using the Google Places API and also
2:33
Google maps API. So first of all go to
2:35
Google cloud console and get your own
2:37
API key from your project. Enable these
2:40
two APIs Google places API and maps
2:42
JavaScript API. Then go to credentials
2:45
and click on your create credentials API
2:47
key. Just make your own API key. Don't
2:49
copy mine. So right here I have given
2:52
all the source code guys in the
2:53
description of the video. So if you go
2:55
to the description of this video, you
2:56
will be finding out a blog post here.
2:59
So basically I have written that blog
3:01
post on my tutorial website.
3:04
So go to it step-by-step instruction is
3:06
given. So all the source code is given.
3:08
So the very first thing you will do here
3:11
basically first of all just make a index
3:13
html file here and simply paste that
3:16
code that I have given in the blog post.
3:18
So now if you paste it basically what we
3:21
are doing right here we are loading the
3:22
Google places API CDN. Here you will see
3:25
that https maps google aapis.com and
3:28
here you just need to replace your API
3:30
key. So I will now go to my credentials
3:33
simply I will copy this API key
3:37
and replace this API key here. You will
3:39
see that
3:41
replace it and basically you can see and
3:44
we are using this library which is the
3:46
places API we are using it we are
3:48
loading it that's all inside the HTML
3:51
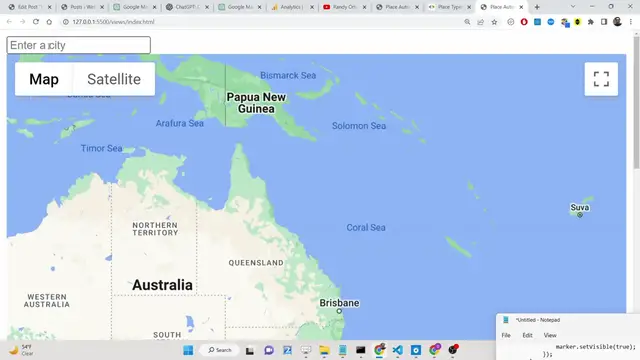
guys we basically have a simple input
3:53
field out there of type text and here we
3:56
are allowing the user to enter a city
3:59
this is a autocomplete field out there
4:01
enter a city and then basically we are
4:03
loading or rendering out the Google map
4:06
we are giving a height of 800 pixel and
4:09
a width of 100%. So here we will be
4:12
showing our Google map. Now if I open
4:14
this with live server so you will now
4:16
see as I type here nothing happens
4:18
because we haven't integrated the Google
4:20
maps API. And now to integrate with
4:23
Google u we will be writing all the code
4:28
guys inside our onload function which is
4:32
window.onload.
4:34
So you just need to write this function
4:36
right here. So whenever your page loads
4:39
so we will be writing all the code
4:41
inside this block of code. So now we
4:44
will first of all be loading all the
4:47
city's name. We will first of all target
4:49
this input field that we have given the
4:52
ID here. So we will be targeting it
4:55
document.getelement by ID.
4:58
Get element by id.
5:01
So this needs to be document.
5:04
So here we will pass the id guys which
5:06
is search input.
5:10
We will pass the id. We will get the
5:11
reference. After this guys we will what
5:15
we will do here is that
5:17
after getting the reference we will get
5:19
the also the reference of the map
5:21
element also. So here we will be
5:23
basically google.m mapaps do map and
5:28
basically we will be getting the
5:29
reference of the map element where we
5:31
just need to load the map. So we have
5:34
given the map an id here. You will see
5:35
we are just simply passing the id here.
5:38
And inside the second argument guys
5:41
basically it takes some options. First
5:43
is the zoom level which is four. And
5:46
here we will provide the center.
5:48
So here you just need to provide the
5:50
latitude and the longitude. So this will
5:52
be minus 34 397 and longitude will be
5:58
around uh 150.644.
6:01
You can just give it anything. And the
6:03
third option we will have scroll wheel.
6:06
So whenever you scroll with the help of
6:08
mouse it will be able to uh just zoom in
6:11
and zoom out. So after you do this guys
6:14
we simply need to attach also the marker
6:17
to the map also. Now to attach the
6:20
marker we will simply say Google maps
6:23
marker and inside this we will simply
6:26
pass the map. So what you will see guys
6:29
now if you scroll you will now see your
6:31
Google map basically.
6:34
So Google map is showing here. You will
6:36
see that basically
6:40
you can scroll down to zoom in and zoom
6:42
out. You can see that.
6:45
And now guys we basically need to here
6:49
attach the autocomplete to this input
6:52
field. So for that we first of all need
6:55
to have the options. So these options
6:56
are really important guys. This will be
6:59
an object and basically
7:02
contains the first property which is
7:04
which uh quantity you want to show. So
7:07
we only want to include the city's name.
7:11
So basically this is include only the
7:13
cities here inside our addresses
7:16
whenever you type something on the
7:18
autocomplete field. And the next option
7:20
is component restrictions.
7:23
So this basically offers an again this
7:27
is an object and here you it contains a
7:30
property called as country. So here you
7:32
can provide a single country also which
7:35
is US. So it is two twolet digit code
7:38
for the country. So this stands for
7:40
United States. So now if I want to
7:42
attach it to the autocomplete field
7:44
here,
7:46
we will simply basically first of all
7:49
make autocomplete
7:54
and then we will simply uh say new
7:58
Google
7:59
maps
8:01
sorry new Google maps places dota
8:05
autocomplete
8:07
and here basically we will pass. So this
8:10
needs to be places dot autocomplete.
8:13
And here we will pass the id guys which
8:15
is input field which we have there
8:19
and then we will simply call this
8:21
function which is autocomplete bind to
8:24
and simply will pass bounce and map
8:27
that's all.
8:29
So now guys if you see basically if I
8:32
write here D you will now see
8:35
it will show you
8:41
will see
8:43
um whenever I type here the restrictions
8:46
are not applied here you will see it is
8:48
showing me all the cities name and all
8:49
the count's name so I think some u meth
8:53
some mistake is happening let me cross
8:55
check you will see inside types property
8:58
we have city's name
9:01
and under component restrictions we have
9:04
country sorry this needs to be a array
9:07
not a object. So this basically is a
9:10
array here. So we will need to provide a
9:13
angular pro brackets here like this. So
9:17
now if you load here
9:21
uh let me see here why
9:26
just wait
9:31
okay okay sorry
9:33
we haven't passed the options here you
9:35
can see in the second argument we need
9:37
to pass this options so just to attach
9:40
these options so we haven't passed it so
9:42
in the second argument you will see
9:44
whenever we are declaring this
9:46
autocomplete in the second argument here
9:49
we need to attach these options. So
9:51
that's why. So just pass these options.
9:54
And now if you just pass it. So if you
9:57
now type anything here, it will now show
10:00
you all the cities name starting from D
10:03
in the United States. So now you can
10:05
even attach multiple countries also.
10:07
Let's suppose I want to attach
10:09
Australia, New Zealand, NZ, India, Ind.
10:15
So now you will see four countries are
10:17
there. So it will now show all the four
10:19
countries which are there. If I now
10:22
refresh
10:25
so you will see Australia, USA you'll
10:28
see that
10:32
you can see that.
10:35
So now guys whenever I select any sort
10:37
of location I need to plot a red marker
10:40
on the Google map. So how to do this?
10:43
It's very simple.
10:45
There is basically we have discussed
10:47
this inside our previous videos on
10:50
Google places API. There is a event out
10:53
there that you can attach to your
10:55
autocomplete fields out there which is
10:57
places changed.
11:00
So you can basically add a event this
11:04
place changed. So whenever you select
11:07
your location this event will
11:08
automatically trigger. So now if I alert
11:11
out
11:12
basically what will happen if I now type
11:15
a location you will see that this
11:17
automatically triggers that's why this
11:20
alert statement executed. So now inside
11:23
this basically we just need to place the
11:25
marker on the map. So so we will set the
11:28
visibility of the marker to false first
11:30
of all and then we will get the place
11:33
that the user has selected. So we can
11:35
get the place using this method which is
11:38
provided by the autocomplete API which
11:40
is get place. So this will return the
11:42
place. After this we will simply check
11:45
that if the place is plotable on the map
11:49
if it has the coordinates latitude and
11:53
longitude. If it doesn't have then we
11:55
will simply alert out the user that uh
11:58
no details available
12:02
and then simply we will return. So now
12:04
if the place is plotable then we will
12:07
simply
12:10
plot the so basically this is some
12:13
sample code which is required here
12:15
simply paste it. So we will simply call
12:18
this map do fitbounds pass the geometry
12:20
and we will set the center of the map
12:23
here to the location set the zoom level
12:25
to 17 it looks good set the position and
12:28
set the visibility of the marker that's
12:30
all. So now if you reload now if I type
12:34
a location here
12:37
you will now see basically now Ite.