Up next in 10

Android Project to Integrate Google OAuth2 Login & Logout System & Save Profile in SharedPreferences
Dec 10, 2025
Buy the full source code of the application here:
https://procodestore.com/index.php/product/android-project-to-integrate-google-oauth2-login-logout-system-save-profile-in-sharedpreferences/
Show More Show Less View Video Transcript
0:00
Uh hello friends today in this tutorial
0:02
I will be showing you that how you can
0:03
integrate the Google o2 login and logout
0:07
system and basically shared sh save the
0:10
data of user inside shared preferences.
0:13
This is basically the Android
0:14
application in Java. Here the little
0:16
demo out there if you open this
0:18
application you will get a button out
0:19
there sign in with Google. If the user
0:22
press this button a list of screen will
0:24
be shown to the user where they will
0:26
select your account here. Let me select
0:28
this account here. And after that they
0:31
will be redirected to the next activity
0:33
where the profile picture, name of the
0:36
user, email of the user and also there
0:38
will be a log out button. It will be
0:40
there and once you basically redirect
0:43
the user back to the user detail
0:45
activity guys what will happen uh we
0:48
will store all this data inside shared
0:50
preferences. Now let's suppose uh user
0:53
try to close this application and once
0:56
again they open this application once
0:58
again that data will be saved here and
1:01
now once you reopen the app the
1:04
application will automatically detect
1:06
the user has successfully signed in and
1:08
they will redirect the user back to the
1:11
user detail activity. And now if I click
1:13
the log out button I will be redirected
1:15
back to the main activity. So now if I
1:17
close this app and now if I open this
1:19
once again now uh the application will
1:23
detect the user hasn't logged in. So
1:25
they will show this sign in with Google
1:27
button. This is actual application. Once
1:29
again you can select a different account
1:31
here. You can now see this will now you
1:34
can see that very simple application but
1:37
still effective. So if you are building
1:39
any sort of chatting application, any
1:41
sort of uh you want to access the user
1:43
data authentication, this is really
1:46
important how to integrate the Google
1:48
authentication system inside your
1:50
Android application. So this will be a
1:52
complete tutorial project. All the
1:54
source code is given in the description
1:56
of the video. So now let's get started
1:57
by building this. So I have given all
2:00
the source code guys in the description
2:02
of the video. This is a step-by-step
2:04
blog post and all the source code is
2:06
given. So now let's get started. I will
2:08
now create a new project. You will see a
2:12
new project. I will create select an
2:14
empty activity and then I will say that
2:16
uh o
2:19
to
2:22
project and then you need to select your
2:25
language. I will select Java language
2:27
and then I will simply click finish. So
2:30
the now guys basically this will build
2:32
out this application. Let me close the
2:34
previous one. So the very first thing
2:36
you need to do guys once this
2:37
application finishes gradal process now
2:40
we need to go to build.tgradal file and
2:43
here guys we need to add these two
2:44
dependencies which are the Google play
2:47
services and the glide library. So just
2:50
copy this two dependencies inside the
2:53
dependencies tab here. Just paste it.
2:56
And now you need to click the
2:58
synchronize button. So this will
3:00
automatically install all these
3:01
dependencies in the background. Now you
3:04
need to open the android manifest.xml
3:06
file guys. So after this you need to add
3:09
the internet permissions. So once we
3:12
click the button we will be wanting the
3:14
internet permission. So just add this
3:16
internet permission. That's all. So just
3:18
close this file. And now we need to go
3:21
to our uh layout file guys. So inside
3:24
the layout file activity_main.xml.
3:28
Here we will have a simple button which
3:30
will be a sign in with Google button. So
3:33
we will have a relative layout. So just
3:36
paste this layout file. So we have given
3:38
an ID here to the button button sign in.
3:42
Uh and the text is sign in with Google.
3:44
And you will see the design here. It is
3:47
right here in the middle of the screen.
3:49
And now we need to go to main activity
3:51
on Java file guys. And here we need to
3:53
target this button. So once we click
3:55
this button what should happen? But
3:57
before that we also need to declare some
4:00
variable. So we will say Google sign in
4:04
sign in client. So we need to basically
4:07
import this dependency or automatically
4:09
it is imported. And then we will say am
4:11
Google
4:14
sign in client. So just declare a
4:17
variable of this type. And also guys we
4:20
will need one two other depend static
4:24
variables. static final integer rc
4:30
sign in this will be a simple integer
4:33
value let's suppose one and uh then we
4:37
will say private static final string
4:40
sorry this is not needed here [snorts]
4:43
so now now right here guys we'll get
4:45
reference to the button so we will have
4:48
a button widget
4:50
and we'll say sign in button and
4:53
basically we will uh get the reference
4:55
by find view by id r dot id. So whatever
4:58
you have given the id to it like this
5:01
and now we will bind the basic uh
5:05
uh on click listener. So once we click
5:07
the button guys this will automatically
5:09
execute on click uh method and right
5:12
here we need to first of all initialize
5:14
our client guys. So we have created this
5:16
uh Google signin client. So we need to
5:19
specify
5:21
uh Google first of all Google signin
5:24
options. So just import this gso we will
5:28
just make your object new Google signin
5:31
options builder and here you need to
5:34
specify guys the basically the options
5:38
here we need to say Google
5:41
signin options and basically it contains
5:44
the default signin or default game
5:46
signin. We need to use default sign in
5:49
and then this basically contains some
5:52
methods. We can request email. You can
5:55
request ID token, request profile,
5:57
request cops as well. We only need the
5:59
user email address. So that's why we
6:01
will build out. That's all. This is all
6:04
that you need to do guys right here. So
6:06
we are requesting the email of the user
6:08
right here. So now after doing this, we
6:10
just need to initialize our client. So
6:13
we'll say Google signin client. And here
6:16
we will simply pass Google sign in
6:20
and then we will simply say get client
6:24
and then we will pass this reference the
6:26
context and then gso that's all
6:30
and put a semicolon that's all. So now
6:33
once you basically click the signin
6:35
button guys uh we need to basically open
6:38
a screen where the you can select your
6:41
account. So right here
6:45
we will make use of the intent class and
6:48
here we will say sign in intent
6:51
and we will say m Google client and we
6:54
will say get sign in intent and then we
6:56
will say start activity for result and
7:00
here we will pass the signin intent and
7:02
the constant which was we have declared
7:06
this constant right here which is one.
7:08
So now at this moment of time guys if I
7:10
run this application what should happen.
7:13
So just wait the application is building
7:16
here. [snorts] So now once it finishes
7:20
it will open the app here and uh now it
7:24
is installing it. Sorry let me change
7:26
this to real my device so that I can
7:29
show it on a real device. Uh this is my
7:32
real device which I'm running on. This
7:35
is the application guys. If I hit this
7:37
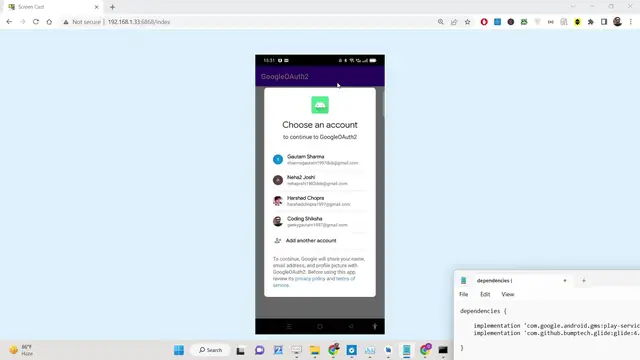
button right here, you will see a pop-up
7:39
window will appear where you can choose
7:41
your accounts. Once I choose this
7:43
account guys, I need to redirect the
7:45
user back to the different activity
7:47
where we can show the details to the
7:49
user. So for doing this, we need to uh
7:51
basically override this method which is
7:54
uh on activity result. Once we call this
7:56
method start activity for result, we
7:59
need to specify this method which is on
8:01
activity result.
8:04
So it has automatically added the super
8:06
call and here we will basically have a
8:09
if condition.
8:11
We'll compare the request code if it is
8:13
equal to the request code that we
8:15
specify which was r sign in that we
8:18
passed here. This is request code that
8:20
we pass. So here we can just have this
8:24
and then basically we'll basically start
8:26
this task.
8:29
We need to just have this task here and
8:33
inside this we need to basically specify
8:35
Google signin account.
8:41
Google sign in account. This is
8:44
basically we need and uh
8:48
just make an object here and we will say
8:50
Google sign in get
8:58
get sign in account. So we will get the
9:00
information of the Google signin
9:01
account. So we will say Google sign in.
9:05
So get [snorts] sign in account
9:10
from intent and here we will pass the
9:12
data. So whatever data is there and then
9:14
we need to basically call this function
9:16
which we will make handle sign in result
9:20
what whatever data that we got. So we
9:22
will pass the task here. So now we need
9:24
to define this custom method guys. So
9:26
once we get some data from the account
9:28
window which we select whichever account
9:30
that we select we need to make this uh
9:33
private method. So this can be a private
9:36
method
9:38
private void handle sign in result.
9:41
Basically, it will have the task which
9:43
is of the type Google signin account
9:46
and we'll say completed task. Just make
9:51
this variable.
9:53
So right inside this guys we will
9:55
basically uh surround all the code
9:57
inside try catch block and basically we
9:59
will say catch API exception e
10:05
and
10:07
we will basically just here
10:12
so inside the try block guys we will say
10:14
google sign in account
10:18
and here we'll say account and uh we
10:20
will say completed task dot get result.
10:24
So we will get the result of the user
10:25
guys. So here we will say API exception
10:31
dot class
10:34
and uh after this guys we will basically
10:36
update the UI. So we will create this
10:40
method. We will pass the account
10:42
information that we got.
10:46
So now we need to create this method
10:47
guys uh which is uh
10:50
actually will be a private method once
10:52
again which is update UI.
10:56
We will get the Google sign in account
10:59
data. We'll call this as account. And
11:03
here we need to display basically we
11:04
will check inside the if condition if
11:06
the account is not equal to null in that
11:08
case some information is present. So
11:11
inside we will redirect the user to
11:14
another activity to user detail
11:17
activity.
11:18
So for doing that it's very simple. We
11:20
will get all the information. First of
11:22
all we will get the email address by
11:24
using account dot get email. We will get
11:27
the display name
11:30
like this account dot get display name.
11:33
You can see all this information can be
11:35
easily fetched. We can even get the
11:38
profile picture by picture. Uh we can
11:42
wrap this string dot value of account
11:45
dot
11:47
photo URL. Get photo URL.
11:51
So get
11:54
photo URL.
11:56
So we only need these three details
11:59
which are there. So now we can basically
12:02
pass this information guys using the
12:04
intent class. We can initialize a new
12:07
intent and here basically we can pass
12:09
from we can redirect the user to from
12:12
this activity to the user detail
12:16
activity.
12:18
So we need to create this activity guys.
12:20
So we can simply put the data here like
12:23
this. We can call this as email. This
12:26
will we will pass the email. Similarly
12:29
we will pass the name as well.
12:34
And similarly [snorts]
12:36
the profile picture as well. So picture
12:42
and then we will start the activity
12:44
guys. So start
12:48
the activity and then intent. That's
12:51
all. So now we need to create this
12:53
activity guys. So we will simply say
12:55
right click and simply select empty
12:58
activity here. And we will call this as
13:02
user details
13:05
activity.
13:08
So you can see it has now the error is
13:11
gone here. Now we simply need to catch
13:14
this uh
13:16
basically guys inside this activity we
13:18
need to catch this information. So for
13:21
doing this first of all we need to
13:22
basically copy paste the XML code for
13:26
the layout of this activity. So this
13:29
will be a simple linear layout. Just go
13:30
to this activity user details. So I have
13:35
given all the source code in the
13:36
description of the video. You can just
13:37
copy paste it. So you will see the we
13:40
will have uh three details. This is the
13:42
profile picture which will be image view
13:44
widget. Then we have two text view
13:47
widgets which will display the email of
13:49
the user, display name and then there
13:51
will be a button which will be a log out
13:53
button. So we have given ids to each and
13:55
every widget out there. Now we just need
13:58
to open this user details activity Java
14:00
file and right here guys we will display
14:03
all these details.
14:06
So first of all we will get all the
14:08
details from the intent class. We will
14:10
say intent dot get string extra.
14:16
Get string extra. And here we will get
14:19
the email of the user.
14:24
Email of the user. Sorry.
14:28
So
14:31
first of all we need to get the intent
14:32
here. Sorry. And then we need to simply
14:35
get the email
14:37
and intent dot get string extra.
14:42
Get string extra here. And here we will
14:45
need to get the email.
14:48
We will get the name.
14:54
We will also get the
14:58
picture URL that's so intent dot get
15:03
string extra and picture. So this needs
15:07
to be same guys. So whatever you call
15:09
right here main activity this needs to
15:11
be matching here. This is the keys here.
15:13
Email name picture this needs to match.
15:16
So after you get this information guys
15:18
we will basically display this
15:20
information on the screen. So you will
15:23
have the image view
15:26
widget and uh IV profile. We will simply
15:30
say find view by ID. So R dot id dot uh
15:35
IV profile and we will use the glide
15:38
library guys. So we will say with and we
15:41
will pass the reference which is context
15:43
and here we will simply say we will load
15:46
this image URL which is IV profile.
15:51
Sorry, this is picture URL. Sorry,
15:54
picture URL. And then we will simply say
15:57
we need to crop this into inside a
15:59
circle and into so we will in just load
16:03
this inside the profile like this. So
16:06
now after this we just need to put a
16:08
semicolon right here.
16:11
So now similarly we can display
16:13
basically the email and the
16:20
so we can say
16:22
find you by ID R dot id dot
16:32
set text.
16:36
So here we'll say email will be equal to
16:39
our email
16:42
and similarly we have uh the display
16:46
name as well. So TV name find view by ID
16:50
R do ID dot
16:53
TV name.
16:56
So we'll say TV name dot set text.
17:00
So here you will say the display name.
17:04
So name is equal to name.
17:09
[snorts] So now if you launch this
17:11
application guys. So what will happen
17:13
here? If I
17:15
once again click
17:22
I need to terminate this and once again
17:24
start this. So what should happen guys?
17:26
You will see that uh if I click this
17:28
button and now if I click my account I
17:31
will be redirected to the next activity.
17:34
So I think some error has taken place.
17:36
Let me see inside log section.
17:43
Uh
17:52
let me hit this once again and select
17:55
this.
17:58
Nothing happens. So let me uh
18:02
reinstall this guys. Just wait. O2.
18:13
Let me uninstall this and run this once
18:15
again. And once again if I run this.
18:22
So it has launched it. If I click this
18:25
uh it will have this
18:28
uh nothing happens. Let me just uh see
18:30
guys what is the error and
18:32
>> [clears throat]
18:32
>> uh sorry guys I just uh just get the
18:35
problem why it is occurring here. So we
18:38
need to basically create uh just go to
18:40
your Google developer console and right
18:42
here you need to create credentials you
18:45
need to create a oath client ID and uh
18:48
inside your application type here you
18:50
need to select here Android because we
18:52
are developing an Android application
18:54
which we are integrating the Google
18:55
login. So that's why we need to create
18:57
this oath client ID. Simply select this.
19:00
And then guys, you need to basically
19:02
name your oath client here. [snorts]
19:05
Just have it default here. You can give
19:07
any name of your choice. And then you
19:09
need to basically paste your package
19:11
name guys. You can just go to your
19:13
Android manifest.xml file and just this
19:17
is your package name which is com
19:18
example o2 project. So I will just write
19:22
the package name here. So I have given
19:24
all these instructions in the blog post.
19:26
So I just forgot that's why com example
19:30
O2 project. So just make sure that you
19:33
give the correct package name. Let me
19:35
cross check O2 project. That's all.
19:38
Yeah. After this guys, you need to
19:40
basically paste this SHA certificate
19:43
fingerprint and uh you can do this
19:45
easily by using Android Studio and you
19:48
need to first of all go to if you're
19:49
using the latest version you need to
19:51
first of all go to settings file
19:53
settings and you need to uh inside exper
19:56
experimental you need to uncheck this
19:59
box which is only include test task in
20:01
the gradal text. You need to uncheck
20:02
this box and then click uh apply and
20:05
okay. After that you need to simply
20:07
select the gradal section here inside
20:09
here and then basically go to the task
20:11
here and then go to Android and then
20:14
basically go to the signin report and
20:16
doubleclick it. As you double click it
20:18
guys you will get your SHA single
20:21
fingerprint here. You will see SHA1
20:23
here. You need to copy paste this
20:25
fingerprint here. So just right click
20:28
copy and just paste it here. just paste
20:31
it here and then basically click on the
20:35
create button. So as you click the
20:36
create button guys, it will register
20:38
this Android application with the Google
20:40
servers and now it will provide you this
20:42
client ID which you can use but we don't
20:45
need this client ID. You can simply
20:47
download the JSON file if you want to
20:50
have this JSON file. I think uh now if
20:53
you run this application that uh inside
20:56
main activity that account will be
20:58
returned to us inside here. This account
21:00
will not be null. So we can be
21:02
redirected back to the user detail
21:05
activity. Let me just uh rerun this
21:07
application again. Run this application
21:09
here. So here we need to select app
21:12
here. Sorry, just change it to app. And
21:15
now once again let me run this
21:17
application. So now
21:20
let me just see
21:23
let me just uh screencast my mobile
21:25
phone. So just wait.
21:30
So you will see this is my application
21:32
guys uh O2 project. If I now click this
21:36
sign in with Google. If I type here you
21:38
will see it will redirect me to the next
21:41
screen here. As you just see this is a
21:44
profile picture. This is the email of
21:46
the user. This is name coding section
21:47
and this is basically the log out
21:49
button. If I click the log out button
21:51
guys nothing happens. You will see I'm
21:53
clicking the log out button is nothing
21:54
is happening. We need to fix this. We
21:56
need to allow the user to log out also.
21:59
So for log out button guys it's very
22:01
easy uh for this code here.
22:04
So right here whenever you do this log
22:07
out button what we need to do is that uh
22:12
right here inside here log out button we
22:16
need to first of all get its reference.
22:18
So after you do this
22:22
inside our user details activity. So
22:25
after you do this guys we need to get
22:26
the reference of the log on button. So
22:28
button and then log out button.
22:33
We will get the reference by find view
22:35
by id r do id dot uh log out button and
22:39
then basically we will bind on click
22:41
listener to it. Set onclick listener new
22:44
view. And when we click this log on
22:46
button guys, we need to first of all
22:48
define a variable right here at the very
22:50
top which will be a private variable of
22:54
uh Google signin client.
22:59
And here you will say call this as uh m
23:02
Google
23:05
sign in client
23:08
and here we need to initialize this
23:10
object guys. So in order to sign in sign
23:13
out sorry it contains a method sign out
23:16
guys you can see you can directly call
23:18
this method and it contains add-on
23:20
complete listener and uh we can call
23:24
this new onclick complete. So once it's
23:27
completed guys it will call this method.
23:29
Now we need to simply return to the main
23:31
activity. So we will again use the
23:33
intent here intent class and here we'll
23:37
say new intent. And now we will go from
23:40
user detail activity to the main
23:42
activity. So you can see we are going
23:44
from user details activity class to the
23:46
main activity class.
23:49
So again from intent and we again call
23:52
start activity
23:54
we'll pass the intent. After this we
23:57
will call the finish method. That's all.
24:01
So now guys what will happen? uh
24:03
basically it is saying uh
24:06
main activity sorry this is a class we
24:09
need to say class that's all guys and
24:11
now if you see uh if I run this
24:13
application once again it is saying
24:16
semicolon is expected on line sorry just
24:20
put a semicolon here
24:24
so now you will see u now once again we
24:28
need to login it will automatically
24:31
login here and Now if I click the log
24:33
out button guys, I will be redirected
24:34
back to the main activity. You will see
24:36
that. So now the log out button is also
24:39
working here. It is redirecting back to
24:41
the home screen. So now we need to
24:43
implement the shared preferences guys.
24:46
So once again if I uh log here and if I
24:49
close this application and reopen this
24:51
application you will see the state will
24:54
not be preserved. I will be redirected
24:56
back to the homepage. I once again need
24:58
to click this button. So we need to
25:00
share basically save this data inside
25:02
the shared preferences. How we can
25:04
achieve this? It's very simple. What we
25:07
can say is that uh right here inside our
25:10
update UI method inside main activity.
25:12
So whenever we are putting this
25:14
information inside the intent right here
25:17
just after we get this information we
25:19
can initialize the shared preferences
25:21
class and we can say editor and call the
25:25
editor here variable and just say get
25:28
shared preferences and we can call this
25:31
as user user data. You can call this as
25:33
anything
25:35
and then we will open this inside uh
25:38
private mode. We will edit this
25:42
and basically we will put inside this
25:45
information which is first of all we
25:46
will put the name of the user which we
25:49
can say account dot get display name.
25:53
Similarly we will say put string for the
25:56
email address.
26:05
And lastly we will do the same thing for
26:07
the picture as well.
26:21
So you will see that uh sorry
26:26
we need to put here the picture. So this
26:29
needs to be a string right here. That's
26:31
all. So now guys we have put this
26:34
information and also we need to at last
26:36
we need to apply these changes. So we'll
26:37
call the apply method. So now you can
26:39
see all these things are being saved
26:41
inside shared preferences. Now we can
26:43
basically inside our on create method.
26:46
So whenever we launch the application
26:47
right here we can uh have a if condition
26:50
here basically sorry we can simply have
26:53
first of all fetch the data here. Shared
26:56
preferences again we will use
26:59
shared preferences class.
27:03
We will say uh call the get shared
27:05
preferences method once again. And here
27:07
we will say the same name that we used
27:09
right here whenever we saved it user
27:12
data. So this name needs to be same
27:14
here. And here we will again open it
27:16
inside private mode. We will get all the
27:19
three information guys. First is the
27:21
name of the person and this will be
27:27
get string name. Default value will be
27:30
null.
27:34
Similarly, email uh get string email
27:38
default value again will be null
27:44
picture
27:51
that's all. And now we will simply have
27:54
the name. We will simply compare if the
27:57
name is not equal to null. If some
28:00
information is present in then we know
28:02
that the user has logged in. Now we
28:04
simply need to redirect the user to the
28:06
user detail activity. Again we will use
28:08
the intent
28:10
and now we will go from main activity
28:12
here
28:15
to the user details activity class
28:19
and
28:20
and we will pass the information again
28:23
like this.
28:35
And we'll start the activity pass the
28:38
intent. That's all. So what it does guys
28:41
basically it will detect automatically
28:43
whether the user has logged in. Whenever
28:45
you open the application it will
28:46
redirect user to the user detail
28:48
activity.
28:50
So now if you uh run this application it
28:53
will solve a very good problem. So if I
28:56
log in here, so you will see now I'm
28:59
currently logged in. If I close this
29:00
application once again, open it, you
29:03
will see that it will automatically
29:06
detect and it will redirect back to the
29:08
user detail activity. And now similarly
29:11
guys, if I need to log out here, I need
29:13
to uh delete this data from shared
29:15
preferences. Now I can't log out. You
29:18
will see I can't log out again. This
29:21
data is preserved right here. So now to
29:23
fix this problem. So wherever we are log
29:27
logging out inside user details activity
29:30
we need to delete this data. So this is
29:32
very easy right here. Uh we will just
29:36
need to say whenever we are calling
29:38
right here whenever it is complete
29:41
shared preferences
29:43
editor
29:45
editor
29:47
and we will get the shared preferences
29:50
get shared preferences.
29:54
So this will be user data and we need to
29:57
delete that data. So we will first of
29:58
all get that open this inside uh private
30:03
mode we'll edit this
30:06
and uh we need to say ed editor doclear
30:09
so it will clear all the data and then
30:10
it will apply the changes that's all
30:13
this is all that you need to do guys
30:15
simply now refresh
30:18
so now you will see if I click the log
30:20
out button I will be redirected back to
30:22
the main activity
30:25
so I think what So,
30:30
so [snorts] it is saying uh
30:41
okay I think I need [clears throat]
30:47
I need to uninstall this app here so
30:50
that it will work. O2
30:53
let me uninstall this app once again and
30:55
unin uh install it. So again if I run
31:00
this application uh just wait it is
31:03
installing it.
31:06
So again if I log in uh you'll see that
31:14
[snorts] now you can see that uh
31:19
you can see again it is logged out.
31:24
So in this case guys you will see that
31:26
if I once again open this application
31:29
I think some kind of problem is there uh
31:32
for this you will see that uh I can't
31:36
able to log out so what I will do is
31:38
that guys I don't waste your time uh you
31:40
can go to the description of the video
31:42
you can simply copy paste that code of
31:45
user detail activity uh I have given
31:48
this code here
31:50
this is actually the code for
31:57
I will simply copy this code here. Just
31:59
wait. Let me fix this. So,
32:06
so this is the code here guys. You will
32:08
see that. Let me say m Google sign out.
32:13
Yeah, sorry. So now, okay. Okay. I think
32:17
I was doing the wrong thing. So, I was
32:19
placing main activity here. Let me just
32:21
show you.
32:23
Okay. Yeah. So it is saying uh
32:27
log out button is already defined. So
32:29
now let me say run this application.
32:34
And now if you see click log out
32:41
uh
32:43
you will see let me again open this O2.
32:52
[sighs]
32:54
So now this is the screen guys you will
32:56
see that click log out you will redirect
32:59
to the main activity you will see that
33:01
again you want to sign in you will see
33:04
different account
33:06
and now if I close this application
33:09
let's suppose I need to open it once
33:11
again
33:13
you will see it will stay on this page
33:15
click log out you will see this is
33:17
basically the functionality guys I built
33:19
using Java Android and Google O2 login
33:22
and logout system all The source code is
33:24
given in the description of the video.
33:26
Thank you very much for watching this
33:28
video and I will be seeing you in the
33:30
next one.