Up next in 10

Angular 14 Auth0 Example to Integrate Google OAuth2 Login & Display Profile of User in Browser
Dec 22, 2025
Buy the full source code of application here:
https://procodestore.com/index.php/product/angular-14-auth0-example-to-integrate-google-oauth2-login-display-profile-of-user-in-browser/
Show More Show Less View Video Transcript
0:02
Uh hello friends today in this tutorial
0:04
I will be showing you that uh how we can
0:06
integrate Google login button inside our
0:10
application angular application using
0:13
the package which is o zero basically
0:17
guys O0 in the last live stream when I
0:20
integrated through uh ReactJS I already
0:23
showed you you will see automatically
0:25
this will authenticate me it is already
0:28
detected that I'm already logged in. So
0:30
it is displaying the name, email address
0:32
and the profile picture. So in the last
0:35
live stream I have shown you how
0:37
basically you can integrate this inside
0:39
our react chase application. If you
0:41
haven't watched that video I will
0:43
definitely recommend go to my channel
0:45
and watch that video. And uh Ozero guys
0:48
basically it's a library or it's a
0:50
package which makes it very much easy to
0:53
integrate social login. This is their
0:56
official website and it supports all the
0:59
major social media networks.
1:02
So you just need to sign up for a new
1:04
account here and simply login here and
1:07
after login you need to create a brand
1:09
new application and it contains all
1:12
these methods brand built in. You don't
1:14
need to reinvent the wheel. So if I
1:16
click log out here you will see I will
1:18
be successfully logged out. Now if I
1:21
refresh the page you will see login
1:23
button will be shown to me. And now if I
1:25
click the login button, you will see
1:26
once again it will ask me for the
1:28
permission. This pop-up window will
1:30
appear here. So Facebook login is also
1:32
supported. But in this tutorial we will
1:34
only look at the Google login and this
1:37
uh email password validation is also
1:40
supported here. So now if you want to
1:41
sign up with a new email address and
1:43
password you can sign up and also you
1:45
can login that with the same email
1:47
address and password. And also we also
1:50
have this functionality guys. If you
1:52
want to reset your password as well,
1:53
this functionality is also built in. And
1:56
now if I click sign in with Google guys,
1:58
you will see that basically now this
2:01
will show to me my email name here,
2:03
email address, display name and the
2:05
profile picture. So all this information
2:08
is returned to us guys once the client
2:10
is authenticated. And basically this is
2:14
basically the dashboard here. You will
2:15
see that we have the applications tab
2:18
here. And now first of all guys I will
2:21
show you how to create this inside our
2:23
angular application. All the source code
2:25
is given in the description of this live
2:27
stream. So you can go to it and uh
2:29
simply get all the source code. So now
2:32
let's get started guys by building this
2:34
application. So
2:37
first of all what I will do is that I
2:39
will delete all the source code from
2:41
here and start from scratch.
2:46
So let me just delete all that and start
2:49
from scratch.
2:52
So the very first thing guys you need to
2:54
do is that uh you just need to create a
2:57
brand new application. Click on this and
3:00
simply name your application as uh let's
3:02
suppose angular o and it supports
3:05
various applications. We only need the
3:07
single page application. So I will
3:09
select this. Click on create and now it
3:11
will create your application guys. So
3:13
after this you need to select here
3:14
angular and uh now there are
3:18
documentation is very good guys. So
3:20
first of all you need to install this
3:22
package. I have already installed it.
3:25
Let me inside your angular project npm
3:28
install oz0 oz0-angular.
3:31
This is specifically for angular
3:32
application. So simply install this
3:34
package guys. So I have already
3:36
installed it. So I will simply start my
3:39
application. So after you do this guys
3:42
basically all these instructions you
3:45
will be adding you need to go to your
3:48
app domodule.ts file of your angular
3:50
project and right here inside the
3:52
imports array you need to add this
3:54
dependency. So right here we will put
3:57
the import statement and we will import
3:59
this module which is o module from this
4:02
package that we installed. And now
4:04
inside the imports array guys basically
4:06
we need to say o module and for root and
4:10
inside this we need to pass this option
4:12
guys first is a domain option. So all
4:15
this information domain client ID you
4:17
will get inside your dashboard and we
4:20
also has authorization parameters. So
4:22
this is an basically an object which
4:24
contains a property which is redirect
4:26
URI. This will be simply equal to
4:28
window.loation do origin. So this will
4:31
be the homepage of your application
4:32
which is in this case the application is
4:35
running on localhost 4200. So this is
4:38
your simply homepage URL. So this is
4:41
equal to window.location.
4:45
So now to get your uh domain name guys.
4:47
So domain name if you go to your
4:49
application settings right here at the
4:52
top you need to simply go to settings
4:54
here and all this information will be
4:56
shown here. This is your domain name.
4:58
This will be different for you. So don't
5:00
copy my domain name and then also your
5:03
client ID as well. So this is basically
5:05
your client ID. Simply copy paste here
5:09
and that's all. So now you need to close
5:11
this file and now we will move through
5:13
our app dot
5:16
uh component.ts file. So inside this
5:19
file guys what we need to do we need to
5:22
basically import the service here which
5:24
o service it is called as from this
5:27
module. we will see that
5:30
don't need this public API just write
5:32
this. So after this guys uh we just
5:36
inside this constructor of this
5:38
component we need to pass this service.
5:41
So inside the constructor we will
5:44
basically pass uh
5:47
this we will use this inject and we will
5:50
pass this document. So all this will be
5:52
imported here. We will see document from
5:54
this and inject from this and this will
5:58
be of the type public
6:02
and document and this will be of the
6:05
type document.
6:08
This will also get imported. You will
6:09
see that
6:13
and then guys we will basically create a
6:16
variable of this o service. So public o
6:19
and is it is it of the type o service
6:21
that's all. So you just need to write
6:23
this line guys. So this makes it uh easy
6:28
inside our constructor we are passing
6:29
all these things to our angular
6:31
component. So now inside our HTML code
6:34
inside the app.component HTML file we
6:37
can basically can display login button
6:40
logout button all that stuff. So inside
6:42
this ng container tag guys, we will
6:45
basically uh display a button
6:50
right here at the top here button and
6:52
this will be equal to
6:57
first of all we will basically
7:00
uh display this uh a login button. Sorry
7:05
let me first of all display a login
7:07
simple login button. So now you will see
7:09
basically if you go to your application
7:11
there will be a login button. So this
7:14
basically guys it contains a method here
7:16
we can bind on click listener. So
7:18
whenever you click this button we have
7:20
this o object available to us because we
7:22
have initialized this service here. You
7:24
will see we have declared this public o.
7:27
So this service is available inside this
7:30
uh object. So this object contains a
7:32
method guys which is called as login
7:35
with redirect. login with redirect. So
7:39
we will simply call this method guys.
7:40
Whenever you click this button, this
7:42
function will automatically gets called.
7:45
So now what will happen here? You will
7:47
see this will get give me an error that
7:50
is your call back URL is not matching.
7:53
So this basically uh is a error here.
7:57
You need to basically copy paste this
7:58
URL and go to your application settings
8:01
here guys. right here you need to paste
8:04
inside this local host call back URL
8:06
allowed call back URL logout URL also
8:10
simply paste it and also inside allowed
8:13
web origins. So in these three places
8:15
you need to paste this URL guys. So
8:17
after you paste this URL click on the
8:19
save changes button. So after you click
8:22
this you will see it will generate this
8:24
notification. So now if you now refresh
8:27
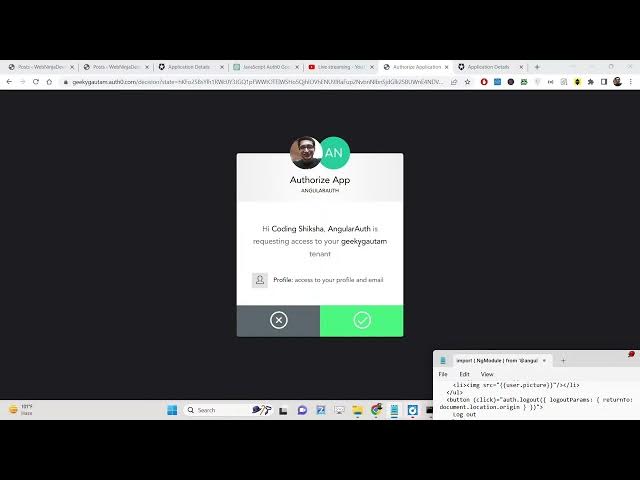
your application should work. Click. And
8:30
now you will see it will tell me that
8:32
authorized the app high coding angular o
8:35
is requesting access to your geeky
8:38
gotham tenitance. This will only appear
8:40
for the very first time. So if you're
8:42
only very first time authenticating your
8:45
app. So now you have four op profile
8:48
access to your profile and email. You
8:50
can either decline it or you can accept
8:52
it. If you decline it, you will see that
8:56
again it will redirect back to the login
8:58
page.
9:00
Once again now you can accept it.
9:04
You can see now this will generate
9:06
access access token guys. So now we need
9:09
to uh display the profile details. So
9:12
how to display the profile details guys?
9:14
It's very easy. Basically we have a
9:17
property guys. uh we will make use of
9:20
that property which is called as uh
9:24
inside the ng container tag we will
9:26
basically have a simple ng if so inside
9:29
our angular uh applications we use this
9:32
directive guys ng if so this object
9:35
contains a property which is called as
9:37
is authenticated so either this returns
9:40
a true or false value guys if the user
9:42
is authenticated or not. So if the user
9:44
is authenticated then it will return a
9:46
true value and we will simply use this
9:49
operator which is async
9:51
and here we will say else log out.
9:57
We will basically make a
9:59
uh we will attach this to this uh we
10:02
will surround this button guys inside ng
10:05
template. So we will conditionally show
10:07
this login button. So we will simply
10:09
move this login button right here. So
10:12
this simply means that guys we need to
10:14
attach this id that we are referencing
10:16
it which is logged out. So this simply
10:19
means that if this value comes out to be
10:22
true
10:24
then execute the code which is right
10:26
here we will simply say
10:29
you are logged in logged in and if the
10:33
user is not logged in then then it will
10:35
return false and in that case we will uh
10:38
display this template which we are
10:40
referencing here inside the else col
10:43
here logged out. So if the user is not
10:46
logged in then the login buttons will
10:48
show. So now if you refresh it you'll
10:49
see that you are logged in because this
10:52
variable guys which this o zero contains
10:56
this is basically a method it returns
10:58
true because you are logged in and now
11:01
we can basically display a log out
11:04
button guys. So we can simply display a
11:06
log out button. You will see now if I
11:10
click the log out button guys I need to
11:11
log out the user. So there will be a
11:14
very simple onclick we can say. So when
11:17
we click this button guys we can simply
11:19
say o dot logout that's all
11:24
and basically it takes a parameter guys
11:27
which is logout params and inside this
11:31
we need to tell exactly where to return
11:34
to.
11:36
So here it takes an option guys which is
11:38
return to and inside this we will simply
11:42
say document dot location origin
11:48
that's all
11:51
uh o logout
11:58
uh I think yeah let me just move it to
12:00
the same line. So now if you refresh
12:03
guys if I click this button I will be
12:05
redirected to the homepage. You will see
12:07
that basically I am now logged out. So
12:10
now the login button is showing here. If
12:13
I close the window again open it inside
12:14
another tab localhost 4200. So now I'm
12:18
logged out. So again if I click login
12:20
you will see that it will access sign in
12:23
with Google. So now this will show you
12:26
are logged in. Now we can display the
12:28
details guys. It's very easy. uh we can
12:31
basically inside this condition we can
12:34
display here inside ul tag and we can
12:37
simply say ng if and here here you will
12:41
say that o dot user if the user property
12:44
exist inside this object then in that
12:48
case we need to display the user
12:50
information
12:53
async as user and inside this guys we
12:56
will display this first of all user name
12:59
inside this double curly brackets and we
13:03
can display the user email address and
13:05
lastly we can display the profile
13:07
picture. So right inside this we can say
13:12
image dot sorry user picture
13:18
that's also we are displaying the
13:19
username, email address, profile
13:21
picture. So if you now refresh you will
13:23
see that automatically detect you will
13:26
see you are logged in. If I click log
13:28
out, you will see you are successfully
13:30
log out. Again, if I click login, you
13:32
will see that this is very simple live
13:34
duty guys. If you're building a very uh
13:37
very small or mediumsiz application, you
13:40
don't need to implement all the Google
13:43
authentication from scratch then you can
13:45
use this library. It makes it very much
13:48
easy to integrate Google login or any
13:50
sort of social media login. If you go to
13:53
here authentication, so various social
13:56
collections are supported here. Not only
13:59
Google, Facebook as well. So you can see
14:03
lot more. You will see Microsoft,
14:05
LinkedIn, GitHub, Apple, all those major
14:08
platforms are supported. So you can just
14:10
check out this library. All the source
14:12
code is given in the description of the
14:14
video. And I will be seeing you in the
14:16
next one.