Up next in 10

Angular 13 Export HTML5 Table to Excel (.XLSX) File and Download it Using xlsx Library in TypeScript
Dec 22, 2025
Buy the full source code of application here:
https://procodestore.com/index.php/product/angular-13-export-html5-table-to-excel-xlsx-file-and-download-it-using-xlsx-library-in-typescript/
Show More Show Less View Video Transcript
0:07
Uh hello friends, today in this tutorial
0:09
I will be telling you that how to export
0:12
HTML 5 table data to uh Excel file. So
0:17
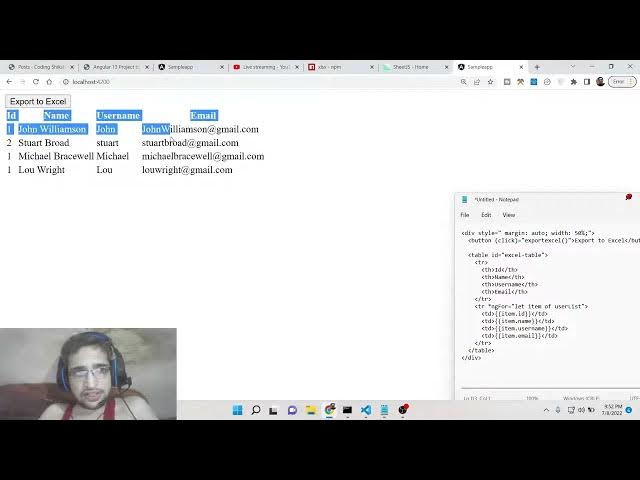
basically this is the application which
0:18
is built using angular 13 and basically
0:21
you can see there are four columns out
0:24
there which is ID, name, username and
0:27
email. So there are five rows. So this
0:31
is the data that we will be export to
0:34
Microsoft Excel file and there is a
0:37
simple button out there which is there
0:39
which if I press this button all this
0:42
data will be converted to Excel file and
0:44
the file will be downloaded. Let me just
0:46
press this button. So as I press this
0:49
button you will see that guys the file
0:50
will be downloaded as a attachment. So
0:54
this is the excel file Excel SX. If I
0:57
open this, you can see that this data is
1:00
converted to Excel file. You can see
1:04
this is Excel viewer. You can see the
1:06
software. So it contains ID, name,
1:10
username, email. So again if you hit it,
1:14
you will see that this is creating that
1:16
exporting this data. So you can contain
1:18
as many rows, as many columns as you
1:21
want. So for converting this guys we are
1:24
using a very special library which is
1:26
called as XLS. So if you search for this
1:29
package this is a package which is we
1:32
are using. So it is over one million
1:36
weekly downloads. So it's a very popular
1:39
module.
1:42
So this is its official website.
1:46
So there is a simple command guys you
1:48
need to install it. npmixlx.
1:51
I have written a complete blog post on
1:53
my website coding six. So if you face
1:55
any sort of problem if you want the full
1:58
source code you can refer the blog post.
2:00
So all the step-by-step instruction is
2:02
given. So just just go to the edit
2:05
option and uh you will find out this uh
2:08
blog post. So now to start this
2:12
application guys you need to first of
2:14
all make a new angular project and uh
2:18
just install this dependency excel
2:21
sx. So install this and after that
2:24
simply start your angular application.
2:28
So let me delete all this code guys and
2:30
start from scratch.
2:34
So there will be nothing here. You will
2:36
now see project is empty right now. So
2:39
just go to your app do.component html
2:41
file and we will start writing the code
2:44
here.
2:46
So the here first of all guys we will
2:48
have a simple div.
2:51
So
2:53
inside this div we will have a simple
2:55
button. So which will say to export to
2:58
excel.
3:01
So here we need to simply write the
3:04
event handler. So when we click this
3:06
button so this function will execute
3:08
which is export excel. So we will write
3:11
this function here.
3:14
So after this we will have a simple
3:16
table
3:18
and uh inside this we will have table
3:21
row. So there will be four columns out
3:24
there. First one is for ID. Then it will
3:27
be name. then it will be
3:32
um username and then this will be email.
3:39
So inside app.component.ts
3:42
file guys we will declare a user list
3:46
array. So basically this will hold uh a
3:49
array of objects.
3:52
So inside the first object we will have
3:56
four properties. ID field will be one.
3:59
The name field will be you can just put
4:02
any name of your choice
4:07
and uh then username
4:15
and then email address. So,
4:24
so like this guys you can see that
4:27
uh so basically you can put a comma
4:34
and you can just
4:37
write three more times change these
4:39
values accordingly.
4:41
Uh Stewart.
5:03
So just change the values here.
5:15
And here we can see.
5:30
So the there are four
5:33
uh list of data out there guys. You can
5:35
see that we have this. So now we can
5:38
simply loop through inside this table.
5:43
So now to loop through it is very easy.
5:45
Inside this table rotac we can use
5:49
something called as ng4 which is a
5:51
directive inside angular. So basically
5:54
it's a for loop type. So we will say
5:58
user list. You can see that inside app
6:01
component.ts we have this user list
6:04
array. So basically we are just using
6:06
this user list array. For this we will
6:10
first of all print the ID here like this
6:14
inside double curly brackets
6:16
and then we will print out uh
6:20
uh name
6:23
uh then we will print out uh username
6:29
and then we will print out email.
6:33
So in this fashion guys you can print
6:34
out all this information here inside
6:37
this table. So if I now execute this you
6:40
will see that uh export excel is not
6:42
defined. So just define this method guys
6:45
you have uh here let me just delete this
6:48
for now
6:50
and run this. So it is compiled
6:52
successfully. So if I open here
6:55
localhost 4200.
7:01
So now guys you can see that this data
7:03
is successfully displayed inside the
7:06
table. Uh let me just change the ID here
7:12
3 4.
7:15
So now you can see 1 2 3 4. So this is
7:18
name username email. So once I hit this
7:21
button I need to export this to Excel
7:23
file. So for that we need to write some
7:26
code here inside app.component.ts
7:29
file. So here we can define this method
7:32
which is export excel. So just bind this
7:35
here now
7:42
export excel. So here
7:49
inside this method guys what we need to
7:51
do is that.
7:55
So basically this will be a void method
7:59
and inside this we need to first of all
8:03
get the element to which we need to
8:05
convert. So for this we will use
8:07
document.getelement by id. So just give
8:11
it a id to the table to which you need
8:14
to convert. So Excel table. So just give
8:17
it a ID so that we can target. So Excel
8:21
table.
8:23
So after doing this, after getting this
8:25
guys, we can simply declare WS. This
8:30
stands for XLS.
8:32
And you can see we are importing this
8:35
library. Import star as XLS.
8:40
from XLS. So you need to write this line
8:43
at the very top.
8:46
So right here we will use the worksheet
8:50
method here of this.
8:54
So this will be equal to Excels [snorts]
8:57
dot utils dot
9:01
table to sheet.
9:05
This is a method. Basically it converts
9:07
a table element to a worksheet by the
9:11
name itself. So we need to pass the
9:12
element. So we will simply pass the HTML
9:16
table.
9:18
So after this guys we need to generate a
9:21
workbook. For generating a workbook this
9:25
is
9:27
WB. So this will be xls dot workbook
9:32
and this is xls dotutils dot we need to
9:38
initialize a new book like this
9:42
and then we need to say xls dotutils dot
9:45
we need to append so we will say book
9:48
append sheet we will pass the workbook
9:52
worksheet comma so here you need to
9:55
initialize your sheet name so I will put
9:57
sheet
9:58
And then we need to simply write this
10:00
file. So we will simply use write file
10:04
and workbook we need to pass as first
10:06
argument and then the file name. So file
10:09
name guys we need to initialize it. So
10:12
whatever file name that you need to give
10:13
it you can initialize it right here at
10:15
the very top. File name. So this can be
10:20
anything.
10:21
Let me say sample sheet dot xls. That's
10:26
it. So this is your application guys. It
10:29
is complete. Let me test it now and
10:32
refresh it. If I click export, you will
10:35
see examples sheet.xls is downloaded.
10:38
You can see all these values are being
10:40
converted to uh Excel file. So it has
10:43
four columns, four rows. You can see
10:46
that. So in this way guys, you can
10:48
convert any sort of HTML table to Excel
10:52
file.
10:55
Is it it is very easy. So inside Angular
10:57
13. So I have shown you the complete
11:00
example. If you want the full source
11:02
code, you can go to the description of
11:03
this video to download all the source
11:05
code. Please hit the like button,
11:07
subscribe the channel and I will be
11:09
seeing you in the next tutorial. Until
11:10
then, thank you very much.