Up next in 10

Build a Vue.js 3 Google Maps Autocomplete API to Find Places Addresses & Photos Using Places API
Dec 10, 2025
Get the full source code of application here:
https://codingshiksha.com/vue/build-a-vue-js-3-google-maps-autocomplete-api-to-find-places-addresses-photos-using-places-api/
Show More Show Less View Video Transcript
0:00
Uh hello friends, welcome to this video.
0:02
So in this video I will show you how to
0:04
make use of Google places autocomplete
0:06
API inside Vue.js3 to make this awesome
0:09
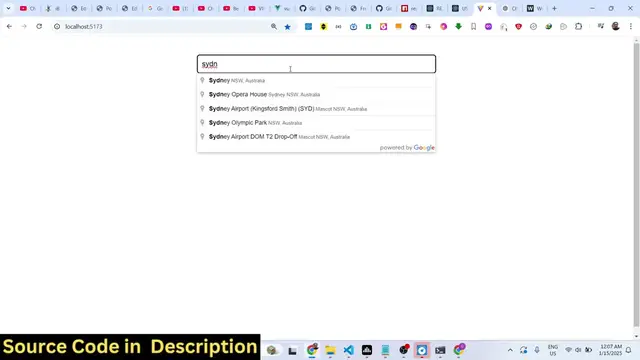
little application which uh you see can
0:12
we have this input field where we will
0:14
enter a address and automatically as you
0:17
enter the address it will autocomplete
0:19
this. So as I write address let's
0:20
suppose a particular location. So I
0:24
search for Sydney which is in Australia.
0:26
So you can see it is giving me
0:27
suggestions. So Sydney you can see all
0:29
these suggestions will come in
0:32
and as you type the location you will
0:35
see the details address details will
0:37
come up the name of the place the
0:39
formatted address the full address the
0:41
place ID latitude longitude and then the
0:44
photographs of that place. So all this
0:46
data is returning through Google places
0:48
API and Google maps autocomplete API. So
0:51
you can search for this place and this
0:53
will open this more information about
0:56
that place specific place. the
0:58
hyperlinks are there. So we'll be
1:00
building this complete application. I
1:01
will show you a package in Vue.js3 which
1:04
lets you do uh build this fetch this
1:07
data
1:09
and uh display this data. So you can do
1:12
it as you change the address you will
1:14
see that you can pick any address and
1:17
then you'll see it is communicating with
1:20
that places API and then it is returning
1:22
you the full address
1:25
the latitude longitude the photographs
1:27
of that place. So
1:29
the top 10 photographs will be returned
1:32
here and displayed right here. So all
1:34
the source code I have given in the
1:36
description of this video. So now let's
1:38
get started by building this. So first
1:40
of all you need to uh install a package.
1:43
So just go to your npmjs.com website
1:47
and install this package. So which is
1:50
view 3.
1:53
Vue3 Google address
1:57
autocomplete. So this is actually the
1:59
package here uh which specifically is
2:02
made for the latest version of Vue which
2:04
is Vue3. The command is very simple. you
2:07
install it npmi view3 Google address
2:09
autocomplete. I've already installed it.
2:12
It's almost got 605 weekly downloads. So
2:15
it's a fairly new package but it's
2:17
really powerful. So now to get started
2:20
you will edit your app dot view file. So
2:23
directly go to this file and now I will
2:28
write this application. So what you need
2:30
to do?
2:33
So
2:35
first of all we'll be writing the
2:36
template here and then we will also be
2:40
writing the TypeScript code in the
2:42
script tag. So
2:44
so the first thing we need to do we need
2:47
to require this package and the
2:48
necessary packages. So import reference
2:51
and this will be coming from the base
2:53
view package and then we'll be importing
2:56
this uh Google address
2:59
autocomplete.
3:02
This will be coming from this package
3:04
which is view3 Google address
3:06
autocomplete. So in this way you first
3:09
of all require this package using the
3:10
import statement. And then we need to
3:13
declare some variables
3:15
address variable. So this will be we'll
3:18
storing address in this variable. So
3:20
just add this setup
3:23
attribute. So just it's very important
3:25
you need to add the setup.
3:29
So after this we will also be having a
3:31
variable where we'll be storing the
3:32
places. This will be a null
3:35
and uh then
3:37
now we need to display the actual
3:41
template. Go to the template section and
3:43
right here we will give it a div and
3:46
just give it a class of autocomplete
3:50
container. And inside this we will embed
3:53
the component here which will be Google
3:55
address autocomplete. And this actually
3:59
takes some parameters this component.
4:01
The very first parameter is take is the
4:04
API key. So API key uh it will be coming
4:08
from Google cloud console. You need to
4:09
create a project here. And then v
4:13
modelel which is actually
4:16
the address we will be binding. So this
4:18
is actually the variable that we
4:19
declared. So we are directly binding it
4:21
to this vodel. Next we need to bind a
4:25
call back function as well. So as soon
4:27
as you write something in this input
4:29
field, this call back function will
4:31
execute. So now we just need to define
4:34
this call back function in our Java
4:36
sorry TypeScript. So we just bind this
4:39
function. So call back function.
4:43
So whatever place that you write this
4:45
place, we need to fetch more information
4:47
about this place. So first of all we
4:50
will console lock this selected place
4:53
and the next parameter it takes this one
4:57
is the class. So we can directly attach
4:59
a CSS class you can style this input
5:01
field. So I will just give it a class
5:03
here autocomplete input and then the
5:06
placeholder. So just letting know user
5:08
we need to enter an address here. So
5:11
these are all the parameters it takes.
5:13
So here this API key I need to register
5:16
a new project here. I have already
5:18
created one and first of all you need to
5:20
enable your API. So just search for
5:24
Google places API and uh I have already
5:27
enabled this API. You need to click the
5:29
enable button.
5:31
Uh then we also need to enable that um
5:35
Google maps API as well. So just search
5:38
for map static.
5:41
So this is actually the API you need to
5:43
enable maps static API. I enable both
5:47
these APIs.
5:49
So just enable this as well.
5:54
I think this is not the API. Let me show
5:56
you. This is actually maps JavaScript
5:59
API. You need to enable this one. So a
6:02
lot of versions are there. So these two
6:04
APIs you need to enable. Then you need
6:05
to go to APIs and services and go to
6:09
credentials and then you need to create
6:12
your own API key right here. So just
6:15
create an API key. Uh this will be
6:18
different for you. So don't copy my API
6:20
key. So once you get your API key just
6:24
copy this and inside your component just
6:28
paste it.
6:31
So now what happens if you run this
6:32
application now
6:35
if I just run this.
6:38
So you will see this input field
6:39
appearing. uh just need to add the
6:43
necessary styles here. So what I will do
6:45
I will paste it. You will get all this
6:47
source code in the description of this
6:48
video.
6:50
So just it's it's done for just a
6:52
styling purpose. I will just paste it.
6:57
So if you go to your application,
7:00
it will be now centered right here. So
7:02
as soon as you write something right
7:04
here, you will see the suggestions
7:05
coming. So these are all the
7:07
suggestions. As soon as you pick a
7:09
place, this object will be returned to
7:13
you. The name here if you see is you can
7:17
see it's a selected place.
7:22
So now we need to get information about
7:24
that place. So we go to our function
7:27
right here which is this call back
7:29
function. So where we have console
7:32
logging it. So after this we say place
7:35
dot value is equal to the selected
7:37
place.
7:42
So
7:45
now to display the actual information
7:48
about that place we go to our template
7:52
just after that you display we will have
7:55
a div tag and just we will bind this v
7:57
if condition that if the place is there
8:00
then we need to give it a class here
8:02
place info
8:07
and I think as I run this
8:11
You can see it is working.
8:16
Can select
8:18
just refresh it.
8:24
You will see all this information will
8:26
be returned to you. You can see address
8:28
component addresses format address. So
8:30
this is contained inside this JSON
8:32
response which will be returning from
8:33
the places API. Now we need to display
8:36
all this information. So what we are
8:38
doing right here? We are simply
8:40
displaying it
8:42
inside our template.
8:44
So,
8:47
so we are on inside our template. So, we
8:49
are displaying this information.
8:52
So,
8:54
first of all, we will display the
8:56
address. So address details
8:59
and inside the paragraph
9:01
the strong tag we will display the name
9:04
of the place which will be inside double
9:07
curly bracket place dot name property
9:11
and after this we will be displaying the
9:14
formatted
9:20
address. So this will be your uh
9:27
place dot formatted
9:32
address. So after this we will display
9:36
the other information which will be the
9:39
place ID.
9:42
So every place in Google places have a
9:44
particular place ID attached to it. So
9:46
to display that we simply say place dot
9:49
place id
9:53
then uh for showing the latitude and
9:56
longitude.
10:02
So it's very simple uh this you can see
10:05
we are just parsing the JSON response
10:08
and just showing it place dot geometry
10:11
dot location dot latitude. This is
10:15
actually a function. So we just need to
10:17
wrap everything in double quotes.
10:25
Similarly we display the longitude as
10:27
well. So this will be instead of
10:31
latitude we are returning longitude. So
10:33
replace here.
10:47
So last but not least, we will display
10:50
the photographs of the places that the
10:52
user has selected. So we will loop
10:54
through all the photographs. So inside
10:57
this div tag, we'll give it a class of
10:58
photos.
11:00
And then inside this we will run a
11:03
simple V for directive.
11:05
So for each photo inside this place
11:11
photos.
11:13
So it's an array here we are looping
11:15
through each photograph. So we are
11:17
giving a index variable index and a
11:20
class of photo. And inside this we will
11:23
display
11:25
the image. So we'll simply image the
11:28
source will be equal to
11:31
we'll give the get the URL for photo dot
11:35
get URL. So we'll get the URL of the
11:37
photograph
11:39
and uh
11:43
apart from that we will also show a
11:46
simple
11:51
we will simply uh what we will do
11:55
we will make sure that it is hyperl.
12:00
So when you click on that image you will
12:02
be redirected to more.
12:06
So that's all that we need to do.
12:10
If you refresh your application
12:18
think I made typo mistakes. So all the
12:20
source code will be given in the
12:22
description guys. So
12:27
if you enter the address,
12:33
so you can see that. So as soon as you
12:35
write this, you will see all these
12:36
details appearing. Name, address, place,
12:38
ID, latitude, longitude, and then the
12:40
photographs. If you click any of the
12:42
photographs, you will be redirected to
12:44
the actual photo. So in this way, you
12:46
can develop this nice little places
12:48
autocomplete application. So, thank you
12:51
very much for watching this video and
12:53
also check out my website as well
12:55
freemediatools.com
12:57
uh which contains a thousands of tools
13:00
regarding audio, video and image and I
13:03
will be seeing you guys in the next
13:04
video.