Up next in 10

Build a React.js Google One Tap OAuth2 Login to Display User Profile in Browser Using google-one-tap
Jan 21, 2025
Get the full source code of application here:
https://codingshiksha.com/react/build-a-react-js-google-one-tap-oauth2-login-to-display-user-profile-in-browser-using-google-one-tap-in-ts/
Hi Join the official discord server to resolve doubts here:
https://discord.gg/cRnjhk6nzW
Visit my Online Free Media Tool Website
https://freemediatools.com/
Buy Premium Scripts and Apps Here:
https://procodestore.com/
Show More Show Less View Video Transcript
0:00
uh Hello friends welcome to this video
0:02
so in this video I will show you a
0:03
reactjs application where you can
0:05
implement this one tap
0:07
authentication uh if you load your page
0:10
automatically this on the right hand
0:11
side window you will see this account
0:14
screen will open and as soon as you tap
0:17
on that continue as then it will fetch
0:19
your information such as the username
0:22
profile picture and the email address so
0:24
both these three information will be
0:26
showing right here on the profile page
0:28
so you can easily implement the Google
0:31
authentication using one tap
0:32
authentication in react CHS using this
0:35
module so simply click this account
0:38
screen and then the information will be
0:40
fetched so there is a module that I'm
0:42
using which is Google one tap if you
0:45
just search on npmjs.com this is
0:48
actually the module here Google One
0:52
Tap and this is the command here I've
0:56
already installed it and uh it's almost
0:59
got 9,000 weekly downloads so now to use
1:02
this I have given all the source code in
1:04
the description of the video so first of
1:06
all you need to make a functional
1:09
component and uh then we need to import
1:12
this module so we simply say import
1:14
Google One
1:19
Tap and which will be coming from this
1:22
package Google One Tap so you actually
1:24
require this package at the top and then
1:29
inside your app application we declare
1:31
some variables some State variables for
1:33
storing the user profile information so
1:36
user set user and we use the UST State
1:39
hook the initial value will be null so
1:42
this here we are storing the user
1:45
information in this and then we use the
1:48
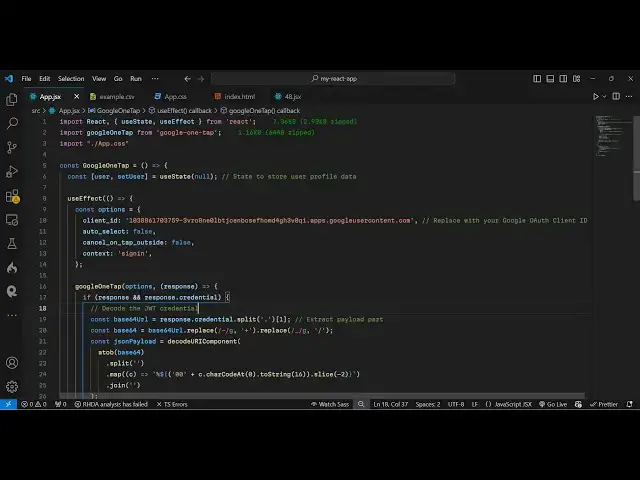
use effect
1:49
hook which is which will
1:52
execute as soon as your application
1:54
loads so here you will actually write
1:57
the code for the Google one tap
1:58
Authentication so I will just make a
2:01
options object right here and here we
2:04
need to pass our client ID and then we
2:08
also need to pass Auto Select which will
2:11
be
2:12
false and cancel on
2:16
tap
2:18
outside to be false and then the context
2:21
here will be sign in so these four
2:24
options it takes and now for the client
2:26
ID you need to create a Google Cloud
2:28
console account for this so just go to
2:30
my Google Cloud console account and
2:33
inside create credentials you need to
2:35
select o o client ID so from the
2:39
application type you select web
2:40
application and in the authorized
2:42
JavaScript Origins you need to paste the
2:45
homepage URL so I'm developing this
2:49
application on HTTP Local Host 5173 so
2:53
this is actually my homepage URL and
2:55
apart from that you also need to paste
2:58
HTTP Local Host
3:00
which is also required so both these
3:03
URLs and then you need to paste this
3:06
authorized redirect URI as well so paste
3:09
this as well like
3:11
here and then click on create so as soon
3:14
as you click the create button it will
3:16
give you your client ID and the client
3:18
secret we only need the client ID so
3:21
simply paste your client
3:24
ID so after you paste it we will execute
3:28
this function that we imported at the
3:31
top Google One Tap so we are simply
3:33
using this and here it takes the options
3:36
as the first argument and secondly it
3:39
will return the response which
3:43
will and here we just need to compare
3:45
that if the response
3:49
create create our JWT credential and for
3:53
this we do need
3:55
to decode this credential which will be
3:59
contained in the response so if I
4:01
console log it and just refresh your
4:04
browser so now what happens if you see
4:07
continue you will see this window as
4:09
soon as you click
4:12
it it will do the authentication and in
4:14
the console an object will be returned
4:16
to us so this actually is the JWT token
4:20
Json web token and we need to decode
4:22
this token and for decoding it we just
4:26
need to use some discode right here that
4:29
I will show
4:31
you I have given all the source codes
4:35
so so this is little bit complicated
4:38
code so what I will do I will simply
4:41
paste it just to save the time so this
4:44
is just the JWT token decoding that we
4:47
are
4:50
doing we split it then we convert to
4:53
base 64 Json
4:55
payload so if you console log this Json
4:58
payload
5:01
so this will be having your profile
5:11
data so now you can see that now we got
5:14
get this Json which contains all this
5:17
user profile information
5:23
so now we need to
5:27
actually for the profile info we just
5:30
need to
5:32
pass this Json so json. pass and we pass
5:35
this Json payload and this will convert
5:38
this into a JavaScript object so we can
5:40
store it in the user object by the hook
5:44
function so name is your profile info.
5:48
name and then for the email profile
5:52
info. email and then for the picture you
5:56
simply say profile info. picture so we
6:00
store all these three details and store
6:02
it inside the
6:04
state now we come to the jsx where you
6:07
you not need to display
6:13
it so here you'll be comparing that
6:16
uh if the user exist then only in that
6:20
case only we need to display the details
6:24
and if the user doesn't exist then we
6:28
simply display a
6:32
loading like this so here we need to
6:36
display just
6:42
put and right here colon symbol so we
6:46
will display the image tag which will
6:48
hold the user.
6:53
picture and H3 tag which is containing
6:56
your
7:00
username and then the email address
7:03
which is user. email so that's all we
7:08
are showing all these three details if
7:10
you refresh click on that button and now
7:14
you will see these three details
7:15
printing out this is profile picture
7:18
this is your username this is your email
7:20
address so in this easy way you can
7:23
Implement Google One Tap authentication
7:24
in react CHS using this module Google
7:27
One Tap so thank you very much guys for
7:30
watching this video and also check out
7:32
my website as well uh free mediat
7:34
tools.com uh which contains thousands of
7:37
tools regarding audio video and MH and I
7:41
will be seeing you guys in the next
7:42
video