Up next in 10



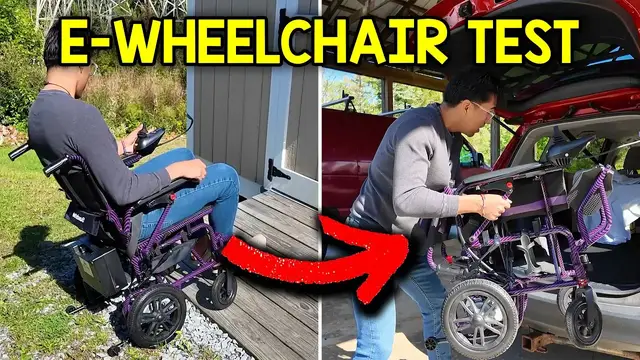
In this video, I go over an electric wheelchair.
Check it out here https://link.amazon/B0hTbA4k7
Want FREE Shipping With Amazon Prime? Get a 30-DAY FREE TRIAL by signing up here http://www.amazon.com/tryprimefree?tag=thechrisreview-20
DISCLAIMER: This video and description contains affiliate links, which means that if you click on one of the product links, I'll receive a small commission. This helps support the channel and allows us to continue to make videos like this. Thank you for the support!
Show More Show Less View Video Transcript
0:00
So here's everything the box comes with. So inside here we're gonna have the charger
0:12
the user manual, this baggie, some wheels, and this attachment. And there's also the battery
0:17
and finally the electric wheelchair itself. And to open this up this just has to be pulled right out
0:23
I can move this piece out of the way and it looks like I can just lift this up
0:27
and now let me pull it up a little bit more oh and then from the back side this can be pulled up
0:31
and these things are going to click onto place all right now before testing out the electric wheelchair it's time to install the rest of the
0:42
components starting with the controller so right over here we have the controller and it's got this
0:48
piece that can be slid right over here on the right side now make sure the cable is towards
0:53
the outside of the chair and it's going to be just slid right inside give it a good push and
0:58
now it's time to put the wire to the side so if this still doesn't attach just give it a little
1:04
bit more of a push so there's enough slack oops actually this might be in the way so let me put
1:08
it like this and there now there's enough space so the handbrake uh is free to be used all right
1:15
so with that now it's time to tighten this part over here so at the bottom there's going to be this screw so make sure it's tight and then tighten this up this way you can't accidentally like pull
1:25
this out all right so now it's time for some accessories and it comes with two things we're
1:30
going to have the cup holder and the pouch in this case i'm going to install the cup holder
1:35
right over here on the right side and to do that it comes with these two parts
1:40
so this piece has to be attached right up here and it is kind of tricky because if you look up top
1:46
over here the plastic is going to be bent inwards and so I kind of have to give it more of a push
1:51
inside use a little force and then I can push it up in place and make sure to lock it all the way
1:57
up because this is going to be a little bit too loose so just push it more until you hear the click
2:01
there and now it's all the way up and tight and now I'll just loosen this up a bit
2:08
and then find somewhere to attach it so I'd say probably over here would be the best spot
2:14
it doesn't interfere with the handbrake so it's still good so do that and actually i'll do it
2:20
yeah actually here yeah here's good that locked in place all right it's still kind of loose so
2:26
i'll tighten it a little bit more all right that's a lot better so now your drink right over here on
2:31
the side and now it's time to go to the complete other side and i'm going to install this pouch
2:37
so this is going to be velcroed but first let me take something out of here because there is
2:40
something in here and it's going to be this light and we're going to install this in just a second
2:45
but first the pouch so this is pretty easy and the velcro just come right off just like so and i'll
2:50
just loop it around over here velcro it in place and then same thing over here and actually i'll
2:57
put this one a little bit closer there just like that and now you can store some things on the side
3:02
here this is going to kind of go back and forth but it's not going to interfere with this brake
3:06
here. All right, now let's go back to the front, and we're going to install this reading light. So
3:11
you don't have to keep this on all the time, but if you do want that reading light, you can put it here. It just goes right inside, just like that, and then this light can be moved, and it's going
3:20
to be capacitive touch right on the top just to turn it on, but right now it's not going to turn on, and that's because the battery isn't installed. So let's go all the way to the back side and
3:28
install the battery. So right over here, if you can see, there's this metal part, and this is where
3:32
the battery is going to rest on top of. Now be very careful. And then it's got these two hooks
3:38
These are going to hook on this metal part over here. Just like that and make sure it slides into
3:43
those grooves. And so the battery won't move out of place and I can connect them just like so
3:49
And now this is ready to be used. Oh yeah. And one last thing I forgot to mention is going to be
3:54
the anti-tilt wheels. So these are going to be these guys right over here and this goes to the
4:00
bottom here. So first just remove that C clamp, push this in, and then put the C clamp back in
4:07
place. And you can get a better view over here. So just pull up that C clamp, push the anti-tilt
4:13
wheel inside, and then install that clamp again. And there. All right, so before I ride this
4:18
let's have a look around this so you get a better idea of what to expect. So at the bottom here
4:23
these are going to be the feet rails These can just be placed up like this and they can be stored upwards with a little bit of force like that and when you want to put them down just push it down
4:34
and place that like so and by the way these are not adjustable they're going to be
4:39
one setting which is going to attach right over here and that's it right over here you're going
4:43
to have the seat it's going to have this soft cushion that's not going to be the thickest type
4:48
of padding but it is going to be soft and also does have a seat belt so make sure to put that on
4:53
before using the electric wheelchair. On the sides, there's going to be these thin rails
4:58
probably about maybe like an inch and a half or so in width, it looks like
5:03
And here's the controller itself. So using the controller is pretty easy. This is going to be the knob to move forward, back, around, reverse, everything
5:11
There's going to be the power button, the horn button, speed up, speed down
5:15
And then right over here is going to show you the indicator of the current battery life
5:21
which is going to be increments of 20% and then right here it's going to show you the speed but
5:25
more on that later. Right here is the light and by the way none of this is going to work until I
5:29
turn this on which I'll do in a little bit but now let's go towards the side. Right here you have
5:35
the handles in case you're moving somebody over here and when we head down here there's going to
5:41
be this part. Now right over here I just end up putting the charger and then the instruction
5:47
manual just to not lose that. Of course here's the battery. There's the thick wheels followed by the
5:52
anti-tilt wheels on the back. So if I accidentally push this backwards those anti-tip wheels are going
5:58
to help it prevent from it actually tipping. See the electric wheelchair has all the right features
6:02
and now going to the handbrake itself. It's going to be these guys right over here. So if I push down
6:07
it'll break it and then also let me see if I could if I push all the way down it's going to lock it
6:11
in place and if I push upwards or if I pull upwards nothing's going to happen. And by the way you do
6:16
need some force to push it down and lock it in place but it is manageable and of course this does
6:22
come on both sides. Now the one thing I noticed about this these accessories which is going to be
6:27
mainly this cup holder is once you put a bit of pressure in here it is going to want to tilt
6:31
backwards so I may have to tighten this a little bit more or if this isn't necessary this can just
6:36
be removed altogether or maybe put somewhere else but this seemed like the most convenient option to
6:40
put it in and then right on the other side here this here which again it's kind of like
6:44
loose around so once you put something heavy it'll kind of want to go back this way over here
6:50
but it doesn't seem to interfere with the wheels and if it does this can always be scooted over
6:54
to my left side a little bit more so i can attach this part here and this over here but with that
6:59
out of the way now let's actually use this thing all right so now time to test out the wheelchair
7:03
itself so here you can see my point of view as well too and the first thing to do is to make sure
7:08
to put on that seat belt can be right over here oh and actually this might be a little bit too small
7:14
for me so let me tighten it up and there so now that's all done now over here you can see the
7:19
control arm so when I turn it on you can see everything lights up and here you can get a
7:24
better view you can see that there's going to be these all these lights over here we have the green
7:28
orange and red and when it's all the way up top this indicates is at 100% and each of these bars
7:33
are 20% and we could see our speed as well too so there it is and then there's also the horn
7:39
and I can hold it and I'll beep and when I back up it's also going to start beeping so now let me
7:48
just yeah let me keep it at this fast setting over here and move everything so here you could
7:53
see what my point of view looks like as well too and right here we have this pathway yeah this is
7:59
a pretty good speed and then when I want to brake let me just go backwards just to prevent it from
8:05
hitting the camera in the front of me. Yeah that was pretty good but now let's try to see what
8:11
happens when we go uphill. So right over here you can see that's going to be the driveway
8:17
to the house so let's see if it actually reached that incline and let's actually move like this
8:22
and I'm going to set up the camera right over here right there and this way you can get a good view
8:31
of all the way on top. Now let me just turn around
8:39
Alright, time to go up this incline, see how well it handles it. And by the way, this is gonna be full speed
8:49
The battery is still at 100%. I do feel like the motor is working a bit harder though Oh it went over these metal parts but it was still fine Now I don know how big this incline is but it handling it really well
9:03
Now, the dangerous part is going to be going back, but I should manage. Now, if you see around me, there is going to be grass
9:09
And in case you're curious if this does work on grass, let's actually do that right now
9:14
It's right over here. Let's see how well it handles it. Oh, actually, this is doing pretty well
9:19
And by the way, this grass is still pretty high. Oh, pretty high up
9:25
It doesn't need to be cut. Now this area right here, this backyard, is going to be pretty hilly
9:30
so it's not going to be the best to go on, but it is possible. All right, now back to the blacktop again
9:42
Oh, okay. The tire kind of skid around it, but okay, now it's good
9:46
And this might be the scary part, going down this hill. let's see what happens if i just let go all right right now there my hands are off the joystick and
9:55
there it is able to break it and if i move forward inch a little bit it does inch a bit just a little
9:59
bit but yeah it should be good so now let me pull push forward and yeah this speed is going to be
10:07
much quicker than compared to me going uphill which makes sense and this is what i want you
10:13
to check out when i spin around so this will be easy just to shift my direction as well too
10:24
but now let's go to a different thing and that's going to be like a wooden ramp which is going to
10:32
be right over there and also while we're at it we're also going to change the uh the terrain a
10:37
little bit so this is going to be back to grass but there's also going to be some gravel here so
10:41
I don't know how to handle it. Right? Still managed to work
10:47
And then hopefully right over here you'll get a good angle. You'll be able to see that ramp. Now this does look to be like about, yeah actually, this might not be the best because
10:55
if you see here, this is about like an inch above it so it probably won't work but I'll
11:00
try it anyway to see what happens. Oh! Okay, so the wheels are skidding. Let me see if I put more weight here
11:13
Yeah, I'm not able to do it, but thankfully I'm also not tipping backwards thanks to those anti-tip wheels
11:19
They're actually working literally right now preventing me from tipping Okay, so I can't go up this ramp. So what's next
11:25
I want to try to get back. So let's see if I can reverse It does not let me reverse. Let me try going sideways
11:31
Yep, it does not work. I am officially stuck if I just move around a little bit
11:40
Alright, so I reached its limit. It's officially stuck, so this is when you'd have to ask for help
11:45
Or if you are a bit mobile and you are able to get up, then you would have to get up from the chair. And then just move this backwards
11:54
Oh, wow, actually, yeah. This chair's pretty heavy. And right over here, you can also see the marks
12:04
where my wheels were so right over here is where those anti-tip wheels were uh oh actually it wasn't
12:09
here or it might be here but either way you can see the marks where it got stuck yeah it dug like
12:14
a hole right over there so let me not do that again but let me go back to the gravel and then
12:20
just go back to the blacktop again of course safety first make sure to put on that seat belt
12:25
every time you go on the electric wheelchair all right let's see if we can handle this incline up
12:33
yeah i can and also by the way quick update battery is still going to be at that 100
12:41
which is good all right and now let's go to the front of the house which is going to be uh right over here and there's also going to be like another pathway also i'm going up the
12:49
blacktop again at this pretty big incline now this pathway is going to be more narrow than what we did below hand
13:01
Now let's say I'm here, I want to turn around. Let's see how easy it is to do so
13:08
Actually, that was very easy. Yeah, this turning radius on this is insanely good. Oops
13:14
I did scratch it a bit on this edge over here, but I'm fine. Yeah there it is
13:33
Alright, now let's go all the way back up, but this time I'm going to go backwards to
13:37
see if that motor can still handle it. And yep, and you can also hear that beeping
13:42
And while I'm going backwards, I'm definitely going a lot slower than I did going forwards
13:47
which makes sense since it's gonna be more dangerous when I go backwards with
13:52
an electric wheelchair versus forwards. I think I'll keep it right there and now
13:58
I'll leave the camera right here so you can get another angle of me going down
14:01
the hill this time. All right, made it and now back up
14:17
And by the way, this is going to be full speed. But yeah, so far using this electric wheelchair, pretty easy
14:30
I really love that joystick. It's fun to use here. you can see how it is, I just move it upwards
14:36
And also, let me see if I move it a little bit. I can also control the speed if I don't go all the way back
14:41
But in this case, if I go back, I'm going to go as fast as possible. So it's good that you can have some more manual adjustments
14:51
versus just relying on whatever speed it is you can control. And then there you can see how it break
14:55
It breaked while me going down the hill. All right, but now let me park this thing back over here
15:02
so I could show you how to fold this up. All right, so now we're back to where we started right over here
15:10
Now to get out, make sure to take off that seatbelt. Move up, and there it is
15:16
Also, yeah, moving this electric wheelchair backwards isn't really that easy, probably because it's not meant to do that
15:21
Now let's see how easy it is to put this away. So I'll start by turning it off
15:25
So right down over here, power button, hold it. Oh, actually, one more thing I forgot to mention is going to be this light
15:30
so right over here you can see the brightness of it i tap it or it's off so it's got one two three
15:37
three different settings i'll leave that on for now there i'll turn this off by holding the power
15:41
button and now it's time to fold this up and i'm going to start by removing that battery
15:46
so i'll take this off pull the battery upwards and there and i believe this can be yeah this is
15:54
pulled up yeah this pulled upwards oh yeah forgot i have to pull this down
16:00
so then this can go down like so oh and then the legs go upwards
16:05
oh okay yeah why did this feel harder actually i think yeah i think from me doing this it felt like it was
16:17
easier so when i tipped it to the side here and then gave this a push it'll be easier to like kind
16:22
of squeeze it and so this way this is as thin as it'll get and if you want to put it at the back
16:28
of a trunk then you can so I'll put it in my rav4 here all right so this is going to be a 2013
16:35
toyota rav4 and I do have some other boxes in here so I'll just move them out of the way for now
16:39
all right there it is and let's see how easy it is to move this so I'll start
16:44
with the battery just put this off to the side right there and now the rest of that wheelchair
16:50
yeah and it's able to fit just like that and of course when you're transporting this moving it
17:00
around make sure to tie this make sure to secure it in place otherwise this is going to roll around
17:04
and you probably don't want to tilt it to the side especially if you have some accessories on
17:08
the side here so yeah this would have to be tied up and then it's ready for transport use
17:13
and then likewise to take it off to take it out just like that and then we can open this back up
17:22
by pulling it out pulling those two upwards pushing the feet down then right over here
17:30
actually no I won't use my foot I'll use my hands to push this down a little bit more
17:34
there just like that and push this down too and there now it's ready to be used
17:42
So overall I'm pretty happy with this electric wheelchair. Controls are easy to use
17:46
I'm a fan of this joystick knob, super simple. It's got good accessories, but yeah
17:51
if you're looking for electric wheelchair, definitely check this one out
Computers & Electronics