Up next in 10

Angular 13 ngx-avatar Example to Create Social Media and User Profile Image Avatar in TypeScript
Dec 22, 2025
Get the full source code of application here:
https://codingshiksha.com/angular/angular-ngx-avatar-example-to-create-social-media-profile-avatar-cards-in-browser-using-typescript/
Show More Show Less View Video Transcript
0:07
Uh hello friends. Today in this tutorial
0:09
I'll be showing you that uh how to
0:11
create uh profile image avatars from
0:14
social media handles or you can also
0:16
upload your custom image and create the
0:19
avatars. So this will be doing it inside
0:22
the angular application. So basically
0:25
this is the uh library that we will be
0:27
using here which is called as ngx
0:30
avatar. So you just need to install this
0:32
by using this command which is npmi ngx
0:35
avatar. And basically you can build out
0:38
these cool little avatars with the
0:41
images. Also you can provide a
0:43
background color to it with the white
0:46
text over it with the first name and
0:49
last name. So it will automatically
0:52
create these uh profile avatars here.
0:57
You can change the color accordingly,
1:00
change the background color accordingly.
1:03
So it supports various social media
1:05
websites such as Facebook, Google,
1:07
Twitter, Instagram. So you just need to
1:09
put the user ID of these social media
1:12
handles and then automatically this will
1:14
create these uh profile image avatars
1:17
for you. [snorts]
1:19
So this is a very handy library. Let me
1:22
show you a very sh little example here.
1:25
So basically you can see that here you
1:27
just need to put your uh initials here.
1:30
So John do is there. So if I change this
1:33
name to K Williamson. So you will see
1:37
that now this is changed to KW because
1:40
we have written Ken Williamson. So if I
1:43
change to Kane Leam so it will change to
1:46
KL. So you will see that and depending
1:49
upon which color you want to use you can
1:52
also change the color you can change the
1:54
background color to let's suppose black
1:58
like this you can change the background
2:00
color as well so
2:03
so we will be looking at this uh
2:07
library how to use this library so here
2:10
you can just uh use a very simple
2:14
website which is code sandbox box which
2:16
lets you create uh angular applications
2:20
without having to locally
2:22
install Angular. So simply create
2:25
account, click on new sandbox, select
2:28
angular and simply it will create the
2:32
angular application for you. So after it
2:35
creates that you just need to install
2:37
that dependency which you can see here.
2:40
Just click on add dependency and search
2:43
for this dependency which is ngx avatar.
2:47
So basically this dependency will come
2:49
simply click this. So basically it will
2:52
install this dependency in the
2:53
background. So now basically it is
2:56
installing it.
2:58
So once it is completed so now to
3:00
include this dependency it is very easy.
3:03
The steps are given to you. I have also
3:06
given the blog post inside the video
3:08
description. So if you want to follow
3:10
along with all the source code, you can
3:12
go to the video description link. This
3:14
is the blog post I have written here.
3:16
Step-by-step instruction is given. So
3:17
just go to the video description link.
3:20
Just go to this addit option and this is
3:23
the source code I have given. So simply
3:26
go to it and first of all hit the like
3:28
button, subscribe the channel as well
3:30
guys. So now what we need to do is that
3:33
you need to include this library.
3:36
So for including this library it is very
3:39
easy. They have given the instruction on
3:41
how to do this. So if you see that
3:48
just type this library ngx avatar.
3:55
So after you add this guys you need to
3:57
go to your uh app.module.ts
4:00
file inside your angular project. So
4:03
basically let me go to it.
4:08
So just go to the app folder app
4:11
dotule.ts file and here you need to
4:14
simply paste this line which is avatar
4:16
module. We are importing it from this
4:17
library and just add it inside the
4:20
imports array which is uh avatar
4:24
module. So just you need to make this
4:27
slight modifications. Simply close this
4:29
file. We don't need this. And uh after
4:32
this [snorts] after you included this it
4:35
becomes very much easy now. [snorts]
4:38
Now now you just need to
4:41
simply
4:43
declare uh this go to your
4:46
app.component.html
4:48
file and simply what you need to do is
4:50
that declare ngx
4:53
avatar.
4:55
So basically this is a tag here. Simply
4:58
close this and inside this guys you can
5:01
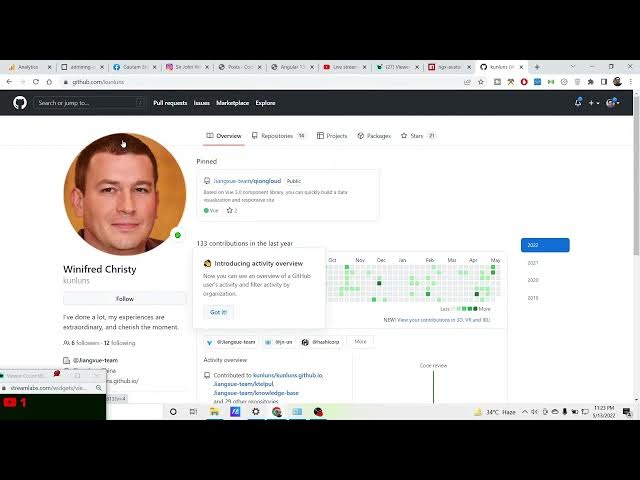
provide your GitHub ID
5:04
in order to get the GitHub uh profile
5:06
avatar. My ID is 1 2 3 4 5 6. So
5:10
basically if I refresh it now on the
5:13
right hand side what you will find out
5:15
that
5:19
so
5:20
some error is there.
5:29
Uh for this guys you also need the HTTP
5:31
client module. So basically it is uh
5:34
just doing in the background HTTP
5:36
request. Go to app.module.ts. simply
5:39
also import the HTTP client module and
5:42
add it inside your uh imports array. So
5:47
now basically if you add this you will
5:48
see on the right hand side this is the
5:51
profile avatar image is showing here of
5:53
GitHub. I can zoom in also. Uh let me
5:56
just show you.
6:00
So you can see that guys this is the
6:02
profile image. You can also open this
6:04
image in new tab.
6:09
You can also save this image. So
6:12
basically the image has been
6:13
successfully saved. So this you can do
6:16
this for any social network guys. Simply
6:18
you need to put the ID, Facebook ID,
6:21
Twitter ID, Instagram ID, any ID of your
6:23
choice, Google ID. So basically it will
6:26
automatically put the avatar image of
6:29
your so you can do it.
6:34
just search for any sort of username
6:36
that it has.
6:38
Let's suppose I go to this. I want to
6:41
get this. So I will simply copy this
6:44
user ID. Simply paste it inside my
6:47
application. Simply I will replace this
6:49
ID
6:52
and this will change here. You will see
6:53
that now this person avatar image is
6:56
coming. Now to create custom images it
6:59
is it is very easy in order to create
7:02
custom images.
7:06
What you can do is you can write any
7:07
sort of name.
7:10
So if you write this name here you will
7:12
see that
7:16
if I show you here.
7:19
So you need to give this name property
7:21
inside the attribute. So this takes a
7:26
attribute name. So put this value here
7:29
can
7:31
like this. So this will create this
7:34
avatar for you. You can see that.
7:37
So all the documentation is given here
7:39
guys in the video description link. So
7:41
you can go to it and download it.
7:45
And you can also change the size of the
7:47
avatar by providing additional parameter
7:50
to it. So the value parameter so this
7:55
can hold to 75%.
7:58
So this will change to 95 96%.
8:03
So with the help of this you can change
8:05
the size as well of the image
8:11
and uh also you can upload a custom
8:15
image.
8:16
So this is very handy because uh many a
8:20
times you need a custom image. So inside
8:22
your assets directory you can uh
8:26
download a image. So let's suppose uh I
8:30
want a custom avatar.
8:33
So I go to my website and and I download
8:36
my profile pick. So simply I will
8:39
download this image. Save this image in
8:42
the downloads directory. And if I want
8:45
to upload this, I will simply upload
8:48
this to the assets directory.
8:53
So it is uploading this this image. So I
8:57
can rename this image to
9:07
profile
9:13
dot jpg. So what you can I can do guys
9:16
you can see I can change this to assets.
9:20
So inside this we have profile jpg. So
9:23
now basically you will see that my
9:25
custom image is showing here. You will
9:27
see that this is a custom image. So in
9:30
this way guys you can create custom
9:32
avatar urls inside your angular
9:34
applications with the help of this ng
9:36
avatar library and this supports various
9:40
options. You can try it with own with
9:43
your own for Instagram, Twitter. You
9:45
just need to put the ID of that person
9:47
automatically it will fetch the avatar
9:49
image. So all the various social
9:52
networks it supports and uh also you can
9:57
also change the background color as well
9:59
if you want to simply go to your
10:01
app.component.ts
10:03
file and simply you need to import this.
10:06
So
10:10
inside your this one
10:12
you can change the avatar colors.
10:28
So this needs to be done inside uh the
10:32
sorry this needs to be done inside your
10:35
app domodule.ts file. So simply what you
10:38
can do is that follow the documentation.
10:41
So right here at the very top you need
10:43
to include this. So the colors will be
10:45
changed here. So you will see the
10:47
background color has changed.
10:59
So this is a full library guys. The link
11:02
will be there inside video description.
11:03
Please hit the like button, subscribe
11:05
the channel and uh I will be seeing you
11:08
in the next tutorial.