Up next in 10

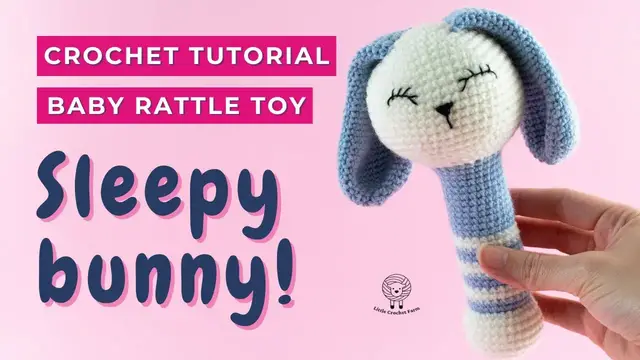
Complete tutorial for this sleepy bunny crochet toy pattern for baby!
Chapters:
0:00 Bunny amigurumi crochet toy intro
0:43 Head (rows 1 to 22)
11:51 body (rows 23 to 49)
16:52 body ending (rows 50 to 59)
20:57 bunny ears
26:46 ears assembly
30:39 embroidering the eyes
32:34 embroidering the nose
You can find the complete Bunny amigurumi crochet pattern free on my website here:
https://littlecrochetfarm.com/bunny-amigurumi-rattle-crochet-pattern/
For a low cost (3 USD) and printable pattern, you can find it here:
Etsy: https://www.etsy.com/listing/1022526081/bunny-crochet-rattle-toy-pattern
Ravelry: https://www.ravelry.com/patterns/library/sleepy-bunny-rattle
If this video was helpful to you, consider supporting my channel by doing one of these little actions below:
Show More Show Less View Video Transcript
0:00
Hello there, my name is Anna, welcome to Little Crochet Farm. I'm going to show you how to make
0:13
this sleepy crochet rattle bunny. You can make as a rattle or as a softie if you don't want to add
0:19
the rattle noise. For this pattern you're going to use two millimeters crochet hook, yes you can see
0:28
and I use 100% acrylic yarn because I like the soft touch but you can use any
0:35
yarn of your preference. We are going to start with the magic ring and six single
0:42
crochet in a magic ring. If you need a tutorial teaching specifically how to
0:48
make the magic ring there is a link down below that you can go and check it out
0:52
it's very detailed showing how to make a magic ring. So here I'm going to start
0:59
making six single crochet inside. I always like to count the amount of my stitches at the end of each row just to
1:31
make sure that I have the correct amount. So close nicely your magic ring and
1:37
let's move on for the row number two. For the second row you're going to make six
1:44
increases, which mean you're going to make two single crochet inside the same
1:50
stitch, having a total of 12 stitches at the end of the row
2:09
So here again at the last stitch of this row. Make sure to close nicely your magic ring and to tight the beginning of the yarn so it will not be unraveled
2:45
Now I'm going to add here my stitch marker. I use a random piece of different
3:04
color yarn than the one that I'm working with, because I think the plastic stitch
3:08
marker can stretch a little bit your stitch, so I use a piece of yarn. So for
3:14
On the third row you're going to make 1 sc and 1 increase and repeat this for 6 times in total, having 18 sts at the end of your row
3:44
So here we are, I'm gonna add the stitch marker and move on for the fourth row
3:53
For the fourth row you're going to make two single crochets and one increase
3:59
repeat six times having a total of 24 stitches at the end of the row
4:05
And so on we are going to be working this, 3 single crochets, 1 increase, 4 single crochets, 1 increase, repeating 6 times
4:18
which means that you're going to add 6 stitches in every row until you have 54 stitches in total
4:28
I'm going to be showing you here, a little bit fast forward
4:40
Thank you
5:10
Now we're going to start the row number six, four single crochets, one increase
5:19
repeat six times. At the end of this row you must have 36 stitches
5:40
Thank you
6:35
6 sc, 1 increase, repeat 6 times. At the end of this row you must have 48
6:42
stitches. And then we will be going to next row which will be our last row of
6:48
increases. Row number 9, 7 sc, 1 increase, repeat 6 times and at the end
6:56
you should have 54 stitches. So we finish with increases and now comes the simple part
7:36
We are going to start working only in single crochet around the row without making creases
7:43
This will give the height of the head of our bunny. We will work only in single crochet and make from row 10 to 17, 54 stitches in each row
8:02
So you'll have 8 rows in total without increasing. Like this. Here we have 4 rows and let's move on for 4 rows more
8:32
I am now finishing my row number 17 I just finished to make eight rows of 54 single crochet
8:45
you can see, and now we are going to start the decreases. For next row you're going to make seven
8:55
single crochet and one decrease. You're going to repeat this pattern for six
9:00
times and at the end of the row you will have 48 stitches
9:25
For the next row you're going to make
9:54
six single crochet and one decrease. You're going to repeat for six times
9:59
having a total of 42 stitches. And then pattern will continue decreasing in
10:08
in every row six stitches. So here I'm arriving at the end of this row
10:24
And moving on for next row. So you're going to make five single crochet, one decrease
10:31
1 decrease, repeat this for 6 times having a total of 36 stitches
10:53
and roll 21, 4 single crochet, 1 decrease, repeat 6 times having a total of 30 stitches at the end of your roll
11:23
And now we arrive at, finally, at the last row of the creases for now
11:29
Three single crochet, one decrease, repeat six times, and you're going to have 24 stitches at the end of this row
11:39
And here, in the last decrease, you're going to make your color change to the other color you choose
11:49
In this case I picked the blue. For color changes I also have a video showing three ways that you can make the color changes
12:01
The link is below on the description of this video. So here you can do it with me
12:10
But in the video I can show you in detail which are the ones that I prefer the best
12:15
For this row you're going to work only in the back loop of the stitch and you're going
12:24
to make 24 back loop slip stitch. Also, for the slip stitch there is a video tutorial showing you how to make it
12:36
So I arrived here at the last stitch of this row and right now the shape should be something
12:50
like this. We are going to start now to make the handler
12:58
So you can cut your yarn, finish off. I like to make a simple knot so all the yarn are connected
13:11
You start adding stuffing material. I like to add a lot of stuffing material until the shape is very round, but it's still soft
13:23
So, next row we are going to work at the remaining front loop of the previous row
13:45
And we are going to work in the front loop making single crochet
13:51
So you're going to make 24 front loop single crochet. Now you're going to start working rounds without increases or decreases, so from
14:37
roll 26 to 37 you're going to make 24 single crochet. All right, so I will see you at the end of these rolls
14:51
Start adding stuffing material, it's much better if you go adding the stuffing
15:01
materials along the way instead of adding just at the end. For the rolls 38 and 39 you're going to work with the white yarn. This will
15:21
make the stripes that you saw at the beginning of the video
15:26
And for the row 14 and 41 you're going to work in blue
15:56
Now we are going to repeat the rows 38 to 41
16:25
two times. Okay, so I'll catch you up at the row 41
16:47
And here we are finishing our stripes. You're going to change your yarn to a
16:54
white color. And again you work with back loop slip stitch. So you're going to make 24 back
17:38
again work at the remaining front loop as you can see and we are going to make
17:46
increases so you're going to do 3 single crochet, 1 increase and repeat 6 times
17:53
Remember to work in the front loop of the yarn that it's remaining of the row 49
18:08
Now we arrive at the last stitch and I put my stitch mark here and we are going to work
18:25
without increasing for 5 rows. So for 5 rolls, we are going to make 30 single crochet in each roll
18:59
We are going to start decreasing, so roll 57 you're going to make 3 single crochet
19:12
1 decrease, repeat 6 times having a total of 24 stitches, and for roll 58 you're going
19:19
to work 2 single crochet, 1 decrease, repeat 6 times having a total of 18
19:25
stitches. Stop a little bit for adding stuffing material before continuing to
19:38
the next row. So for the next row you're going to make 1 single crochet and 1
19:46
decrease and this will be our last row. Repeat six times and you're going to
19:52
have a total of 12 stitches. Now we arrive at the end of the row, you cut the yarn and add a little bit of stuffing
20:20
material if necessary, if you want to make it more stuffed, and with the sewing
20:26
needle you start fastening off. I show how I do my fasting off in the link down
20:35
below, but basically I just insert my needle in the front loop of the two next
20:43
stitches and I close it all. Now we start working on the years so we are going to make six single crochet in
21:03
the magic ring. Following up with the six increases, having a total on the second row of 12
21:30
stitches. Moving on for the third row, one single crochet, one increase, repeat six
21:49
times and you'll have a total of 18 stitches at the end of the row
22:00
So for the next two rows I'm going to continue making creases so for row 4 and
22:08
and 5 you're going to have 24 and 30 stitches. Now you're going to work 4 rolls without making an increase or decrease
22:26
So 30 single crochet along the way until you have 4 rolls
22:31
For roll number 10 you're going to start decreasing. So for this roll you're going
22:41
to make eight single crochet, one decrease and you're going to repeat for three times
23:01
After that, for the row 11 and 12, you're going to work 27 single crochet
23:20
For the next row again, we're going to decrease 3 stitches, so 7 single crochet, 1 decrease
23:27
going to repeat three times, having a total at the end of this row of 24 stitches
23:34
For the row 14 and 15, you're going to work without making decreases, just 24 single crochet
24:04
And for roll number 16 we are going to make 6 single crochet, 1 decrease, repeat 3 times
24:24
a total of 21 stitches at the end of the roll
24:50
and for a row 17 and 18 you're going to work 21 single crochet
25:08
now we are going for our last row with the creases so five single crochet one
25:16
decrease, repeat three times. At the end you should have 18 stitches
25:33
Now we are going to work from row 20 to 31 18 single crochet. This will give the
25:41
height of our ear If you want to make the ear longer or shorter you just increase or decrease the number of the ropes
26:00
and here we have our finished ear you can fold it making it flat so you have a nice
26:07
shape of a ear, a little bunny ear. Cut your yarn, leaving a little bit of space
26:16
for you to sew it at the end in your toy. And make another one, following up the same directions. So now you should have
26:35
two ears. So now let's take our toy, here is the backside, so we face to the back, we
26:49
take the ears and see what is the best position. Here you can sew it where it
26:55
looks symmetrical to you or you can follow where I sew it which was in the
26:59
between the row number four and five. I like to use pins to fasten the ear while
27:09
I'm sewing it. So here this looks very nice to me. Let's attach the other one
27:17
following up in the same row And this looks good to me and we can see that the back is right in the middle, nice
27:49
So now we start sewing the year in the toy. I take one stitch in the middle of two rows and I sew stitch by stitch from the year
28:01
So in this case I had 18 stitches before so I folded in a way that I have 9 stitches on
28:09
one side, 9 stitches on the other side. So right now I'm sewing 9 stitches from the top part
28:53
And now I'm going to move on to sew the stitches from the down part of the year. Okay
29:24
So very simple again I pick one stitch in between the rows
29:32
and one stitch from the year and repeat that in every stitch of the year
29:50
So, when you finish sewing all the stitches from the ear, fast enough, cut the remaining
30:11
yarn and here you go! Very nice and time to sew the other one
30:18
This is how you should be looking like after you sew both ears
30:24
You can sew the back part also of the ear and on the head of the bunny, but I like to
30:28
leave the ears
30:39
Now I search for a nice spot of the eye, where it looks symmetrical to me
30:45
the pattern of the bunny you can see the exact roll that I embroidered the eye and
30:52
how many stitches in between them. So now I'm gonna show you how to make the
30:57
sleepy eyes. So to make this shape I leave three stitches between one edge to
31:07
the other. So insert the needle And here you're gonna count 3 stitches in the middle and put on the 4th stitch
31:32
And you're going to start embroidering the eyelashes, so I make in this sleepy bunny 4
32:11
And there you go
32:24
This looks very nice to me, this sleeping bunny rattle. You can stop it here or you can add the little nose, which is what I'm gonna do next
32:41
Now you find the middle part of the face of the bunny and you embroider a triangle
32:59
After you embroider the triangle you start embroidering lines so you cover the white
33:09
spot there is in the middle of the triangle. And you finish by adding a line at the edge of the triangle
34:09
and there you go your sleepy bunny rattle is ready I hope you enjoyed this
34:18
toy and thank you very much for being here with me
#Visual Art & Design
#Crafts
#Fiber & Textile Arts
#Ceramics & Pottery