Up next in 10

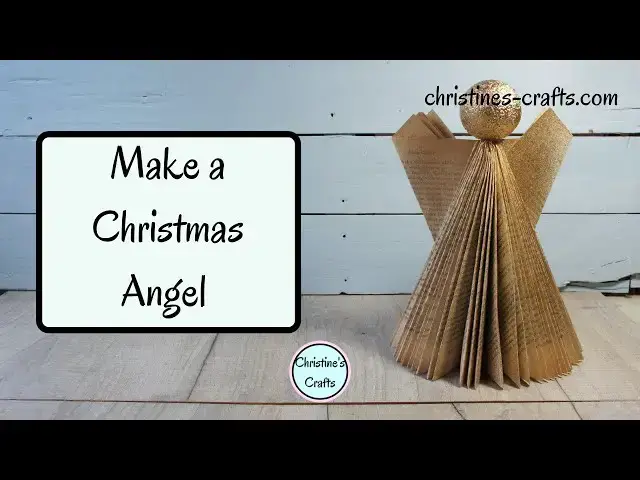
DIY CHRISTMAS ANGEL DECORATION FROM A BOOK - Make Xmas Decor with Style on a Budget
Jan 15, 2025


Are you trying to make a fabulous Christmas on a budget? Then look no further. Make yourself some stylish DIY Christmas angels from old paperback books. These are really easy to make and cost you virtually nothing.
This video will show you exactly how to make yours today.
To make your angel you will need:
a paperback book
a small ball (polystyrene, cardboard, wood, etc)
Glue
Paint (optional)
If you want to see written instructions then take a look at my tutorial on the blog at https://christines-crafts.com/folded-book-angel/
If you are looking for lots of Christmas decorations inspiration then take a look at all my Christmas videos at: https://www.youtube.com/playlist?list=PLJDvtpQDF0PftYyvRR0ID_iVKyZ9k1FO5
Good luck with your Christmas Angel! Let me know how you get on in the comments below.
Show More Show Less View Video Transcript
0:00
do you want beautiful christmas decor
0:02
but you're on a budget
0:03
make this stunning christmas angel today
0:05
for virtually no cost
0:07
what about a pair to go on your
0:08
mantelpiece or dining table on christmas
0:10
day
0:11
i'm christine of christinecrafts.com and
0:14
i'm going to show you how to make yours
0:15
today
0:18
so without further ado what will you
0:20
need some sort of ball for the angel's
0:22
head i suggest a polystyrene or a
0:24
styrofoam ball but any light bulb that's
0:26
the right
0:27
size to look in proportion to your book
0:29
will be fine
0:31
you're gonna need a paperback book where
0:33
the spine's still holding the pages
0:35
together
0:36
you'll see i've only got half a book
0:38
because that's all you need
0:40
you need about 150 pages
0:43
so i use the other half to make a
0:45
christmas tree
0:47
you'll see on the list you need glue and
0:49
i've put paint optional
0:50
obviously mine was painted gold but you
0:52
can leave it without
0:54
so to start with take just one page
0:58
and fold the top corner down to the
1:00
spine
1:01
and get a nice crisp fold and then
1:04
fold that edge to the spine again
1:08
make sure you've got a nice crisp fold
1:11
now the bit sticking out the bottom of
1:12
the book
1:13
fold it up and tuck it in between that
1:16
one page
1:17
and the rest of the book make sure it's
1:20
all nice and crisp
1:22
and open it out so we'll go through that
1:25
again
1:26
take your top right hand corner bring it
1:29
down to the spine
1:31
nice fold go again
1:34
smooth it down nice crisp fold
1:38
the bit that's sticking out the bottom
1:40
tuck it up
1:42
and make a nice fold so you're going to
1:45
repeat that
1:46
so that you have 20 pages folded just
1:49
like that
1:50
just 20 okay
1:54
so just keep folding keep folding keep
1:58
pressing
1:59
keep making sure the nice crisp folds
2:02
until you've got 20 of them
2:04
and then once you've checked you've got
2:07
20
2:08
we're going to make the first angel wing
2:12
very simple instead of looking at your
2:15
top corner
2:16
we're going to use the bottom corner and
2:19
we're going to fold it up to the spine
2:21
again we're still making sure we get
2:23
right into the spine
2:24
nice crisp fold and fold that into the
2:27
center of the book again
2:30
nice crisp fold and do not tuck the top
2:33
in
2:33
leave it sticking out the top of the
2:34
book that's what's going to cause you
2:36
nice
2:36
wing open it out
2:39
and repeat now we're going to just do
2:42
five of these five pages
2:47
okay make sure it's a nice crisp fold
2:49
the more accurate you are with your
2:51
folds the more accurate your angel will
2:53
be the better your wings will line up
2:56
so it's up to you how much care you take
2:59
okay so we're just going to repeat that
3:00
for
3:02
five
3:09
and then just check those are nice
3:11
you're happy you've got five
3:13
and you're going to go back to the
3:14
original fold so let's just run through
3:16
it
3:16
top corner down to the spine fold that
3:19
edge in again
3:22
you'll notice it's starting to get a
3:23
little bit harder to get into the spine
3:26
persevere just keep going
3:29
and tuck that bottom under get a nice
3:32
edge
3:33
and repeat and you're going to keep
3:35
going until
3:37
you've got 25 pages left
3:40
okay so just count do a quick check 25
3:43
pages left
3:45
and we're now going to form the other
3:47
wing for the angel
3:49
so fold it up from the bottom into the
3:52
spine nice fold
3:54
fold it again into the spine and leave
3:58
the top sticking up
4:00
you won't be surprised to learn five of
4:03
those
4:03
because we're doing an angel's wing to
4:05
match the other one
4:07
so just five pages folded this way
4:12
and then we should have two wings
4:17
and you should have 20 pages left
4:23
and those 20 pages you've got left we're
4:26
going to go back to folding down from
4:28
the top
4:30
so again fold down from the top to the
4:32
spine
4:34
fold that edge in again you'll find it's
4:37
getting really difficult by now
4:39
because the ones that you've already
4:40
folded are getting in the way
4:42
but do make sure you keep trying to get
4:44
right into the spine so you get a nice
4:46
end product so repeat for all
4:49
20 pages
4:53
and then you should have no pages left
4:55
that have not been folded
4:59
and when you stand it up it's not going
5:00
to look quite like the angel you were
5:02
hoping for
5:03
so you might need to do a little bit of
5:05
tweaking you can see one of my pages is
5:06
unfolded there right at the end
5:09
so just run your fingers down them
5:11
smooth any that you need to smooth
5:14
and then look at it and think well do i
5:16
want my wings there they're a little bit
5:17
too far back for me
5:19
so i'm going to fold them forward
5:22
slightly
5:23
there we go and now you can look at all
5:26
those folds you've made
5:27
and line them up how you want and all
5:30
you've got left to do now is put your
5:32
head on
5:32
so if you're not doing any painting you
5:34
can glue your head on straight away
5:37
however if you're thinking of painting
5:40
got some advice for you
5:42
if you're using a polystyrene or a
5:43
styrofoam ball
5:45
they really really do not like
5:47
aggressive paints like spray paints
5:50
so i recommend to get the effect i got
5:52
on mine
5:53
to give it a coat of some sort of
5:56
water-based cut
5:57
paint an emulsion a primer undercoat
6:00
one of those sorts of paints you can put
6:03
several coats on
6:05
the more coats you put on the less the
6:08
spray paint will damage your ball
6:10
now if you're using a cardboard ball or
6:13
a wooden ball you won't have this
6:14
problem
6:16
so once you've got it how you want it
6:19
you're going to spray
6:20
paint it now i'm not going to show you
6:21
this because i do it in my garage with
6:23
the door wide open with lots of
6:24
ventilation and it's not a good place to
6:26
film
6:27
but i'm just using a standard metallic
6:30
effect
6:31
spray paint so i'll spray paint spray
6:34
paint the ball
6:36
and the book so then all you need to do
6:40
apply some glue to the ball apply some
6:42
glue to the top of the angel
6:44
and stick your head in place if you want
6:47
more decorations on your angel then you
6:49
can go for it but i've just left mine
6:51
so you can still tell it was a book but
6:53
it's nicely gold
6:55
so thank you for watching please if you
6:58
want to make a christmas tree watch the
6:59
video that's appeared on the screen now
7:01
please subscribe to my channel give me a
7:03
thumbs up thank you
Arts & Entertainment
Visual Art & Design
Hobbies & Leisure
Crafts
Crafts
Home Improvement
Sculpture
Party & Holiday Supplies