0:00
A fabulous thing to be able to do when
0:02
you're doing your hamburg embroidery is
0:03
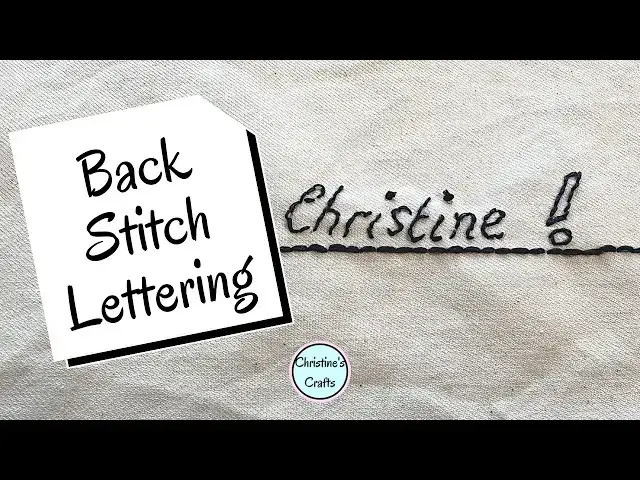
to write like I've done here. Sewing
0:06
forever housework whenever we all
0:08
relate. So we use back stitch for that.
0:11
So that's what we're going to do today
0:14
is go through how to do back stitch to
0:16
do our writing or anything else we want
0:18
to do. So the first thing I'm doing is
0:20
separating my thread because I like to
0:22
use the three strands, not all six. Now,
0:25
if you're going to do it like me where
0:26
you hold it, separate it, and then run
0:28
your finger down, try and hold it
0:30
vertically. Obviously, I can't do that
0:31
because I'm trying to show it you. But
0:33
if you hold it vertically, it can all
0:35
untwizzle at the bottom, and it'll be
0:37
dead easy. So, once you've got your
0:40
thread the right number of strands for
0:42
you, and that does depend on your
0:43
project, but three strands is quite
0:45
nice. Just thread your needle. And you
0:49
could just wet it and poke it through.
0:50
Or like I do, I wrap it round tight and
0:52
then poke that through.
0:55
And then a knot in the end. I know
0:57
that's a little bit controversial. Some
0:59
people say you shouldn't use knots in
1:00
embroidery. My mom always told me just
1:03
use a knot if you want to. So that's
1:05
what I do. Now your back stitch can go
1:08
either way. Depends which way around you
1:09
choose to sew. I like to go right to
1:11
left. So, I'm going to come up at the
1:13
start of the back stitch, which is how
1:16
you start, and just bring the knot to
1:18
the back, just so it sits nicely on the
1:21
back of the fabric. Go forward as if
1:23
you're doing a running stitch. So, go
1:25
the length of the stitch you want, and
1:27
then come up the same distance again.
1:29
Now, don't get hung up on this. You're
1:31
going to try for the same length.
1:34
So you've got a little running stitch,
1:36
but instead of carrying on, go back and
1:38
go down through where the last stitch
1:41
went down and then come up the stitch
1:45
length further on again beyond the
1:47
stitch. So we're going to do that again.
1:49
So we're going down and then back up.
1:52
And we're constantly keeping that stitch
1:55
the same length. Now you'll see I do it
1:58
in one fluid movement because it becomes
2:00
a lovely way to sew. And if you hand sew
2:04
seams, this is a great stitch for using
2:07
because it keeps everything nice and
2:09
secure. Uh, now we're using it for
2:11
embroidery, but you can use it in that
2:14
way. So, you're always going back to the
2:16
last stitch, going down, and then coming
2:19
up. Now, you'll see over here I've done
2:21
some writing that's joined up, but I
2:24
will show you in this video how I do my
2:27
writing and some little hints and tips.
2:31
So, I've sped this bit up so you can
2:33
just see me working my way along.
2:36
You'll also notice all the other
2:38
stitches on this page. Um, so you'll
2:40
find all of those on my channel. So,
2:43
hopefully you're following along with
2:44
me. If not, go and look for them and you
2:47
can use them all in whatever project you
2:49
like, but especially your stitching
2:51
book, which is what you can see I'm
2:52
working on a page of here.
2:55
So, just keep moving along your back
2:58
stitch. Try to keep your stitches the
3:00
same length, but as I say, don't stress
3:02
about it. But try and make sure you go
3:04
down through the same thing so you don't
3:07
end up with gaps. And then at the end,
3:10
just go back down as you normally would,
3:11
but just don't come up again. So then
3:14
you've got a complete row of back
3:15
stitch. And we'll finish off by running
3:18
through a stitch on the back. And then
3:21
if you want to get a nice secure knot,
3:23
just put your needle through the loop
3:25
that you make. And then you can run
3:27
through a few stitches. It's just about
3:29
making sure it's secure and it's not
3:30
going to come undone. So you'll see I
3:32
often like to do that. And then simply
3:35
cut off your thread and you've completed
3:40
So let's turn it over and it's done. But
3:45
what about writing? It's exactly the
3:49
same way, but you might just want to
3:51
have a little think about different
3:53
length of stitches, where you start,
3:55
where you finish. So, you can see this
3:58
is what I started. And I'm just going to
4:01
start at the beginning, right at the end
4:02
of one of the letters,
4:05
and I'm just going to form the back
4:06
stitch. Now, you're thinking, but you've
4:08
drawn on your fabric. Yes, I have. Now,
4:11
what I'd suggest is if you're going to
4:12
use a pencil, do it nice and light.
4:16
I've used a heat erasable pen. I will
4:19
link to it in the description below. So,
4:22
what it means is when I finished, I can
4:24
place my work face down on the ironing
4:27
board, put a thin towel on the back. I
4:29
tend to use a tea towel. You might call
4:31
it a dish towel. And then just press it
4:34
and the blue will disappear.
4:37
Okay. So, I keep the heat low. You don't
4:39
need much heat and it disappears.
4:41
Technically, you're supposed to be able
4:42
to just rub it and it disappears. But as
4:45
you can see, I'm just working my way
4:47
around the letter using my back stitch,
4:49
but I'm using rather small stitches
4:51
because an S is very curved. Now, when I
4:54
come to the H, I'll probably use some
4:56
longer stitches because it's nice and
5:00
but I'm just working my way around. I'm
5:02
not going to show you all the letters,
5:04
obviously. I'm just showing you how easy
5:07
it is. I'm also working without a hoop.
5:11
Obviously, if you've got a hoop, it's
5:13
great. It keeps everything nice and flat
5:15
and it's a really good idea for
5:16
embroidery, but I'm doing pages for a
5:19
book and it might be in future that I'm
5:21
working in a book. So, I'm just
5:23
demonstrating it without a hoop and not
5:25
everybody's got one. So, I'm just going
5:28
to show you this S and I hope you can
5:31
see how it's appearing. And then I'm
5:33
literally just going to come up on the
5:35
next letter and then do exactly the same
5:38
again on the next letter. So you can
5:39
have joined up letters and keep flowing
5:41
or you can have separate letters and
5:43
jump. But whatever happens, you end up
5:45
with this great thing here. So good luck
5:48
with yours. Let me know in the comments
5:49
below what you're hoping to embroider
5:51
with your back stitch.