Up next in 10


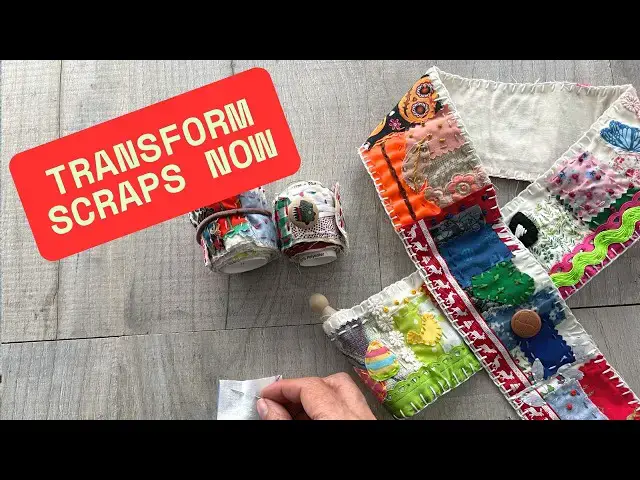
In this slow stitching tutorial, I'll show you how to make a beautiful Four Seasons Embroidery Roll using simple stitches and fabric scraps. You don't need expensive materials — just ordinary fabric, thread, and a needle. Use up those fabric scraps.
I've created a free printable with a whole load of shapes you can cut out, so you can stitch along without any design stress. We'll work through each season step by step, building your hand embroidery skills as you go. This is perfect if you're new to embroidery or you just fancy a relaxing, mindful project. What you'll need:
Fabric scraps (cotton works beautifully)
Embroidery thread or regular sewing thread
A needle
Scissors
Peg / Cotton reel / cardboard roll
The free printable - optional (linked below)
This is all about using what you've got and having a little bit of fun with it. There's no right or wrong way — make it your own.
Download your free printable: https://christines-crafts.com/welcome-to-christines-crafts/
--------------------------------------------
Enquiries: [email protected]
--------------------------------------------
➡️ Want to see loads of written tutorials too? If yes, click here: https://christines-crafts.com/
🆓 Access my entire resource library for free: https://christines-crafts.com/enjoy-the-craft-gardening-resource-library/
--------------------------------------------
If you enjoyed this, why not try our other slow stitching tutorials? Subscribe for more budget-friendly craft ideas delivered straight to you.
Get vidIQ to grow your channel faster! 🚀
https://vidiq.com/ChristinesCrafts
Show More Show Less View Video Transcript
0:00
Have you ever wanted to make something
0:02
that captures the whole year? Well,
0:04
that's what we're going to do here.
0:06
We're going to make a slow stitching
0:08
roll.
0:09
And it's going to represent all four
0:11
seasons.
0:13
So, we're going to have winter.
0:15
We're going to have autumn.
0:19
Summer.
0:21
And of course, spring.
0:23
It's going to be packed full of ideas
0:24
and I'm going to show you exactly how I
0:26
made mine. If you're struggling for any
0:28
sort of inspiration or you just want a
0:29
bit of more interest on yours, I've got
0:31
some free shapes you can use that you
0:33
can download. There'll be a link on the
0:34
screen and in the description below.
0:37
But really, this is about using your
0:38
scraps.
0:40
Relaxing and capturing your year.
0:43
So, let's get started.
0:46
As part of this project, I've made some
0:47
shapes that you can use to cut out for
0:50
the different seasons. So, you can also
0:52
get that free if you would like to use
0:55
some of those shapes. It just gives you
0:56
some that obviously fit the different
0:58
seasons.
1:00
So, yeah. That you'll get that free as
1:02
well. But you don't need that. You just
1:05
need your fabric pieces and your pair of
1:06
scissors really. You don't have to use
1:08
shapes. You need something to wrap your
1:11
roll around. I'm using a dolly peg, but
1:13
you can use old um cotton threads,
1:16
bobbins. And look, plastic ones work
1:18
just as well as wood. Don't think you
1:20
have to have the vintage.
1:22
And then your actual roll. Now, I've cut
1:24
mine 3 in wide and 39 in long. Which for
1:29
those of you in metric is 7 and 1/2 cm
1:32
by 100. Um but all that really matters
1:36
is that it fits around whatever you're
1:37
wrapping it round. So, you can see I've
1:38
left a bit loose top and bottom without
1:40
roll on it.
1:42
And if you're using a smaller object to
1:44
wrap around, just make it fit.
1:47
It's only so long cuz I'm doing four
1:48
seasons.
1:50
And the only reason there's a hem on the
1:51
end is because I'm using an old sheet.
1:54
It's all about reuse. And here's just a
1:57
little piece I'm going to use to put on
1:59
the end when I put my fastener on. Now,
2:02
I'll talk about fasteners a couple of
2:03
times because you don't have to have
2:05
one.
2:06
You can just put an elastic band or a
2:08
hair band around your roll when you're
2:10
finished.
2:11
Now, because I want to split it into
2:13
four, I'm going to use a heat erasable
2:16
pen.
2:17
So, I'm going to mark the bit that wraps
2:19
around my dolly peg.
2:22
So, that I don't attach anything to it.
2:25
I want to leave that bit plain just to
2:26
stick on.
2:29
Now, you don't have to have a heat
2:30
erasable pen, just use a pencil. Just
2:32
make a tiny mark. It's up to you.
2:35
I just have one, so I like using it cuz
2:38
then I know I can get rid of it.
2:40
I'm not using a square here or anything.
2:42
It's quite imprecise, but I'm marking
2:44
where it starts.
2:46
And then
2:47
what you could do is just fold it into
2:50
half and half again to get your
2:51
quarters. But, I'm an ex-maths teacher.
2:54
So, I'm going to measure mine.
2:57
I'm measuring what I've got left
3:00
once I've got that bit that I'm sticking
3:02
with
3:03
and leaving a bit at the end to put my
3:05
fastener on.
3:07
So, I've measured that.
3:10
Right, I've got
3:12
36 in.
3:15
So, what I'm going to do
3:17
is say I need four seasons, I'll divide
3:20
the 36 by four
3:22
and that gives me 9 in.
3:25
And then I'm going to mark every 9 in
3:27
along the roll.
3:29
Now, if some of you are having a a bit
3:31
of a meltdown there cuz there's maths
3:32
involved, please feel free to just fold
3:34
it in half, mark it, fold it in half
3:37
again and mark it, and that will work
3:39
just as well.
3:41
And again, I'm just doing a line. I'm
3:44
not stressing about lining it up
3:46
perfectly, it being at 90°.
3:49
It's just so I end up with four seasons
3:51
that are
3:53
pretty much the same size.
3:56
Now, the joy of slow stitching is that
3:58
you're doing your own thing.
4:00
So, you don't have to mark anything.
4:02
You can just set off.
4:04
You can do it however you like.
4:06
You also can do these rolls for
4:07
anything. You don't have to have a
4:08
theme, and if you do, it can be anything
4:11
you want.
4:12
So, don't feel constrained
4:15
by what we're doing here.
4:17
I just like to give you some good ideas
4:19
so that you don't start this and think,
4:21
"Well, I don't know what to do."
4:25
So, now we've got four seasons. Let's
4:27
just check. 1 2
4:29
3 4.
4:31
We can start.
4:33
Now, I'm going to start with spring. And
4:35
what I've done is I've got the shapes
4:38
for spring,
4:39
and then I've gathered a whole load of
4:41
scraps and bits and pieces out of my
4:43
supplies
4:44
that I think are spring colors.
4:47
So, I've got ribbons. Ribbons are great.
4:49
Lots of little pieces from other
4:51
projects. And then, I'm just going to
4:54
cut them
4:55
to fit, and then lay them out.
4:58
And
4:59
there's no real plan here.
5:02
I've cut some down, as you can see, and
5:04
I've pinned some of those shapes onto
5:06
some ribbon so I can cut them out.
5:08
And all I'm going to do is lay them on
5:11
and layer them up
5:13
until I like the way they look.
5:15
Now, this is only one way of doing a
5:17
slow stitching roll. Some people just
5:19
set off and do it. I like a bit of a
5:22
plan.
5:23
I'm not sure what that says about me,
5:25
but that's my personality, so here we
5:28
go. So, just for the spring one, I'm
5:30
going to show you how I sort of built it
5:33
up. You'll see I've cut some of them out
5:34
with pinking shears, which stops them
5:36
fraying, which is quite nice, and it
5:38
gives a different effect. Some of them I
5:40
haven't, and it will actually fray the
5:42
edges deliberately because I quite like
5:44
that effect.
5:46
You'll see that I also quite a vertical
5:48
ribbon and it's quite good at the
5:50
beginning and the end of a season just
5:52
to to mark that transition.
5:55
So, this is just an idea of how I might
5:57
do it.
5:59
What you will discover as we go along is
6:01
that I show you plans and then things
6:03
change.
6:05
And that's what slow stitching's about.
6:07
It's about getting in the moment,
6:09
enjoying it, and letting it evolve.
6:13
But, I'm feeling quite happy with that.
6:15
I sort of feel like I want to get those
6:16
flowers in.
6:18
That's a very old ribbon that I've got
6:20
those flowers.
6:22
So, once you've got a plan, photograph
6:25
it.
6:26
That's what I always do. I stop, I take
6:29
a picture,
6:30
and then I can go and slow stitch it.
6:33
So, you can see I've cut my little
6:34
shapes out now.
6:36
So, it is absolutely all ready to go.
6:40
So, I'll peel everything off and I'll
6:42
start with the first shape.
6:45
And I'm just going to stitch it in a
6:47
really simple way.
6:49
Excuse me.
6:51
So, what you can do
6:53
is literally just attach them with a
6:55
little running stitch.
6:57
I'm using embroidery thread and I'm
6:59
using it whole. There's nothing to stop
7:02
you splitting it down into two or three
7:04
threads at a time.
7:06
I'm just using to use the whole thread
7:08
for that chunkiness, that bit of
7:10
texture.
7:11
And for a running stitch, you just go in
7:13
in and out and going round the edge of
7:14
the shape. It couldn't be easier.
7:17
And because it's so repetitive, it is so
7:20
relaxing.
7:22
And you can do the whole thing just like
7:24
that. You don't have to have any great
7:26
embroidery skills.
7:29
Great if you've got them, but it's
7:31
completely optional.
7:34
So, then all you do is just work around
7:35
the shape.
7:36
And then you can carry on and you can do
7:39
that with all the shapes.
7:41
You can use different colored embroidery
7:43
threads. I'm using up old threads off
7:46
all those kits. I mean, who hasn't had
7:48
an embroidery kit or cross stitch kit
7:50
and you've got loads of threads left and
7:52
you keep them, but you've no idea what
7:54
you're ever going to use them for.
7:56
Well, here you go. Doesn't matter how
7:57
short your length, you can use it just
8:00
for one shape or just to put a star on
8:02
somewhere or anything you like. It's
8:05
really good for using up those threads.
8:07
I'm actually using up a whole load that
8:09
my mom gave me in a tin.
8:11
Great big mishmash, all different
8:13
colors, but this is great for using
8:16
them. So, you can see it's just that.
8:18
It's just flat. And then it's time to
8:20
go, right, which one should I put on
8:22
next?
8:23
Well, that's the one I had on the plan.
8:25
Do I want it in the same place? Should I
8:26
lower it down?
8:28
You can adjust as you go along. And I
8:30
just keep referring back to the
8:32
photograph I took. And then I'll just
8:34
keep attaching these on.
8:36
Mainly using a running stitch, but
8:38
sometimes I'll use a little over stitch
8:40
over the edge.
8:41
And this piece of fabric here that I've
8:43
left the edge loose,
8:45
I am actually going to fray the edges.
8:47
And the way I do it is just by getting a
8:49
needle or a pin,
8:50
putting it in the edge thread and
8:52
pulling the thread out.
8:54
And you can do that as many times as you
8:56
like to get a nice frayed edge.
8:59
So, just sew them on.
9:01
And there you go. You'll see it's
9:03
adjusted. It's changed. It's not how I
9:05
planned it, but it's very similar.
9:08
Um and just
9:10
make sure you're happy.
9:12
I love it. I feel it's very spring-like.
9:15
I like my little shapes that I've sewn
9:17
on.
9:17
And I like the ribbon at the bottom
9:19
that's almost like a green grass.
9:23
So, then it's time to think about
9:24
summer.
9:27
So, again, I've got a whole bag full of
9:30
supplies.
9:32
And this time I've gone with pink. I
9:35
think pink should be my theme for
9:36
summer. love pink flowers in the garden
9:38
in summer and I often buy summer bedding
9:42
in pink just so I can have that blast of
9:44
pink.
9:46
I've also got rickrack here. I love
9:47
rickrack. Rickrack from my childhood.
9:51
Absolutely love it.
9:53
So some of that will be going in.
9:55
So it's a case of again cutting it out,
9:59
placing it on and then sewing it on and
10:01
you'll see I've got some sunglasses out
10:03
of black felt cuz I really thought they
10:05
sum up summer for me.
10:07
And you'll see I've got ribbon at either
10:09
end that's just going to separate it
10:12
from the seasons around it.
10:14
So I will simply sew the sunglasses on
10:17
really simply the same as I'm doing the
10:20
other elements but then I might add some
10:22
embroidery detail at the end.
10:25
So you can see we've got spring, we've
10:28
got summer.
10:30
If for you summer is more reds
10:33
then go for the reds.
10:34
If you feel you haven't got enough add
10:36
some embroidery but I'm going to do the
10:38
embroidery on mine at the end on all of
10:41
the seasons. So we'll come back to that
10:44
and I'll show you a couple of little
10:45
techniques.
10:47
For autumn I've done the obvious. I've
10:50
got oranges, browns.
10:53
I do feel it's really autumnal. I'm just
10:55
not sure about that ribbon at the bottom
10:57
so we'll see if that gets added. But you
10:59
can see I've got this mishmash of
11:01
threads
11:02
but all in the right colors.
11:05
So that lot just needs stitching on now.
11:08
I have a confession to make. In between
11:10
filming these bits I've been stitching
11:12
these on in the evening and really
11:13
relaxing.
11:15
And I've really enjoyed it. It is so
11:18
nice.
11:19
So we've got three seasons.
11:23
Didn't add the extra ribbon on the
11:25
bottom. Didn't like it.
11:27
So all we've got to do now is winter.
11:29
Now for me with winter I've gone very
11:31
much the reds of Christmas
11:34
and the blues of cold.
11:36
Again, you might just want to go blue if
11:37
it's cold. Or if you live somewhere
11:39
where winter is hot, some of these
11:40
colors are going to be completely the
11:42
opposite way around.
11:43
>> [snorts]
11:44
>> So,
11:45
I quite like that little ribbon with the
11:47
leaves on, but they're blue leaves, so
11:49
very pale blue.
11:51
So, I'll be stitching all of those on in
11:53
approximately that pattern. The flash of
11:55
green is a mitten.
11:57
And I'm leaving the end clear for my
11:59
fastening. If you're not doing a
12:00
fastening, you can go right to the end.
12:03
And there we have it.
12:06
A whole roll
12:08
all sewn on.
12:10
But do want to add some little details
12:13
before I move on to the fastener,
12:16
deciding whether to back it
12:18
and then affixing it to the dolly peg.
12:22
So, I've just got an embroidery thread.
12:24
Again, I'm using it whole
12:26
and I'm going to do a French knot.
12:28
I do like French knots. So, I'll
12:30
probably do loads on here.
12:33
So, I'm just coming up where I want it.
12:36
And then you take the embroidery thread.
12:39
You wrap it around the needle. I'm going
12:41
to do it three times.
12:43
And then push it back down very close to
12:45
where it came out. And keep hold of the
12:48
thread so it stays nice and taut.
12:52
Now, you can do it with two twists
12:53
around the needle
12:55
or four twists twists four twists around
12:58
the needle. As many as you like. You'll
13:00
just get a larger or a smaller knot.
13:03
But the key thing is to hang on to that
13:04
thread so it keeps it quite taut.
13:08
And then you can add these as detail
13:09
wherever you like. They're great for
13:11
little eyes on birds, things like that.
13:14
But I tend to just use them to just add
13:16
a bit of texture, to be honest, a bit of
13:18
interest.
13:20
So, I'm just going to do a few on this
13:21
red ribbon.
13:24
And you can see you just keep repeating.
13:27
And then I will add them to other
13:29
places.
13:30
But I did say I'd come back to the
13:32
sunglasses.
13:33
So, what I'm going to do is using some
13:35
white thread, I'm just going to do
13:38
straight stitch
13:40
to show where the glass would be.
13:44
Perhaps the light catching on it.
13:46
And then I'm going to do another
13:47
straight stitch directly below.
13:50
And I'm sort of going to follow the
13:52
shape of the lens of the glasses.
13:57
I hope you know what I mean by that.
14:01
And back in. You'll see I'm having a
14:03
little bit of trouble cuz there's a lot
14:04
of layers here.
14:05
Now, if you've done them too far apart
14:07
and you think, "Oh, no, I want the solid
14:09
white."
14:10
Then just put another stitch
14:12
in between the two you've done.
14:16
Now, I'm going for the effect of the
14:18
whole lens. What you could do is just
14:21
put a little flash of white in the
14:22
corner just to show a reflection. It's
14:26
entirely up to you. You don't have to
14:27
bother doing anything. But I'm just
14:29
trying to give you an idea of how you
14:31
can add detail to different bits. You
14:32
can add detail to anything you want.
14:35
Just buy some embroidery stitches. Keep
14:37
them simple. If you want to learn
14:39
embroidery or you can already do lots of
14:41
embroidery stitches, then go for it.
14:43
Great. But remember, this is just about
14:46
relaxing.
14:48
So,
14:49
I tend to keep it quite simple.
14:52
You see, that one was a bit small. I
14:54
don't mind. I'm happy.
14:56
Just make them look like glasses. And
14:59
that's what I was going for.
15:01
See, you can see now I've added
15:04
French knots around the place.
15:06
I've added more French knots.
15:10
I've added a star in the middle of that
15:12
orange panel cuz it seemed quite
15:14
flat. I've put a vein down the middle of
15:17
the leaf.
15:19
And I've put some crosses onto the
15:22
mitten to give that a bit of texture.
15:25
So now I'm going to turn my attention to
15:27
the fastener. I'm going to use elastic.
15:30
You can use a ribbon, piece of string,
15:32
you can use what you like. Um I like a
15:35
piece of elastic cuz it pulls it nice
15:36
and tight. So I'm just going to cut it
15:39
so that it stands off the end like that
15:42
and is a generous loop. So long as the
15:45
button goes through it, I don't need to
15:46
worry too much because it will be pulled
15:48
taut. So the button isn't going to keep
15:50
popping out anyway.
15:53
And then I'm just going to sew it on the
15:55
back.
15:57
And then I could use a piece of fabric
15:59
just to cover that over if I wanted.
16:02
Now what I'm going to do actually is
16:04
cover the whole of the back. So all I've
16:07
done is cut another strip of fabric
16:10
out of the same old sheet,
16:12
the same length as the roll and the
16:14
width as the roll so I can cover the
16:15
back. Now that's a very personal
16:18
decision.
16:19
But if we get back to the elastic,
16:22
I'm just going to place it in the middle
16:24
and I'm just going to sew it on by going
16:26
backwards and forwards through the
16:28
layers.
16:30
Nothing complex here, nothing too
16:33
technical. Just going to make sure
16:35
there's plenty of stitches
16:37
so it's nice and secure.
16:40
That's all that matters is that it's
16:41
secure. No one's ever going to see it
16:44
and
16:47
it doesn't matter, does it? We're
16:48
relaxing.
16:50
So just make sure it's secure and finish
16:52
your thread off.
16:54
And then you can see when you come to
16:55
the front, we can see those stitches.
16:57
So I'm going to cover those up. Now I'm
17:00
going to cover them
17:01
with a plain panel that I'm going to cut
17:03
out of this bit.
17:05
Cuz I'm not using it on the back, I'm
17:06
going to use it on the front.
17:08
I'm also not going to add anything to
17:10
it. Now this would be a great
17:11
opportunity if you wanted to
17:14
to label your roll because this will be
17:16
on the outside. So, if you wanted to
17:18
label it the four seasons,
17:21
life,
17:22
one year,
17:24
my roll, anything you like, you could
17:27
write or embroider it on now before you
17:29
sew it on.
17:32
And then I've just sewn it on with a
17:33
running stitch. So, you can see that
17:35
roll is ready
17:38
to attach
17:39
to whatever you're attaching it to.
17:41
Now, the back of your work, you can
17:43
leave it like that, embrace it. Nothing
17:45
wrong with that. I've done that on other
17:47
rolls.
17:48
Or you can cover it like I'm going to do
17:50
with this one.
17:52
It does also help with fraying if you
17:54
cover it.
17:56
Um
17:57
I mean, strictly you could glue it on.
17:59
It's not something I've ever considered
18:01
cuz I'm here to slow stitch and embrace
18:03
the slowness of the process.
18:06
So, I'm going to use a blanket stitch.
18:08
You'll notice I've just attached Great
18:10
British Stitcher bit of ribbon there cuz
18:12
I keep doing that to my projects.
18:14
So, I'm going to put the needle in and
18:16
out of the
18:18
the back of my work. You can do this
18:20
from the front or the back. It's
18:21
entirely up to you.
18:23
Bring it round and then go through both
18:25
layers
18:27
in the same place.
18:29
Put your needle through the loop.
18:35
Okay, it's really important you do that.
18:38
Move along a little way.
18:40
Go through both layers.
18:42
Bring the needle through the loop.
18:48
And you can see it's forming that band
18:50
along the edge which stops it fraying.
18:53
So, again, through both layers,
18:56
through the loop.
18:59
Through both layers,
19:01
through the loop. And just keep going
19:02
all the way round. Actually, on my
19:04
YouTube channel you can find a video all
19:07
about how to do blanket stitch if you
19:08
need more. But you should be able to
19:10
just work your way around doing that.
19:14
And here we go.
19:17
It's a completed roll.
19:19
I've edged it
19:21
by attaching the back. And you can see
19:24
you've got those blanket stitches
19:25
showing everywhere, which I love.
19:28
And we've got the elastic.
19:30
Haven't put anything on there, but you
19:32
could do.
19:33
And I've got my great British stitcher,
19:34
so I I've just taken to adding those to
19:36
my slow stitching projects.
19:38
Don't ask me why. I just liked it.
19:41
So now what we're going to do is glue it
19:43
to whatever you're wrapping around.
19:47
So just make sure you're happy with it.
19:50
And then put some glue
19:52
on your dolly peg, your cotton bobbin,
19:55
whatever you're wrapping it round.
19:58
I mean, strictly you can wrap around
19:59
anything.
20:00
So you know, get creative. Have a look
20:02
what you've got that's likely to be
20:03
going in the bin and use that.
20:05
You could use the roll out of a a toilet
20:07
roll, anything.
20:09
And then make sure if you've got a right
20:11
and a wrong way up that you get it the
20:13
right way up.
20:14
And then wrap it round. Oh, I've managed
20:17
to get the glue on my fingers, so I'm
20:18
just going to get rid of that. I don't
20:19
want it on the fabric on the right side.
20:22
And just roll.
20:24
And then firm it down. You just want to
20:26
make sure it's all in contact and it's
20:29
going to stick nicely.
20:31
Now, that's sufficient, that's plenty.
20:34
But if you actually want it to be
20:36
wrapped a little tighter, a little
20:38
further towards your sewing, then just
20:40
put some glue onto your fabric
20:43
and wrap it a little bit further. How
20:45
much you wrap and glue is entirely up to
20:48
you.
20:49
I'm just going a little bit further.
20:53
So that the whole of the stitching is
20:56
off
20:57
the dolly peg.
20:59
Let it dry before you do anything else.
21:01
And then once it's dry,
21:03
you can roll it up.
21:05
Now, if you're going to just wrap with
21:07
an elastic band or a hair band, you're
21:09
done.
21:10
Get your band,
21:12
wrap it round,
21:14
and you've got a beautiful four seasons
21:16
roll.
21:17
But, if you stuck with me and you're
21:19
actually fastening it with a button,
21:21
now is the time to sew the button on.
21:23
Now, I've waited till now because I want
21:25
to make sure I put the button in the
21:26
right place.
21:27
So, just stretch your elastic,
21:30
look where your button's going,
21:32
have a double thread,
21:34
and then just do a few stitches to
21:35
secure. And I'm not going through the
21:37
whole lot to the back. There's no need.
21:39
There's three layers there before you
21:41
get to the back.
21:43
And then sew your button on. This can be
21:45
any button. Again, we're back to eco,
21:47
aren't we? Any button you've got in that
21:49
button tin. And don't tell me I've got
21:51
one. We all have one, don't we, if we're
21:52
crafters.
21:54
So,
21:55
use a button that you've got lying
21:57
around or off some old clothes that are
22:00
going to recycling.
22:02
If they're going to the charity shop,
22:03
don't take a button. But, if they're
22:04
going to recycling, you can steal the
22:06
buttons.
22:07
So, just make sure that's secure and
22:09
make sure you finish your thread off
22:11
properly.
22:13
And then you've got a beautiful roll
22:16
that rolls up and fastens closed, and
22:19
you can keep it in a small space. You
22:20
can take it out anytime and enjoy it.
22:22
And hopefully, you've enjoyed the whole
22:24
process of slow stitching.
22:27
And remember, you can write on there.
22:30
I think they're great for relaxation.
22:33
Lovely.
Hobbies & Leisure
Fiber & Textile Arts