Up next in 10


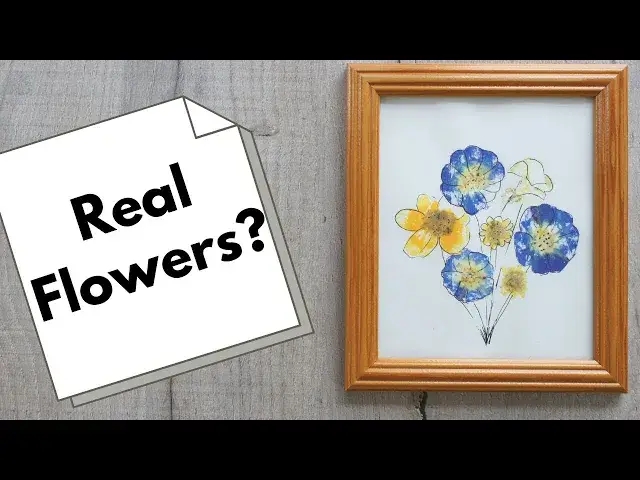
Flower pounding on paper is a very satisfying and creative craft. In this video you will learn how to do it as a beginner.
As an Amazon Associate I earn from qualifying purchases
The supplies you will need are:
Washi Tape - https://amzn.to/45YlUJd
Kitchen Paper Towel - https://amzn.to/3svrmF5
Hammer - https://amzn.to/3sFEjwg
Watercolour Paper - https://amzn.to/45Qr1Lu
Something to hammer onto - it may get damaged
If you enjoy crafting my blog is full of great ideas and tutorials. Plus if you subscribe you gain access to my free resource library, which includes a home crafts e-book, planners and much more, and get to hear about my latest projects first. Take a look at https://christines-crafts.com/
Enjoy watching and creating your own flower pounding art. Please leave me a 'thumbs up' if you enjoyed this video and subscribe so that you get to see all my videos as they are posted.
You can also find me across social media. To see all my information and ideas find me at https://linktr.ee/Christines_Crafts.
If you are thinking of opening an Etsy store then use this link and get off to a great start with 40 free listings https://etsy.me/32xoPdg
Show More Show Less View Video Transcript
0:00
So how can we make gorgeous art completely naturally
0:03
Well, it's by pounding the flowers or leaves that we're going to use. It's really easy to do and I'm going to show you exactly how
0:09
If you stay around to the end, I'm going to show you lots of different ways that I've used mine as well
0:14
So let's get started. You're going to need some sort of tape to hold your flowers or leaves down
0:20
Now I recommend a washi tape like this one, simply because it doesn't stick very well and you can peel it up without damaging your paper
0:28
Piece of kitchen roll and a hammer or a mallet of some kind
0:32
just something to hit it with and some paper. I recommend watercolour paper because it takes the dye really well
0:39
But feel free to experiment with other papers. Copy of paper, not great
0:43
And something to hammer onto. I'm using an old bit of wood that's just ready for burning
0:48
Just think on that whatever you use, you could well damage it. You are going to hammer it
0:53
Some thick newspaper can help. So let's get started. I've cut my page down because I know exactly what I want to do with it
1:00
And I want to make sure my design sits there. So just gather your leaves or flowers and then you're going to arrange them
1:08
Now, what I would say at this point is if you're going to use leaves
1:11
they need a lot more pounding than flowers. So if you're going to do both, I recommend arranging it all
1:18
taking a photo, lift off your flowers and then arrange your leaves
1:23
Do those and then put your flowers on. Or the other way around
1:28
But I wouldn't try and do them all in one go because that's very difficult
1:32
So as you can see, I'm cutting the stems off. You could leave them on and press them down flat
1:37
But I just wanted the effect without them for the moment. I think my flowers will lie down better
1:43
So just play around with the arrangement and get them how you want
1:47
You will find that wide flowers like this that sit quite flat often work a lot better
1:54
But I really recommend you experiment because it's not always the flowers
1:57
you think that are going to do the best effect. I was convinced some yellow flowers I had would look fabulous and it just made a
2:05
yellow splodgy mess, so I didn't use those again. So as you can see, I've got a little arrangement building up
2:13
and I'm looking at it and I'm thinking it's quite, quite nice
2:17
It's pretty much what I want. I'm just going to add another yellow one. And this is a different style of flower
2:22
So we'll just have to decide which way to press the stem
2:26
And if you have flowers like that, you just have to give a little bit of thought of how it's going to look
2:30
Now, as you can see, I've managed to do it all over to one side a little bit. So I'm just going to adjust them and I think I'm going to spread them slightly
2:37
So there's a little gap between the flowers. So even when they're pressed down flat, there'll still be little gaps
2:45
Once you're happy with your arrangement, I really recommend taping it down because they have a tendency to wander around
2:52
when you're hitting them. So just apply some tape and make it go all the way over onto whatever you're
2:59
hammering onto and it's just going to secure the whole thing. Now, I'm going to put a few on so that every flower is at least caught in one
3:07
place just to keep it there. And if you start getting it on and you think I'm not quite happy with that
3:18
just peel it back. You've checked your tape, you know you can peel it back without any damage
3:24
So I've got that one stuck. Doesn't matter. I'll just reposition it
3:28
Just make sure everything's underneath the tape. Otherwise, your dye will not transfer
3:34
And then make sure you're completely happy because we're now going to start pounding it
3:41
So get your paper towel and place it over the top. And that's just going to keep everything nice and tidy and neat
3:51
And it's also going to allow you to see when the dye is starting to escape from the
3:56
flower or the leaf. And then just start. I recommend picking one area and having a good go
4:04
Now you'll see with the flowers, I'm not hitting it really hard. I'm holding the hammer near the end
4:08
I'm not needing all that weight and all that leverage of the long handle
4:12
It's just about applying pressure. So experiment. Give it a try. And you can see that dye is starting to come through on the paper towel
4:23
So probably starting to work well. So move on to the next flower and just work your way around them all
4:30
I've sped the film up. I don't work that fast. Work around them all until you think, well, they might have all transferred
4:40
And then you can have a little look. You're not committed to anything
4:44
You're just having a look. And if you think, actually, I'm going to do a bit more, just do a bit more
4:51
And then when you look next time, maybe you'll peel a bit of tape up and have a look. And if you're not happy, go again
4:56
If you are happy, well done. It's entirely up to you. So you're going to experiment
5:02
The first few you do are maybe not going to be your best, but just try them out
5:08
If you're enjoying this video, please give me a thumbs up so it transfers to lots of people
5:12
Because we want everyone having a go at this. I mean, talk about a sustainable craft
5:17
It really is a good idea to do. And you get to preserve those flowers that you like
5:21
You can keep looking at them forever. Not the actual flowers, but a print from them
5:26
So you can see I've peeled a petal up. Not quite sure, so I'm just going to apply a bit more pressure
5:33
A little bit more hammering. And then it comes time to have a look what you've produced
5:41
So just gently peel your tape up. I'm going to start with the last one I put on
5:47
And you will find some bits of flower stick to your tape and some bits don't
5:52
And it really doesn't matter. Just take your time and do it carefully
5:58
You don't want to damage your paper. And you can see one of those flowers with the yellow, I've not got a complete flower
6:07
But I don't think it matters. I think I'm still going to be able to make that look nice
6:11
But you can see the blue ones really are obviously bright blue flowers
6:16
And the yellow one at the bottom seems to have stuck really well as well
6:21
So then if they're easy to peel off, you can peel the other bits off
6:24
But if they don't come off easily, just leave them to dry
6:28
It really doesn't matter how long they take. And then you'll be able to brush those bits off
6:32
You don't want to damage your picture. So I've realised that I forgot to record me adding any embellishments to this picture
6:39
So I'm just going to show you that after it dried, before I framed it
6:45
I got a fine marker and I just added some detail. Now you could do that with any colour
6:49
You could add watercolour detail. You could add anything you wanted. Stickers even. It's your art
6:55
Embellish it how you see fit. But one of the things I really like to make are gift tags
7:01
And you'll see a nice, simple gift tag with one leaf on it. So effective
7:07
No creative flair required. Just punch a hole, put a tag on it and away you go
7:13
And cards. I like to use the nice green or brown card blanks
7:19
And then I just take my picture from the front and glue it on
7:24
And all I've done is cut them out using a ruler and tearing them
7:28
so that they look even more natural. So you can see on there I've used the black outline again
7:32
And then I'm going to have another one without the black outline. So get creative, make your own art
7:39
and please leave me some comments below telling me how you're going to use yours
7:43
Thank you for watching and check out my next video
Visual Art & Design
Crafts
Crafts
Jobs & Education
Flowers
Art & Craft Supplies