Up next in 10


In this video you will see how to hand embroider these beautiful flowers even as a beginner. You do not need any special equipment and that is what I show you. They are great for pictures and decorating clothes.
For a video showing you how to embroider the leaves check out https://www.youtube.com/watch?v=oITj7TwLVi4&t=320s
If you enjoy crafting my blog is full of great ideas and tutorials. Plus if you subscribe you gain access to my free resource library, which includes a home crafts e-book, planners and much more, and get to hear about my latest projects first. Take a look at https://christines-crafts.com/
Enjoy watching and embroidering your own flowers. Please leave me a 'thumbs up' if you enjoyed this video and subscribe so that you get to see all my videos as they are posted.
You can also find me across social media. To see all my information and ideas find me at https://linktr.ee/Christines_Crafts.
Show More Show Less View Video Transcript
0:00
in this video i'm going to show you how
0:02
to hand embroider your own flowers just
0:04
like these on this design this is part
0:06
of a series when i'm going to show you
0:08
how to do the flowers the leaves and the
0:10
tiny flowers that are called french
0:12
knots you can be a complete beginner and
0:14
have great success with this if you stay
0:16
until the end i'll show you some great
0:17
project ideas for using them i'm
0:20
christine of christine's crafts and this
0:21
channel is dedicated to crafting on a
0:23
budget
0:24
so the first thing i'm going to talk
0:26
about is what you need
0:27
ideally when you're embroidering you
0:30
want an embroidery hoop however if you
0:32
do not have one don't be put off
0:34
also if you're wanting to decorate items
0:36
you already have you may not be able to
0:39
use an embroidery hoop
0:41
so ideally what you're going to do is
0:42
get your fabric you're going to open up
0:45
your hoop which you do by twisting the
0:47
screw at the top
0:49
place the inner hoop on a surface
0:52
put your fabric over
0:54
and then push the outer ring on and
0:57
you'll see it's already gone quite taut
0:59
so i recommend then that you tighten
1:01
your screw up
1:03
and then if it's not tight enough
1:05
which it probably won't be it's quite a
1:07
lot of give just pull the fabric
1:10
to tighten it up you're looking for it
1:12
being as tight as possible so you get
1:13
nice even stitches and everything lies
1:15
flat
1:16
that's the main advantage of using a
1:18
hoop
1:19
if you haven't got one don't worry i'm
1:21
going to show you in this video the way
1:23
to do them without a hoop so you can
1:26
cope without one
1:27
so you can get started today
1:30
so what you're actually going to need is
1:32
your fabric
1:33
a needle and some embroidery thread
1:36
and a pencil or a pen to just draw your
1:38
design where you want to put it
1:41
so get your needle threaded up and put a
1:44
small knot in the end of your thread
1:47
just so it doesn't pull through when you
1:49
start sewing
1:52
the first thing you're going to do is
1:53
draw your flower where you want it to go
1:56
you're just going to draw a circle the
1:58
size of the flower that you want
2:01
you can draw around something for a nice
2:03
accurate circle or you can just freehand
2:05
like i'm doing it's not a big deal it's
2:07
nothing to worry about
2:09
mark the center of your circle again
2:11
just by eye
2:13
and then you're going to draw spokes on
2:15
now it depends on the size of your
2:17
circle as to how many spokes i think the
2:19
smallest you should go for is five
2:22
and you'll see for this size i'm going
2:24
to put seven on mine to get plenty of
2:26
detail
2:27
you must make sure you have an odd
2:29
number
2:30
so if you're trying to go much bigger
2:32
try nine
2:34
but i think really a giant one you're
2:36
going to have some trouble with
2:38
so once you've got your spokes and
2:40
you've made sure you've got an odd
2:41
number it's time to start sewing
2:44
bring your thread up from the back right
2:47
up the center of your circle
2:50
then choose one of your spokes and take
2:53
the needle in again
2:55
at the end of the spoke
2:59
it doesn't matter which one
3:01
just pick one
3:03
and go in at the end of the spoke on the
3:05
circle
3:07
and then you're going to pull it and i'm
3:08
not going to use the word tight but
3:09
you're going to pull it so it lies flat
3:11
on the fabric and this is where you're
3:14
going to find it's harder without your
3:16
embroidery hoop i suggest you keep
3:18
placing the fabric down flat and making
3:20
sure it's lying properly and you've not
3:22
pulled anything too tight and puckering
3:24
up your fabric
3:27
and you're just going to keep bringing
3:29
that needle up through the center
3:32
and then taking it back
3:34
down at the end of one of your spokes
3:37
and keep doing this until all your
3:39
spokes are in place
3:47
once you start doing these you'll very
3:48
quickly realize how many spokes you like
3:50
working with on which size flowers
3:53
you can see i'm just starting to pucker
3:55
a little bit and i just have to keep
3:56
pulling the fabric and flattening it
3:58
down
4:06
obviously when you've done this you have
4:08
set the size of your flower
4:13
see me flattening it again
4:19
just keep working your way
4:22
around those spokes
4:24
make sure you're keeping your
4:27
yarn so that it's sitting flat on the
4:29
back of the fabric as well as the front
4:34
you don't have to be too fussy about
4:35
what sort of fabric you're embroidering
4:37
on because if you're doing a project
4:39
piece you may not have much choice
4:43
okay so you can see i've got one spoke
4:45
left
4:47
so i'm just going to come back up
4:48
through the center
4:51
and you'll see me messing about with
4:53
this fabric so it really is easier with
4:55
a hoop but i wanted to show you that
4:57
it's possible without
5:01
so once you've got all those spokes
5:03
it's going to be time to form the petals
5:05
of your flower i rather think they look
5:07
like hand embroidered roses but you
5:10
decide what you think they look like
5:13
so you need to bring that needle up
5:16
near the center
5:18
just right next to the center
5:21
and then you're going to take your
5:22
needle
5:23
over a spoke
5:25
and then under the next one so over a
5:28
spoke
5:29
under the next one you're not going
5:30
through the fabric at all
5:33
and then you're going to go
5:35
over the next one
5:37
and then under the next one
5:40
and you keep working your way around the
5:43
flower
5:44
going over then under
5:47
over then under and you'll get a little
5:50
rhythm going
5:51
and each time just pull that thread so
5:53
that it sits nicely you're not trying to
5:56
pull it so tight it draws everything in
5:58
but you don't want great big loops
6:00
either
6:02
so i've spread it up here just so you
6:03
don't get bored just keep going round
6:06
and round over and under over and under
6:08
and you'll see your flower appearing
6:12
you'll see that you're forming those
6:14
pretty petals
6:15
as you go over and under
6:18
and as you work your way out your spokes
6:20
are getting shorter and shorter
6:22
and once you get to the point where
6:25
your spokes have pretty much disappeared
6:28
you'll find it gets a little bit
6:30
trickier but you're still following the
6:32
same technique over and under
6:35
over and under
6:38
as you get to the end you'll see i'm
6:41
just still trying to squeeze a couple
6:42
more stitches
6:44
once your spokes have disappeared you
6:47
can't see them anymore
6:48
your flower is complete
6:51
and then it's time to take your thread
6:53
through to the back
6:55
just poke it through under that edge so
6:57
that you can't see that tiny stitch
6:59
you've made
7:01
and you're on to the back and you'll see
7:02
on the back you've still just got those
7:04
spokes
7:06
and now take a small stitch
7:09
and then put your needle through the
7:11
loop
7:12
and then i always do two just to be sure
7:15
and they'll stop your thread pulling
7:17
through
7:19
and then you can cut off your thread
7:23
and you've completed your first flower
7:28
well done enjoy and i hope you're going
7:31
to make many more i promised you some
7:33
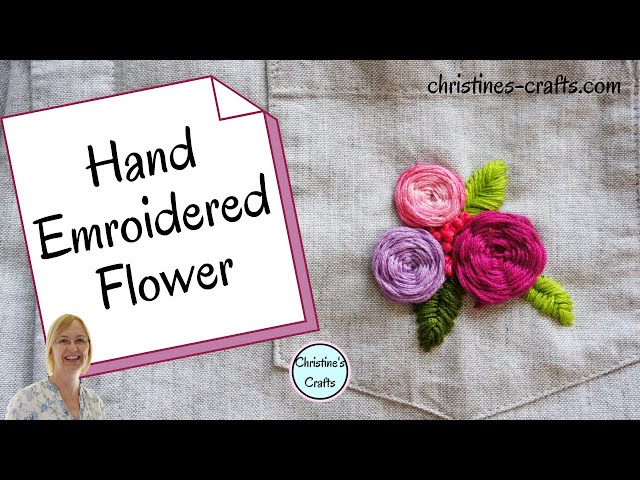
project ideas well what about this of
7:35
decorating a pocket on a shirt give
7:38
those clothes a new lease of life with
7:39
lots of hand embroidery so i hope you've
7:42
enjoyed the video please give me a
7:43
thumbs up if you have and subscribe to
7:45
catch all my videos next week i'll be
7:48
showing you how to do the leaves
#Arts & Entertainment
#Crafts
#Fiber & Textile Arts
#Fiber & Textile Arts