0:00
Hi, welcome to day 17 of 30 mixed media
0:03
cards using your craft supplies at home.
0:06
You can find all the others on the
0:07
playlist on the description below on my
0:09
channel. You'll find them. But today,
0:12
we're going to be making this card here.
0:14
So, let's get started.
0:18
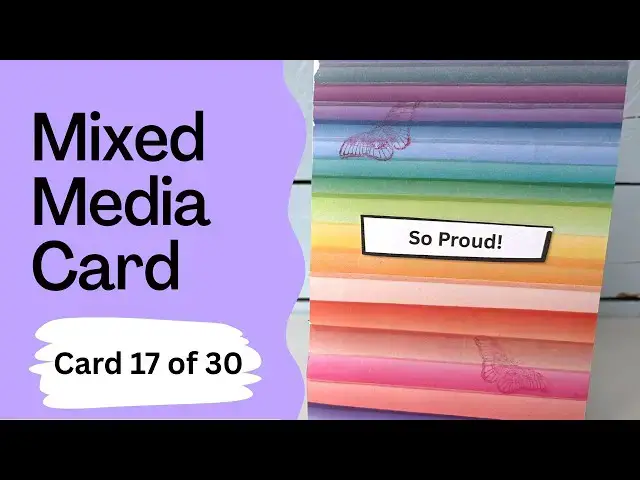
This is one of my favorite cards in this
0:20
set of 30. And all it is is an ordinary
0:22
card blank or just a piece of card
0:24
folded in half and then washi tape. Now,
0:28
if you've never come across washi tape,
0:30
it's lovely tape for crafting with. It's
0:32
really easy to handle. You can put it on
0:34
and take it off. It is really, really
0:36
nice, and you can get it in so many
0:38
patterns, designs, colors. And all I'm
0:41
going to do is use this set of all
0:42
different colors and put a stripe of
0:45
each color. Now, when you're using washi
0:47
tape, it's really easy to tear. So, to
0:50
cover the front, I'm just making sure I
0:52
go off either side. I'm not trying to be
0:55
exact at the ends. It'll be a little bit
0:57
long. That's not a problem. And you can
1:00
see I'm just using the colors in the
1:02
order they came in the packet. Um, I
1:04
will link to different washi tapes that
1:07
you can buy on Amazon just to give you
1:09
some ideas and allow you to go and have
1:11
a look, but I believe I bought these
1:13
locally in a craft shop. And you can see
1:16
I'm just using a selection of colors and
1:18
I'm just grading them down the page. You
1:20
could go the other way and do them
1:22
vertically. You could use different
1:24
patterns. You could overlay them. Get
1:27
creative. The whole idea here is that
1:30
I'm showing how to do a really bright
1:32
card simply with washi tape. And I hope
1:36
you agree that it's really effective.
1:38
And then once you've covered it and
1:42
the best thing to do is to just turn it
1:45
over and you can see all those little
1:48
extra bits that you want rid of and just
1:50
trim them off. If you have a rotary
1:52
cutter and a board, that's great. If
1:54
not, just get your scissors out and trim
1:56
them off. All those little bits want to
1:58
stick to your scissors and they want to
2:00
stick to you. So, just persevere. Now, I
2:04
hope you're enjoying this card and
2:06
you're looking forward to the next
2:07
steps. So, if you are, please give me a
2:10
thumbs up so it spreads to more people.
2:12
We can fill the whole world with lovely
2:13
rainbow colored cards or indeed yours
2:16
might be completely different with your
2:17
washi tape that you have in your
2:20
So, just make sure it's all down and
2:23
nice and firm. And then I'm going to do
2:26
a little bit of stamping. Now, I've got
2:28
this stamp pad here, and I've got some
2:31
of the acrylic stamps that you put on
2:33
the blocks. Again, I'll link below so
2:35
you can have a look at these supplies
2:37
and see the sorts of things I'm using.
2:39
And you'll see I'm having a bit of
2:40
trouble with that ink pad. It's
2:42
obviously a little bit dry, but I quite
2:45
like the effect of stamping onto the
2:48
card. So, I'm doing a nice simple
2:51
Um, you can see it's not bold. It's not
2:54
in your face, but you can definitely see
2:56
it. And it's quite a nice subtle effect
2:58
on there. And then I think there's so
3:01
much going on. I'm just going to add my
3:02
greeting. Now, there's a whole two
3:05
sheets of these greetings for free. You
3:07
can download them off my website.
3:09
There'll be a link on the screen and the
3:10
description below. This do all
3:14
And all I'm doing is sticking it on with
3:18
some little foam pads. I do like them
3:20
for getting a 3D effect on your cards.
3:23
And then I'm simply going to stick that
3:25
in the middle and leave it at that. So I
3:28
hope you feel inspired and you're going
3:30
to go and make way and make your washi