0:00
Welcome to day 28 of the 30 mixed media
0:04
card challenge. Um, I hope you've seen
0:06
all the others. If you haven't, they're
0:08
in description below on the screen on my
0:10
channel. You'll find them. But today,
0:13
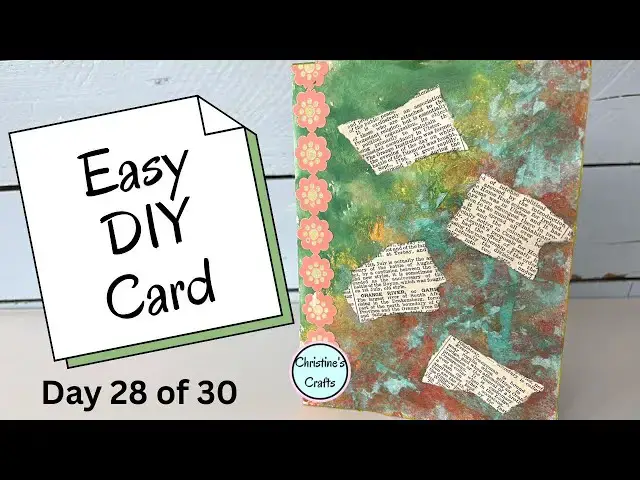
we're going to be making this card here.
0:16
So, let's get started. The first thing
0:19
you're going to need is a piece of card
0:21
folded in half to form your card or a
0:23
card blank if you buy them. Now, mine is
0:25
going to be 7 in x 5 in, but you can
0:28
make this any size you like. And I'm
0:30
going to use paint. Now, I've opted to
0:33
use these watercolors that work really
0:36
well and merge well together. And then
0:38
it's really just a case of choosing your
0:42
and getting a little bit. You can use
0:44
the watercolors that you get in a
0:45
palette, in a tray. Um, you could use
0:48
acrylics. You can use whatever paint
0:50
you've got. I mean, this channel is all
0:53
about crafting on a budget. So, look
0:55
what paint you've got available and give
0:57
it a go. And as you can see, I've run
1:00
from green through a reddy orange, a
1:02
yellow, and hopefully a brown, but
1:04
clearly I've never needed to paint brown
1:06
before. And I've squeezed it too tight
1:08
to get the lid off. Oh, I've got in a
1:09
mess. Never mind. Let's put that to one
1:14
I'm just going to get a brush, a really
1:16
simple basic brush, and I'm just going
1:18
to stipple, which means I'm just using
1:20
the ends. I think stipple's the right
1:22
word, but I'm no painter.
1:24
And I'm doing an arc of brown and then
1:26
the red. And make sure you overlap them.
1:29
If you're going for a similar effect to
1:31
me, you want to make sure you're doing
1:32
some of the color on top of each other.
1:35
And when it comes to the yellow, I've
1:36
not let the red dry because I want them
1:38
all to merge together. If you want a
1:41
clear line, you have to let each color
1:42
dry. But the effect I'm going for is all
1:45
merged. So, I'm keeping it all wet at
1:48
the same time. And you can see how
1:52
I'm just going over making sure it's
1:54
done. And then I've added a 3D element
1:58
by getting some decopage glue, some PVA
2:01
glue, an old napkin, a paper napkin, and
2:04
just getting one layer of it. So, if
2:06
it's two ply, open it up. And then just
2:08
putting small pieces on. And you can see
2:11
I'm not getting them flat. I'm getting
2:12
them creased. And that's to give that 3D
2:16
effect. I'm not going to cover the whole
2:18
thing, but you could do. I'm just going
2:20
to cover it all over the brown and the
2:24
Just to give another dimension to it.
2:28
You could, of course, not do this at all
2:30
and just leave those colors and then
2:32
carry on with me without adding the uh
2:35
paper napkin. Once it's dry, you need to
2:39
trim off any bits that are straggling
2:41
over. And obviously, if you didn't do
2:44
the decopage of the paper napkin, you're
2:49
Anyway, just about here. So, we can
2:55
So, the next thing I'm going to do is
2:56
add some detail down the left hand side.
2:59
I think I'm trying different angles, but
3:01
I think I'm going down the left hand
3:02
side. It's a tried and tested formula.
3:05
And it's just some sticky um fancy tape
3:09
that I've got really. And I'm just going
3:11
to stick that down the left hand side.
3:15
Any sort of washi tape would be great
3:17
for this or a piece of ribbon, anything
3:20
to just add some detail.
3:22
Obviously, I'm just going to have to
3:24
take it off to length,
3:28
but I think that looks really nice.
3:33
And again, at any point, you can decide
3:35
your card's done. Maybe you don't want
3:37
all the detail I'm putting on there.
3:40
I'm going to use some old paper from a
3:45
book. I have a few books that were just
3:48
going for pulping and I ripped bits out
3:50
of them. uh old encyclopedias and
3:53
dictionaries and I just think they're
3:55
going to look really nice stuck on
3:56
there. Now, you might have card toppers,
3:59
you might have something that matters to
4:02
you, something that means something to
4:03
you. And if you do, you could be
4:05
sticking that on this card, but again,
4:08
I'm just going to use the PVA glue. Um,
4:11
this one's called a decopage glue, but
4:13
it's just PVA glue really. And I'm just
4:16
going to stick it under and over the
4:18
paper so it seals on. You could just as
4:20
well stick it on with a glue stick. Use
4:23
what you've got available. Get creative
4:26
at this point. Add whatever you want. I
4:28
mean, you can see how this is becoming
4:31
um a more in-depth picture, a more
4:34
in-depth card. You you can see all the
4:37
detail that's gone into it. We've not
4:39
hidden it all. It's all still there, but
4:42
we're just adding something else.
4:44
Perhaps you could use a book that means
4:47
something to the person you're gifting
4:48
the card to. You could print something
4:50
off the internet that means something to
4:52
them. And at this point, you might be
4:58
or you might decide to add a bit of
5:00
detail around the edge using an ink pad.
5:02
If you've watched the other videos,
5:03
you'll see I often do this at the
5:04
beginning. And this time, I decided to
5:06
do it at the end. So, I hope you've
5:09
enjoyed the video and that you feel
5:10
inspired to make your own card with the
5:12
supplies that you've got at home.