0:00
In this video, I'm going to show you how
0:02
easy it is to make these gorgeous beaded
0:04
snowflakes. So, let's get started. The
0:07
first thing you need is something soft
0:08
to work off. I tend to use a piece of
0:10
fabric. Um, and you're going to need one
0:13
of these snowflakes made of wire and
0:16
beads. Now, don't get fussy about your
0:18
beads. And the snowflakes and beads are
0:20
freely available online. In fact, I've
0:22
got some links to Amazon in the
0:24
description below. You're going to want
0:26
a paper clip to hang it up. And I'm
0:28
using some roundnse pliers, but to be
0:30
honest, you just need some pliers at
0:32
some point. So, keep watching and see
0:34
whether you've got get away without them
0:36
or whether you want to buy some if you
0:38
haven't already got some. So, the design
0:40
is what you need to decide first. And
0:42
what I'd say is experiment. So, I've
0:44
decided to use some tiny seed beads to
0:47
separate my larger beads. And I'm
0:49
starting with a few seed beads, then a
0:52
nice small bead, and work my way out to
0:56
a larger one at the edge. You could go
0:57
the opposite way. You could use all
0:59
different colors. You could just do it
1:02
random. You could do whatever you like
1:04
really. In fact, you could do every
1:06
spoke different. I'm going to do all
1:08
mine the same as you can see from my red
1:10
one. Um, the seed beads are really
1:13
small. And you'll notice my technique.
1:16
Always use your wire against the fabric
1:20
to just push through the bead. Don't
1:24
pick your beads up and try and feed them
1:25
on the end. it's so much harder and
1:27
takes you so much longer. You'll get
1:29
quite frustrated. So, just take your
1:32
time and you'll realize as you're doing
1:35
this why you're doing it on a piece of
1:36
fabric. It just stops your beads firing
1:38
off everywhere and rolling away. Now,
1:41
once you've finished one part of your
1:43
snowflake, you're going to curl the end
1:46
of the wire around. Hence, I like to use
1:48
the roundnse pliers. But if you haven't
1:51
got any, you could probably do it with
1:52
some ordinary pliers that have a narrow
1:56
And sometimes, even with the round nose
1:58
pliers, you don't get the circle all the
1:59
way around. You can just use some
2:01
ordinary pliers just to close it up. All
2:05
that matters is that your beads do not
2:07
fit off the end. And what I would say is
2:10
one of the ends needs to be a decent
2:12
circle because you're going to use it to
2:16
So, we've got one and we're just going
2:19
to keep going. So, for me, I'm going to
2:22
repeat the pattern for you. You might do
2:25
something completely different. It's
2:26
entirely up to you. Um, if you're
2:29
enjoying these beaded snowflakes, please
2:31
give me a thumbs up below because what
2:33
you'll find is these are gorgeous. And
2:35
if lots of people make them, they're all
2:36
going to get to enjoy them on their
2:38
tree. And another idea is that you can
2:40
actually attach these to your parcels,
2:43
decorate your parcels beautifully and
2:45
actually be gifting the recipient a nice
2:47
little Christmas tree decoration. It's a
2:49
great use for them. So, just keep going.
2:53
And then when they're all done, you've
2:55
got a snowflake. And all we need to do
2:58
is work out how we're going to hang it
2:59
up. And that's where the paper clip
3:01
comes in. Just open your paper clip up
3:05
so it looks like that S shape. Hook one
3:08
end through one of the rings on your
3:10
snowflake. And then use your pliers just
3:13
to close it up. If you don't close it
3:15
up, it'll keep falling off. So, I just
3:17
close it up. And then away you go. You
3:20
can hang it on your tree and you can
3:22
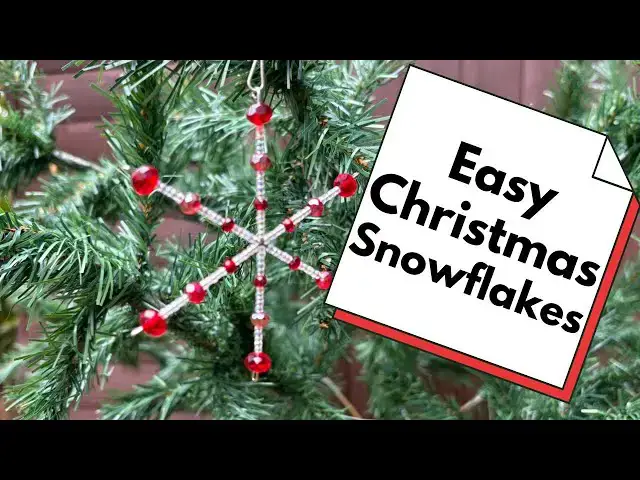
hang them all on your tree. So, here are
3:24
some hung on a tree for me. Enjoy making
3:28
your beaded snowflakes.