Up next in 10

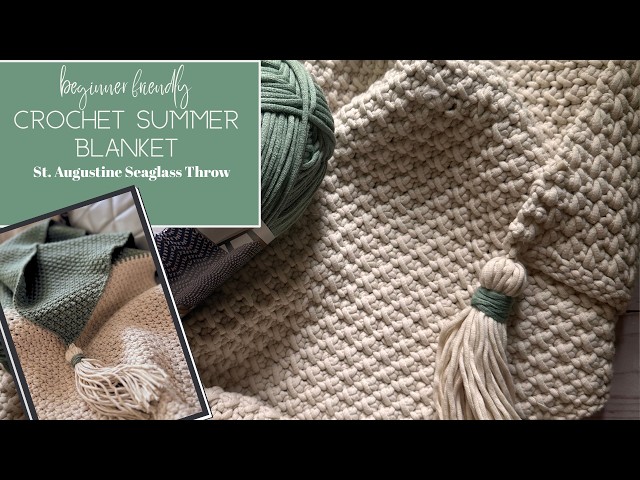
Create a calm, textured summer blanket that feels soft, substantial, and perfect for everyday use.
This crochet blanket pattern is designed with a dense, woven-look stitch using a breathable cotton-blend yarn, giving you the comfort of a slightly weighted blanket without added warmth. It’s ideal for warmer seasons, air-conditioned spaces, or anyone who loves texture without heaviness.
The soft sage and cream color palette adds a relaxed, coastal-inspired feel that works beautifully in modern, neutral homes.
Pattern link:
on my site: https://livechilllife.com/downloads/st-augustine-seaglass-throw/
on Etsy: https://livechilllife.etsy.com/listing/4490170708/easy-summer-crochet-blanket-pattern-knit
on Ravelry: https://www.ravelry.com/patterns/library/st-augustine-summer-throw
🌿 Support the Channel
If this tutorial helped you, please like, subscribe, and share — it makes a big difference for my crochet channel and helps me keep creating free +patterns premium patterns.
Buy me a coffee: Ko-fi.com/livechilllife
Subscribe to the newsletter for monthly discounts, tips and free patterns: https://livechilllife.com/
Try my project tracker for free: https://livechilllife.com/crochet-and-knit/project-tracker-page-for-crochet-and-knit-patterns/
My books:https://livechilllife.com/shop-my-books/
My vintage recipe cooking channel: https://www.youtube.com/@100yearoldrecipes
My Etsy shop: https://livechilllife.etsy.com
If you make this hat, tag me on Instagram so I can see your version!
Happy stitching, Makers. 💛
Show More Show Less View Video Transcript
0:00
Hello everyone. Welcome to a video
0:03
tutorial for the St. Augustine Sealass
0:07
Throw. Now, this blanket I'm using
0:09
Bernat Maker yarn. And because it is
0:12
mostly cotton, so it's 75% cotton with a
0:15
little bit of nylon for a beautiful
0:16
drape, it's going to be lovely for
0:18
summer. It won't get quite so hot. And
0:22
because is a dense stitch, you're going
0:25
to get a wonderful feeling of weight. If
0:28
you like a weighted blanket or the
0:29
feeling of a blanket on you without all
0:31
the heat, this is going to be a great
0:34
option for you. These stitches are
0:36
dense, so they're not they're not
0:39
going to um if you want to make it I'm
0:42
sorry. If you want to make it for a baby
0:44
blanket, it's safe. It doesn't have
0:46
holes for little toes and fingers to get
0:48
stuck in. All right, so let's get
0:50
started. If you have your pattern, you
0:52
have your starting chain in there. And
0:54
if you want to follow along and just
0:55
make the sample stitch with me, you can
0:59
certainly do that. I have the pattern
1:00
linked in the description. So, Bernat
1:03
Maker, this is a bulky category yarn.
1:06
It's kind of in a league of its own.
1:07
It's a tubing yarn, so it's not going to
1:09
split and it washes beautifully. It's
1:12
very soft.
1:14
And um we don't need to worry about the
1:17
what they use to get their gauge on
1:19
here. I've got my own uh hook size for
1:22
the stitch. So we get a beautiful drape.
1:36
All right. So for the swatch size, I'm
1:38
using my 8 mm hook and I have chained 14
1:41
stitches.
1:43
So we're going to do some setup rows in
1:46
the second chain from hook. Pretty
1:49
standard. going to work some single
1:51
crochet all the way across. So, I'm
1:53
going to skip my first chain, go into
1:56
the next, and when you're done, you will
1:58
have 13 stitches for the swatch.
2:06
Right now, from here, row two, going to
2:09
chain one, turn,
2:11
and single crochet in my first stitch.
2:18
Then chain one,
2:21
skip,
2:22
and single crochet in the next.
2:27
Chain one,
2:29
skip one, single crochet in the next.
2:32
Right. So, I'm going to finish this
2:34
across the row. And your last stitch
2:37
should be a single crochet.
2:51
skip.
2:55
All right. So, I'm coming to the end and
2:57
you see I have two stitches. One, two
2:58
left. So, I'm going to chain one, skip,
3:02
and work into that last one. That turn
3:03
chain looks a little funky, but it is
3:05
the last stitch. Let me see where that
3:09
other loop is.
3:13
There it is.
3:21
In there. Make sure I have both on the
3:24
hook.
3:26
Okay, there's my V.
3:33
And pull through.
3:36
Chain one. Turn.
3:38
And I'm going to do the same thing
3:40
again.
3:42
So I'm going to single crochet in the
3:43
first. Now you're going to kind of stack
3:47
your chain one spaces. Okay. So
3:51
there's the space. Chain one skip. Make
3:55
another chain one skip over that. And
3:58
look for that V right here facing you.
4:01
Not at the top but here. That lets you
4:03
know that that's a stitch. So I'm going
4:05
to put my hook in there.
4:09
and work my single crochet. There's a
4:11
chain one space here. So, I'm going to
4:13
chain one, put another one over top of
4:15
it, and work here into this V of the
4:18
next stitch
4:20
there. V, that's a stitch. hook goes
4:23
right in there
4:37
and just continue across the row. Chain
4:39
one, skip. There's my B. Put my hook in
4:42
there.
4:45
Chain one, skip,
4:48
single crochet.
4:51
Chain one, skip, single crochet. And our
4:55
last chain one, skip, and finish with a
4:58
single crochet.
5:00
Where's that bead? It's a little
5:01
twisted. There it is.
5:06
That should look like that. It's not
5:08
exciting yet, but we're about to start
5:10
making it really pretty.
5:13
All right. So, now I'm on row four. So,
5:16
always chain row uh chain one and turn
5:18
your rows. And now we're going to do
5:20
some uh version of a linked stitch.
5:23
Right? So single crochet in first.
5:27
And then now we're going to work in
5:29
these spaces that were created in the
5:31
previous two rows linking them together.
5:34
So we have this chain one space here.
5:37
And then the row below is a chain one
5:40
space here.
5:45
go into that first chain one space and
5:49
pull up a loop. Then go down to the next
5:53
chain one space from the uh two rows
5:56
down or yes, two rows down and bring it
5:59
up. So you're going to have three loops
6:00
on your hook. Yarn over, pull through.
6:04
Now we need to create a chain one space
6:06
over this stitch. So when I said last
6:09
row, that V, that is the stitch. So
6:12
we're going to skip over that and work
6:14
into the next chain space. Right? So
6:16
we're going to create another chain
6:18
space
6:20
and go into the chain one space
6:24
and then to the one right below it a
6:27
chain one space. Okay? Linking those
6:30
stitches together. So you're spiking
6:32
down linking the two stitches.
6:37
Chain one. Skip that V. Work again.
6:44
Chain one space and the chain one space
6:46
below. Yarn over. Keep everything loose.
6:49
No buckling. Okay. Chain one.
6:53
Skip stitch. And then work into the
6:56
space.
7:01
Go down. Chain one. Space below. Three
7:04
loops on hook. Pull through. Chain one.
7:07
And you'll still be maintaining that
7:09
same stitch count. There's no adding or
7:12
removing stitches. Okay, once more.
7:20
Chain one,
7:22
skip. Here's another and final chain one
7:25
space of the row, one below. And we
7:28
always start and end with a single
7:30
crochet.
7:40
Chain one, turn.
7:46
Single crochet in the first.
7:57
Now we're going to work single crochet
8:00
and chain one spaces.
8:06
So, we'll work a single crochet into the
8:08
single crochet. We need to build up
8:10
another stack of chain one spaces to
8:13
work our next row on the opposite side.
8:17
So, after your single crochet, we'll
8:19
look for our stitch, which is here. So,
8:21
it's a longer V because that was that
8:23
kind of spiked down stitch. That is your
8:26
stitch. Work a single crochet into that.
8:30
And next is a chain one space right
8:32
here. So, we're going to create another
8:34
chain one space over it. Here's a V.
8:38
Single crochet.
8:42
Here's our next V. So, we've got to make
8:44
a chain one space before it. There's my
8:47
chain one, skip,
8:50
and work my single crochet.
8:54
Chain one, skip,
8:58
single crochet.
9:01
Chain one.
9:03
skip here, single crochet
9:09
space. So, I'm going to chain one to
9:11
create that second space stacked over
9:13
each other and single crochet. One
9:16
stitch left. Always start and end with a
9:19
single crochet.
9:24
Right. So, that was row five.
9:27
Did you know I designed project
9:29
trackers, large print and regular print
9:32
for small, medium, and large size
9:35
projects? The link is in the description
9:37
to get your own or you can try it for
9:40
free.
9:42
There's a download on my website, link
9:44
in description.
9:49
Now, we're going to do row six. chain
9:51
one, turn,
9:56
and let's see what we've got. So, this
10:00
will be the same as the row before it.
10:03
Two, you know, two rows down. However,
10:05
we're going to stagger these
10:09
linked stitches,
10:13
right? Single crochet always in the
10:15
first.
10:18
All right. So, here's a single crochet.
10:21
So, we're going to make a chain one,
10:23
skip one over it so that we can get to
10:26
the chain one space and work these
10:29
linked stitches. Now, I went to the
10:32
first space. Let me get a little
10:36
pointer.
10:42
So, let's look closely. Where's your
10:45
next stitch going to go? It's going to
10:47
go right here.
10:52
Here's that little cluster.
10:57
So, let me pull that open so you can see
10:59
it. I'm going to go down into it. Pull
11:02
up my loop.
11:04
Pull through.
11:06
Chain one. Skip that stitch. And we'll
11:10
go into the next chain one space.
11:17
And there's my little spot where I put
11:20
my need, my hook. Okay, go in there,
11:24
pull up your loop,
11:26
and pull through.
11:29
And now you see how the clusters are
11:31
kind of staggering over each other.
11:36
Okay, so I did my chain one, skip that.
11:38
There's the V. That's a stitch. Next to
11:42
it is the chain one space. Pull up.
11:45
There's my space for my second
11:50
insertion point.
11:52
Yarn over. Pull through.
11:55
Chain one. Skip.
11:59
Chain one. Space is right here again.
12:03
There's my little opening. Go in there.
12:07
Yarn over. Pull through all three.
12:12
Coming to the end. Go into this space.
12:17
Pull up.
12:21
Pull through. Now we have two stitches
12:25
left. This one here. It's kind of hiding
12:27
behind this, but it's there. So that'll
12:29
be a chain one, skip one, and then as
12:32
always, we finish with a single crochet.
12:38
And that's your repeat.
12:42
those alternating rows. This was row uh
12:46
six. So, you'll repeat rows three
12:49
through six. That's three, four, five,
12:51
and six. Four rows.
12:54
And while they're almost the same, they
12:56
just start and end differently,
13:00
right? So, we start with the single
13:02
crochet and then here, since there's a
13:04
chain one space, you create another one
13:07
and work that single crochet on this
13:09
side.
13:11
So how you start and end before and
13:13
after that first and last single
13:15
crochet. You know, you might have a
13:18
might be a chain one, skip one, or it
13:21
might be a directly working a one of
13:24
those uh stacked cluster single crochet
13:27
stitches.
13:30
So once you get set up, it's pretty easy
13:32
to follow once you get into your rhythm.
13:36
And then you just work out your uh your
13:39
length. So your starting chain is your
13:41
width.
13:44
And then next I'm going to show you how
13:46
I make the tassels. So for mine that you
13:49
see in the
13:52
you see how I'm working the uh chain
13:54
one, skip one, and then working single
13:55
crochets into these V's. Sorry, I don't
13:58
think I said what I was doing, but we've
14:00
done this row already.
14:03
They just start and end differently. And
14:04
then here I'm at the end. There's a
14:06
chain one space. I make another one and
14:09
end with the single crochet. So for my
14:12
blanket that you see, I wanted to do
14:14
something a little different. So mine is
14:16
two tones. It's two blocks of color. So
14:19
when you look at your yarn guide for
14:22
your amounts, you'll just of course
14:23
divide that in half if you want to do a
14:25
two-tone. And then my tassels are
14:28
two-tone. And this is a borderless
14:30
modern blanket. So, if you want to do a
14:33
border, you can feel free to add some
14:35
kind of border that you like, but I
14:37
wanted just tassels. I didn't want a a
14:39
formal border. I feel like that takes
14:41
away from the stitch, but it's just
14:44
personal preference. You do what you
14:46
like. All right. So, let me get my yarn
14:48
and we will start making some tassels.
14:51
All right. So, before we do a tassel, I
14:53
want to mention that when you're working
14:55
this stitch, your project is going to
14:58
start leaning in one direction. you're
15:00
not doing anything wrong. This is what
15:02
happens when you're not using the same
15:04
stitches on both sides and the uh one of
15:07
the sides has more yarn
15:10
being used. So for the row where these
15:14
clusters are being made, these are using
15:16
more yarn than the single crochet chain
15:19
one skip one rows. Right?
15:22
Are you following me with that? So it's
15:24
going to cause some leaning. That
15:26
happens anytime you're doing link
15:28
stitches with a different kind of a
15:29
stitch on the other side. It's perfectly
15:32
fine. You have to block it, though. You
15:35
might be cringing when I say that, but
15:37
that's just that's the fix for it. So,
15:41
for a blanket, what I do when I block
15:43
these larger pieces, I wet them down in
15:46
a tepid water. I don't use cold, I don't
15:48
use hot, just kind of a room
15:50
temperature, you know, 80, even up to 90
15:53
degrees, like a a summer day outside.
15:55
how is how I describe it. Well,
15:58
depending where you live. Where I live,
15:59
sometimes it's 100° in the summer, but
16:01
not quite that warm. Kind of in that 80°
16:04
range. Comfortable to the touch. And if
16:07
you have it, a little fabric softener to
16:09
really help loosen up the fibers so you
16:12
can manipulate them into shape. Then do
16:16
either a spin cycle. If you're doing it
16:18
in your washer, do a spin cycle. You
16:20
don't have to wash it with soap. Just
16:22
get it wet. really wet block. Don't just
16:26
mist it. Don't steam it. You have to wet
16:28
block this. Then I put it on two yoga
16:32
mats for the size I made. This is a
16:34
small throw size.
16:36
And pin it down, pin down the edges,
16:38
kind of shape them, make sure everything
16:40
looks good. And then I put just a little
16:42
room fan that I have and let it blow on
16:44
it. But because this is cotton, this is
16:46
going to dry pretty quickly. It took
16:48
about maybe 6 8 hours, you know,
16:51
overnight. It should dry for you if you
16:53
get enough water rung out. Now, if you
16:56
do not have
16:58
a spin cycle, if you hand wash things,
17:01
you everybody's different. I know not
17:03
everyone has a washing machine. Roll it
17:05
up in towels. Really thick towels. Roll
17:08
to kind of ring out the extra water.
17:10
Don't stretch it too much. Although it's
17:11
pretty sturdy. Uh just, you know,
17:14
carefully get it to get into shape and
17:17
get out as much water as you can. All
17:20
right. Then once it's dry, we're going
17:22
to move to our tassels. So it's great
17:25
that I have two colors because you're
17:27
really going to be able to see what I'm
17:28
doing. You can make your solid, you
17:30
know, what whatever you like. It's your
17:32
blanket. You do what you like. But since
17:34
I have two colors, I thought it would be
17:35
fun to, you know, do the contrast. So
17:38
for my tassel,
17:41
what I do is, uh, this I wrapped on a
17:46
DVD case. Those are about 7 and 1/2 in
17:50
the long way. So if you have a a small
17:52
book, if you don't have any DVD cases, I
17:55
feel so dated using those, but I have
17:57
several that I've had for years, even
18:00
though I haven't used them. Everything's
18:02
streaming now. Okay. And then before
18:04
taking it off of the
18:08
Okay, let me
18:11
here. Let me just use one of my
18:12
notebooks. So these are a little bit
18:14
longer. This is my project tracker,
18:16
although I've updated the um the covers
18:19
for this year. You know, wrap it around,
18:22
but before you pull it off the top here,
18:26
what I did was slide under a double
18:29
thickness of yarn up here, secure it,
18:33
and then pull it off.
18:38
And I'll worry about trimming them
18:41
later. Okay, these I'm going to use to
18:43
attach to my blanket and then to make
18:48
the little gather here secure. Let me
18:52
show you. I do
18:59
leave it a little bit of a tail out.
19:01
Gather it up.
19:07
Sure everything's smooth and straight.
19:10
Going
19:25
to wrap this around a few times.
19:46
Okay, that's good.
20:03
in here.
20:07
Small hook.
20:10
Stick it up in there and bring that tail
20:13
down.
20:15
And then the same with the other one.
20:24
Should be up here.
20:33
just in the opposite direction.
20:39
Oops.
21:21
I just trim it to lay flush with
21:25
the base.
21:44
And then um of course you're going to
21:47
line these up and trim and make your
21:51
edges even. They'll be a little slightly
21:54
crooked, but you just trim them up like
21:55
you're doing a haircut. Okay. And then
21:58
I'm going to attach to my corner. Let me
22:00
get my blanket.
22:04
All right. Right. So, I'm going to go
22:05
into the corner here.
22:08
Probably should have used green for this
22:11
top part, this top tie,
22:15
but it's mostly going to be hidden, so
22:16
it doesn't matter.
22:20
I'm going to just do one pass of a knot
22:24
here
22:26
to secure it.
22:36
One more time and then
22:41
open this up.
22:44
Going to work the ends in. I don't know
22:46
if I can do it invisibly with this
22:48
color. Let's see. I may have to take it
22:50
out and put the green yarn in. But just
22:53
so you can see what I'm doing, this is
22:54
going to work nicely. And I'll pull it
22:56
out if I have to. So, this is going to
22:58
be a do as I say and not as I do
23:01
possibly if you do the two-tone. If you
23:03
do all one color, this will not be an
23:06
issue, but I had to be a little extra.
23:09
So, the price I pay,
23:13
make sure I'm not splitting this. Now,
23:16
it's not splitty yarn, but when you use
23:17
a needle, you can sometimes break that
23:19
chainet
23:21
weave that's used for these. I'm going
23:24
to do two kind of weaves a little bit
23:28
and then take the yarn and go back in
23:30
and pull it down through here like I did
23:32
with the little green wrap area there.
23:40
That's normally what I do with my
23:42
tassels,
23:52
mostly invisible.
24:03
of my other ones. I just wo the strands
24:05
all the way around and through the
24:08
blanket and once I knotted it. So that's
24:12
how I attached them. You may have a
24:14
different way that you like, but this is
24:15
just what I've always done.
24:20
And then your blanket's done. Now, if
24:22
your yarn is a little curly, like this
24:24
one's somewhat curly because I took it
24:26
um I needed a new ske to make my
24:28
tassels. The inside where to do a center
24:32
pull, it's kind of bunched up, of
24:34
course. So, you can just wet them and
24:36
let them dry hanging and the weight of
24:38
the water will pull them straight.
24:45
And then you're done. Weave in your ends
24:49
and you have a lovely soft, drapey,
24:52
summery blanket.
Hobbies & Leisure
Fiber & Textile Arts