0:00
Welcome to day 16 of the 30-day mixed
0:04
media card challenge that I set myself.
0:07
Um, if you want to find all the others,
0:08
you can find them in the description, on
0:10
the screen, wherever. You know the form.
0:12
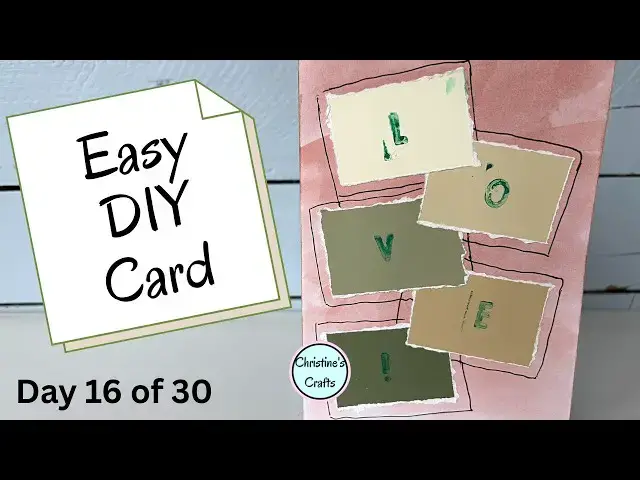
But today's card is this one here. So,
0:18
I'm using these paint samples that you
0:20
can get from any DIY store. Uh, it
0:23
doesn't matter what size they are. You
0:24
can make them what size you want. You
0:25
can cut them down. and just an ordinary
0:27
card blank or a piece of card folded in
0:29
half. And then you can just use them as
0:32
they are, but what I like to do is rip
0:35
the edges. I think it gives a really
0:37
nice effect. Now, what you'll notice is
0:39
the easy way I'm going to say in quotes
0:42
to do this is to use a nice sharp edge
0:45
like a metal ruler and just rip it down.
0:47
Did you see how beautiful that was? If
0:49
you try and take too little off, that's
0:51
when you have trouble. And that's what
0:54
you can see me doing here, wrestling
0:55
with it. So, ideally, take a reasonable
0:57
amount off and it'll just rip down and
0:59
give you a nice nice edge. So, I'm just
1:02
going to do that to all of them
1:06
and then I'm ready. So, I'm going to
1:08
think about where to position them. And
1:10
at this point, you could stick them on
1:12
and and that could be your design. And
1:14
you can see I'm just thinking about
1:16
laying them like that, but I want to get
1:19
the background a different effect. So,
1:21
what I'm going to use is watercolors.
1:25
So nice and simple bit of water on the
1:27
watercolor palette and then just color
1:30
it in. You could of course use crayons,
1:33
pencil crayons, acrylic paints. You
1:36
could do some sort of stamping on there.
1:38
You could do absolutely anything and
1:40
it's a backdrop. I like watercolors
1:42
because you get that different um
1:44
effect. It's not just a a flat color.
1:47
And I do like the brush strokes. And I
1:50
also tend to leave the card closed which
1:51
does cause a problem. You will see in a
1:53
moment. What you could do is open the
1:55
card up and put a bit of washi tape or
1:57
masking tape down the center and just
2:00
color the front. So, let that dry and
2:04
then finalize your design and stick
2:07
those cards on. I'm just going to use an
2:11
ordinary glue stick and just stick them
2:13
down flat. You could use the little foam
2:16
pads and raise them up if you want that
2:18
3D effect or use whatever glue you've
2:21
got to be honest. And then it's just a
2:24
case of gluing them all down where you
2:27
want them. Now, obviously, I've thought
2:29
a little bit in advance that I want to
2:31
write a word on these. So, I've picked
2:33
the right number. And again, just give
2:36
that a little bit of thought if you do
2:37
want to add more detail. If you're
2:39
enjoying this video, could you give it a
2:41
thumbs up so it spreads to more people
2:43
and they can use up all those little
2:45
little chips they get from the DIY
2:47
store? Because we'll keep them thinking
2:49
we're going to use them. And here's a
2:50
great way to use them.
2:53
So before I do my stamping onto those
2:56
cards, I'm just going to put an ink pad
3:00
around the edge of the card. I like the
3:02
effect. So I do it on some of my cards
3:04
and not others, but it does give a
3:10
if you have an ink pad.
3:13
And then I'm also going to use an ink
3:15
pad on the actual cards,
3:19
but I quite like the effect of drawing
3:21
around the cards. So, I'm just using an
3:24
ordinary black fine liner. Nothing
3:26
fancy. And you can see I'm not using a
3:28
ruler cuz I've gone for the rough edges
3:30
on the cards. I think a rough straight
3:35
And I'm just outlining them. You could
3:37
add any detail you like with a marker
3:39
pen, a fine liner, felt tips, Sharpies,
3:43
anything you've got to hand. Just think
3:46
it adds a little something. It's all
3:48
about being mixed media and adding more
3:50
detail and more layers. And then I'm
3:54
stamps and an ink pad. Now, I've got
3:56
some quite dry ink pads, so I pressed
3:58
that in far too hard and got the extra
4:00
bit as well as the L. And then I've
4:03
learned, and so I'm just pressing them
4:04
gently. If you're good at stamping, you
4:07
will do much better than me. But as you
4:09
can see, even if you've never done it,
4:11
you can get a good effect. And you learn
4:13
as you go along. And then there you go.
4:17
You will have a card that you're happy
4:20
with. Now, I mentioned earlier a little
4:23
problem you can have if you paint it
4:28
And you will see there's some paint
4:33
So, the way you can deal with that is by
4:35
adding more paint and but it looks like
4:37
an effect or I'm just going to use my
4:39
ink pad and run that down. And I'm just
4:45
overlapping to the the front of the card
4:47
quite well and just make it look like it
4:50
was meant to be like that. A bit of a
4:51
rough and ready finish, but I quite like
4:54
that. And then there you go. So, I hope
4:56
you've enjoyed this card and I hope
4:58
you've been inspired to use up your
5:00
little paint samples and enjoy.