0:01
Welcome to day 24 of the 30 mixed media
0:04
card challenge. It's all about making
0:06
cards using the craft supplies you've
0:08
already got at home. So, if you want to
0:10
find the other videos on the screen, the
0:12
description below on my channel, you can
0:15
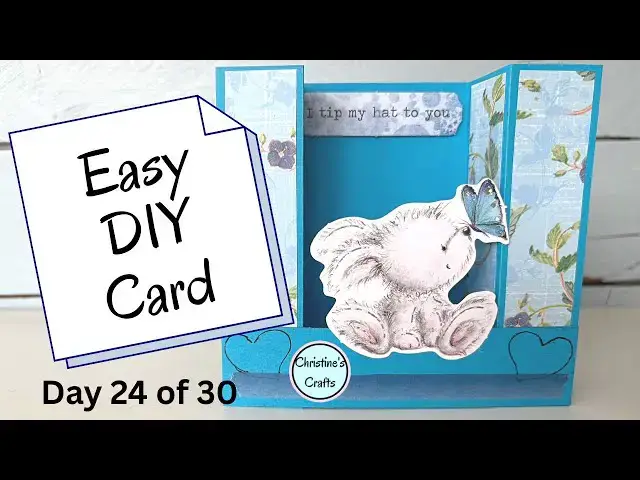
find them. But today, we're going to
0:17
make this little cutie. So, let's get
0:20
started. You need two pieces of card.
0:23
And you can make it any size you like,
0:25
but I'm making mine 7 1/2 in x 5 in. And
0:30
the smaller piece is 5 in by 1 in. And
0:35
if you want those in metric, you can do
0:44
Now, once you've got your piece cut on
0:47
the large piece, you're going to measure
0:49
in 1 in and 2 in from the side or 3 cm
0:54
and 6 cm from the side. So long as
0:57
you're consistent which one you're
0:59
working in. It really doesn't matter
1:00
which one you're using. And you can see
1:02
I'm just marking it slightly with a
1:03
pencil. I'm not going to be drawing any
1:05
lines here. I just want to know where to
1:09
So, just make sure it's very light and
1:11
people won't be able to notice it. And
1:14
then you're going to score along those
1:16
lines. So you could use the back of a
1:19
pair of scissors. You can use a scoring
1:22
tool. I'm actually using um a rounded
1:25
ended tool. It's just a little ball on
1:27
the end. It really doesn't matter. The
1:29
back of a pair of scissors is really
1:30
good for this as well. And you're going
1:32
to score along all four of those lines
1:36
that you marked so that they fold well.
1:41
And then once you've got all four,
1:43
you're going to take the inner ones and
1:45
fold the cardboard forwards.
1:48
And it's a really good idea to run a bon
1:50
tool or a ruler along that fold so it's
1:54
a nice crisp fold. And once you've
1:57
folded both of those in, the outer ones
2:01
you're going to fold out. Makes sense,
2:04
doesn't it? So you can see that shape
2:06
that you saw right at the beginning on
2:10
Let's just get that nice and crisp. And
2:12
there you go. You've got that nice boxy
2:18
Okay. And you can see how that goes on
2:22
So, we're going to decorate it with some
2:24
colored paper. Now, I've cut my strips 4
2:28
1/2 in x 5/8 of an inch. So, they just
2:30
sit nicely on those little panels. And
2:33
if you're working in metric, that's you
2:35
want to do them 11 1/2 cm by 2 1/2 cm.
2:39
and they should fit nicely in your
2:40
panels. Just going to use an ordinary
2:43
glue stick and stick one in each of
2:47
those panels that you made. Obviously,
2:49
you can use whatever paper you like or
2:51
you don't have to indeed put anything
2:53
on. But if you're going for the similar
2:54
effect to me, then you want these
2:57
strips. I've done them all the same. You
2:59
could use different papers.
3:02
It's entirely up to you. But you can see
3:04
how easy it is just to glue those in
3:07
place to give that effect. And then
3:10
it'll be time to think about what's
3:11
going in the back of the card and what's
3:14
going on the little bit at the front to
3:17
give us our overall effect.
3:19
So, it's a great idea to put a greeting
3:22
on the inside. Um, or you could indeed
3:26
put anything you like, a little
3:28
background, maybe some more of the same
3:30
paper. But I'm going to put a greeting
3:32
in the back. and my cute little rabbit
3:35
on the front. So, I'm going to stick
3:37
that greeting in. And the rabbit's going
3:43
So, the greeting in the back. I'm going
3:46
to still raise it up. So, I'm going to
3:48
use little foam pads just so that that's
3:52
got a little 3D effect going on as well.
3:55
If you want some free greetings that you
3:56
can print out, then I'll put a link on
3:59
the screen in the description below and
4:00
you can just go to my website and you'll
4:02
be able to access them. So, you don't
4:06
You can see how that's going to look
4:08
with my little rabbit.
4:11
So, I need to attach the rabbit to the
4:14
piece of card that's going at the front.
4:17
So, again, I'm just going to use the
4:19
glue stick and I'm just going to glue it
4:21
at the bottom of the rabbit.
4:27
and it'll just sit nicely on there.
4:31
So then you could decorate that stick
4:34
some more, which is what I'm going to
4:36
do. You can draw on it. You could add
4:38
more detail. I'm going to put a little
4:40
bit of washi tape on there just for a
4:42
bit of detail. You can see I've gone for
4:43
blue so it's not in your face, but it is
4:47
there. And I'm going to stencil some
4:49
hearts on. if you're enjoying this
4:52
video. Oh, my apologies. My hair is
4:54
dropping in the way. Normally pin it
4:56
behind my ear, but obviously it's it's
4:58
moved. So, sorry about that in the
5:00
corner. Um, if you're enjoying this
5:03
video, I was going to say, could you
5:05
give me a thumbs up below, please, so it
5:06
spreads to more people and we'll carry
5:09
on. So, I think that's all I'm going to
5:15
and then stick it on there
5:19
and that'll be really pretty. So, again,
5:23
nothing fancy. Back with the glue stick.
5:26
And this is why I say these cards are
5:27
intended to be with things you've
5:29
already got at home. Whatever you've
5:37
Nice pretty card. Now, when you want to
5:40
send it off and you want to get it flat,
5:41
you just push it flat. And this card
5:44
when it's flat is 5 in wide or 13 cm
5:49
wide if you're in metric. Just so you
5:51
know what sort of envelope you'd need
5:52
for this size of card. So, I hope you