Up next in 10

PHP 8 GD Library Example to Add Watermark to Image at Different Positions Full Crash Course
Jan 9, 2025
Get the full source code of application here:
https://gist.github.com/gauti123456/8c91e395a149186b9a1ad631cb42687d
Show More Show Less View Video Transcript
0:00
uh hello guys welcome to this video so
0:02
in this video we'll talk about uh the
0:05
graphics library in PHP and uh it's a
0:08
built-in Library you need to activate it
0:11
and we'll be looking at a very simple
0:13
example on how to create images from one
0:15
format to another how to add Watermark
0:17
at different positions let's we have
0:20
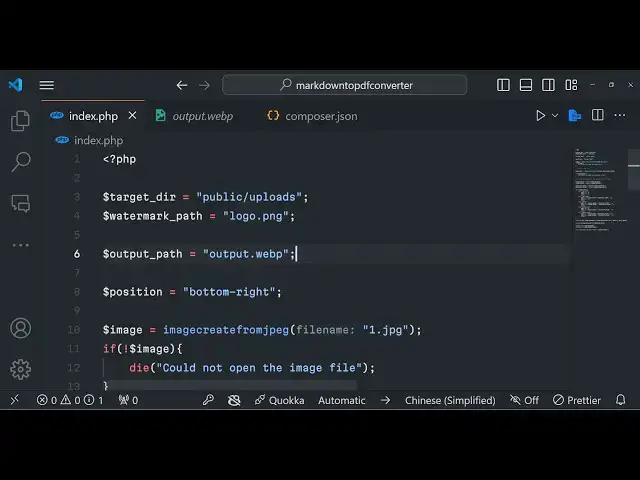
this Watermark and we will be actually
0:22
having this index. PHP script and if I
0:25
run this script right here it will
0:27
create a new file which is output. webp
0:30
file and it will have this Watermark
0:32
appearing in this image you will see at
0:35
the uh top right position we can even
0:38
place it in the center position top left
0:40
bottom right bottom left all these
0:42
positions are supported this is actually
0:44
the PHP script so first of all guys uh
0:47
Graphics Library which is built in in
0:50
PHP it is called as GD Shand GD stands
0:55
for graphics library and uh it is
0:59
basically it's a
1:00
utility Library built in in PHP so if
1:03
you install PHP uh I
1:06
basically I'm using exam control panel
1:09
if you
1:10
see we have this Apache server which
1:13
comes with
1:14
exam so if you basically have exam it's
1:18
a crossplatform
1:20
software you can download for Windows
1:22
Mac or Linux it's available for all the
1:25
systems so once you download basically
1:28
it is located in the C directory
1:30
and there is a folder exam when you
1:32
install it so just go to HD do folder to
1:36
actually create your project so here you
1:38
will create your project so now to
1:41
activate this Graphics Library you need
1:44
to I'm just running the latest version
1:47
of PHP which is at this moment of time
1:49
is 8.3 I'm running 8.2 so you need to
1:54
activate this Graphics Library if you
1:57
don't have it so you need to open your
1:59
ex exam directory just go to C directory
2:02
just open this exam directory and then
2:04
go to PHP directory PHP this is a
2:07
directory PHP and you need to open the
2:11
PHP configuration file so this is
2:14
actually the configuration file that you
2:15
see PHP configuration file you need to
2:20
Simply open it inside notepad on any
2:22
text editor and just search for GD so
2:25
here at the very top contrl F just
2:29
search
2:30
GD and basically you will find out this
2:33
extension
2:35
GD if you put uh by default it will have
2:38
semicolon you need to remove it remove
2:41
this semicolon save this configuration
2:43
file and then restart your server simply
2:47
restart it so once you restart you will
2:49
be having this GD Library activated now
2:52
you can use this library inside your PHP
2:55
script so now we will be looking at a
2:56
very simple example on how to use it so
2:58
just create an index PHP file and right
3:02
here inside this PHP script we will
3:05
actually be loading this uh Graphics
3:08
Library so it is automatically loaded
3:11
now we can use it so we will be telling
3:17
our uh the image file which is present
3:20
is in the public SL uploads directory so
3:23
our image file that is needs to be
3:25
processed this is actually the image
3:26
file that we are taking for example we
3:28
need to add watermark here and uh this
3:32
jpg image is present in the public /
3:34
uploads directory so we are just
3:36
referencing it inside the index. PHP
3:38
script right here so after you do this
3:41
all the source code is given in the
3:42
description guys I'm writing all the
3:44
source code you can copy this and then
3:47
we will simply be telling where the
3:49
watermark is located so Watermark is
3:51
located in the same directory logo.png
3:55
the name of the this is actually the
3:57
YouTube watermark transp Watermark we
4:00
need to add this Watermark and then
4:03
we'll be telling the output path it will
4:05
get created in the same directory so let
4:08
me say output. webp so this file will
4:11
get created once you run this you can
4:14
just see let me delete this so this
4:17
output. webp file will get created once
4:20
we run this PHP script and now the
4:23
position of the water mark So by default
4:25
it will be there on the top right
4:27
position
4:29
it can be in top left bottom left bottom
4:32
right center as
4:34
well so this is actually the we have
4:38
this function called as image create
4:41
from
4:42
jpg you can see that we have all these
4:45
functions available in GD Library
4:47
Graphics Library image create from
4:49
GIF we are taking the jpg example right
4:53
here that's we'll be using image create
4:55
from jpg and it basically creates a new
4:58
image file from a file or a URL so we
5:03
will simply be providing the file which
5:06
is
5:08
present which is the target
5:12
directory
5:14
1.
5:18
jpg so it will actually create a JPG
5:23
image from this uh
5:25
path so after creating it we will have
5:28
this if condition that we will simply
5:30
check if the image is already created or
5:33
not so if the image is not created in
5:36
that case we'll use the D function in
5:38
PHP to actually stop this this PHP
5:42
script and simply open just say to the
5:45
user that cannot open the image
5:50
file so if the image is successfully
5:53
loaded then we will simply add this
5:56
Watermark so you also need to load the
5:59
water Mark image as well in the same
6:01
manner so again we'll be using the same
6:04
function right here this time we'll be
6:06
using image create from PNG because the
6:08
watermark is a PNG image so we have a
6:11
dedicated function for this also which
6:13
is image create from PNG we will use
6:16
this function right here once again we
6:17
will provide the path of the image as an
6:20
argument right here so simply be passing
6:24
Watermark
6:26
path so this function will create a PNG
6:30
image it will read all the content and
6:32
create this image in the watermark
6:34
variable and again in the if condition
6:37
we will check that if this image has
6:39
been created successfully or not if this
6:41
image is not created then we will simply
6:44
say that could not open the watermark
6:50
file so now as you can just
6:54
see if the watermark image and also the
6:57
input image is successfully loaded
7:00
after this we come to the part where we
7:04
add the watermark to this image so for
7:07
that we need to first of all calculate
7:09
the width and the height of the
7:10
watermark and the actual position as
7:12
well so we need to get the dimensions of
7:16
the image and the watermark image as
7:18
well so here we will simply declare
7:21
variables for image width so there is a
7:24
function in this GD Library Graphics
7:26
library or PHP which is IM image SX so
7:31
the sole function of uh this function is
7:34
responsible for calculating the
7:36
width of this input image similarly I'll
7:39
be calculating the height as well image
7:42
height and this one this is image s
7:46
y this function calculates the height of
7:48
the image we need to pass the actual
7:53
image and same thing we need to do this
7:55
for the watermark image as well so
7:57
Watermark width same function we will
8:00
use image exis and here we'll be
8:03
providing the watermark image as an
8:05
argument and same thing which is
8:08
Watermark
8:12
height so again you'll be using this
8:14
function and here will be providing the
8:16
watermark image path so now we have
8:20
these four variables storing the input
8:22
image width height and the water mark
8:25
width and height so now we got these
8:28
Dimensions the next step is to calculate
8:31
the actual position of The Watermark by
8:33
default we are actually adding The
8:35
Watermark at the top right position so
8:38
for that we need to have a switch
8:40
statement which will handle multiple
8:43
cases so we'll be having this position
8:45
as an argument so we will have five
8:48
cases the first case will be the top
8:50
left
8:51
position so if the user selects this
8:54
position then we need to calculate the x
8:56
coordinate and the y coordinate so for
8:58
this we'll be having the x coordinate to
9:00
be
9:02
10 and also the y coordinate to be also
9:08
10 and then we will break from this
9:12
switch statement similarly we will have
9:16
uh the next case which is for top right
9:27
position and for this we we will have to
9:30
calculate the x coordinate to be this
9:33
will be dynamic we'll be using some
9:34
maths here so you need to Simply have
9:38
the image width and from this we need to
9:40
subtract the watermark width and then
9:43
minus
9:45
10 this will be the x coordinate and for
9:48
the y coordinate destination y this will
9:51
be equal to 10 and then
9:55
break and the next case will be for the
9:58
center if you want to place the
9:59
watermark at the center so this will be
10:02
destination
10:07
X so this will be the actual formula
10:10
right
10:12
here let me paste
10:16
it so here we divide the value of image
10:20
withd minus waterm by two and similarly
10:24
for the Y as well we do
10:28
this and rest of the cases this is for
10:31
the bottom left and the bottom right so
10:34
same thing we will do it for this
10:46
also so here you can see that we are
10:49
calculating the x coordinate and the y
10:51
coordinate for the bottom left and the
10:53
bottom right so you have this so after
10:58
this uh
10:59
inside outside this switch statement we
11:02
have all these cases for this position
11:04
of the
11:05
watermark and then we will simply copy
11:08
The
11:09
Watermark to the image by using this
11:12
function called as image copy so here we
11:14
will be having the input image and then
11:17
we'll be passing the
11:18
watermark as the second argument the
11:21
third argument will be the x coordinate
11:23
and the y
11:25
coordinate destination is and
11:27
destination y
11:29
and then we will have
11:31
the width and the
11:34
height and then the
11:37
watermark width and water Mark Height so
11:41
it takes all these
11:43
parameters this
11:46
function so this is actually the
11:48
function responsible for adding The
11:50
Watermark to the image so it takes all
11:52
these values and it generates the
11:54
watermark on top of the image and now we
11:57
need to save this output image so for
11:58
saving it we will be using this image
12:02
web P you have all these functions if
12:05
you want to convert this into image jpg
12:08
image PNG as well but we need to convert
12:11
this into webp image we'll be using this
12:13
function image webp and we'll be having
12:16
this input
12:17
image and then the output
12:24
path so then we now need to destroy
12:29
everything the input image and the
12:31
output image for doing this we'll be
12:32
using the image Destroyer function which
12:35
will delete the input image and the
12:37
watermark image after we done the our
12:40
operations this is a good practice to
12:42
actually delete
12:44
everything just deleted from the
12:47
memory we are deleting the input image
12:49
and the watermark that's all this is
12:52
actually the overall
12:53
script and then we can simply Echo out a
12:56
message that your image has been
12:59
generated that image has been saved to
13:01
this output path so this is actually the
13:03
overall PHP script now we can simply run
13:06
run this so if I just run this run this
13:09
code you will see on the left hand
13:12
side so it is saying that on line number
13:15
turn there is some kind of error let me
13:27
check a line number 10 we we are
13:29
basically giving the input image path
13:41
so I think I have done some typo mistake
13:44
here let me paste
13:47
the okay you can see image Target
13:50
directory 1.
13:52
jpg so if I run this now
14:03
public SL
14:05
uploads so what I will do I will make
14:08
this image in
14:11
this this you can see now this image is
14:14
present in the same directory so what
14:17
this makes it easy so what I will do I
14:19
will simply provide directly which is 1
14:24
dot jpg
14:30
so now if you see the output image has
14:32
been generated output. webp if I open
14:35
this image you will see the water mark
14:36
is appearing on the top right position
14:39
so the nice thing is that we have this
14:41
variable we can change this position to
14:43
top left now again run this so if you
14:47
see now this is appearing in the top
14:50
left position The Watermark I can change
14:52
it in the
14:55
center again run this so now this
14:58
watermark will be appearing in the
15:00
center position same goes with the
15:02
bottom left position if you want to put
15:04
it again run the code now it will be
15:08
there on the bottom left same with the
15:10
bottom right as well so if I run this
15:12
now so the water mark is appearing on
15:15
the bottom right position so in this way
15:17
guys you can add Watermark to images you
15:20
can convert image from one format to
15:22
another you can do all sort of things uh
15:25
it's a very vast Library you can check
15:27
out the documentation by visiting the
15:30
PHP GD docs just write this on Google
15:33
and the GD manual will come in you will
15:36
basically see all these methods are
15:38
there in this Graphics Library which is
15:40
built in inside PHP this is not a third
15:42
party Library it's already built in the
15:45
core library or PHP all these functions
15:48
are there if you
15:49
see related to image processing so this
15:54
was a demo video just introducing this
15:56
library with a simple example on how to
15:59
use this and first of all you need to
16:01
activate it if you already don't have
16:03
activated I told you in the earlier step
16:06
going going to the PHP configuration
16:08
file and activating it so thank you very
16:12
much for watching this video and please
16:14
hit that like Buton subscribe the
16:15
channel as well and I will be seeing you
16:18
in the next video
#Programming
#Education
#Educational Software