Up next in 10

How to Setup Spring Boot and Run Simple Web App in VS Code Full Tutorial For Beginners
Feb 21, 2025
How to Setup Java SDK & Run Java Program in Visual Studio Code
https://youtu.be/NDLqtOVpiLo
Watch My Visual Studio Code IDE Setup Video For Fonts,Themes & Extensions
https://youtu.be/Bon8Pm1gbX8
Hi Join the official discord server to resolve doubts here:
https://discord.gg/cRnjhk6nzW
Visit my Online Free Media Tool Website
https://freemediatools.com/
Buy Premium Scripts and Apps Here:
https://procodestore.com/
Show More Show Less View Video Transcript
0:00
uh hello guys welcome to this video so
0:02
in this video I will show you how to get
0:04
started with the spring boot how to
0:06
install it and run it inside your vs
0:09
code and I will run a simple web
0:10
application which is brought to you
0:12
which will be made by Spring boot spring
0:15
boot is a Java framework for building
0:17
web applications so I will show you the
0:19
step-by-step process on how to get
0:21
started in Visual Studio code so first
0:24
of all guys you should have Java
0:25
installed for spring boot so I've
0:28
already downloaded Java so if you go to
0:30
the command line and if you want to just
0:32
check if the Java version is installed
0:35
you can execute this command java--
0:37
version so it will tell you the exactly
0:40
which version is installed right here so
0:42
if the command is successful so I have
0:44
the latest version of java which is
0:46
installed so if you want to all if you
0:49
want to install Java if you want to
0:51
watch the video I've given the link in
0:53
the description of the video where I st
0:55
you where I showed you how to get
0:57
started with installation of java how to
1:00
get started in vs code so if you want to
1:02
first of all watch that video go to the
1:04
description link you must have Java
1:06
installed inside your system and you can
1:09
download the latest version of java STK
1:11
by simply typing download Java SDK and
1:16
this Oracle website which comes so the
1:19
latest version is jdk 23 so just install
1:24
this is a simple exe file for Windows so
1:26
just select your operating system so I
1:28
am there inside
1:30
x64 so just install
1:33
this and uh now coming back to Spring
1:38
boot inside your vs code so if you also
1:41
want to get how I basically set up my vs
1:45
code what extension settings that I
1:47
showed so I basically you can see I have
1:51
a custom background inside vs code if
1:54
you want to get started and I also
1:56
customized the file explorer window it
1:58
will have this nice little box Shadow if
2:00
you want to actually see my setup video
2:03
vs code crash CES I also given the link
2:05
in the description of this video so you
2:07
can actually uh get the same setup that
2:10
I have this minimal setup that so now
2:13
first of all for this you need to have
2:16
this extension so just type Java
2:19
extension pack so for this you need to
2:23
have this extension which is developed
2:25
by Microsoft and it is having 33 million
2:28
downloads so I have already have this
2:30
extension so this is necessary for
2:32
spring because spring is a framework of
2:35
java so you should have
2:37
Java this extension already installed so
2:39
just install this and now the second
2:41
extension you need is simply type spring
2:45
extension
2:47
pack so this is actually spring boot
2:50
extension pack and it's also having 3
2:53
million downloads and it's developed by
2:55
this
2:56
VMware and now just simply click install
3:00
so it will install all these extensions
3:02
that is there inside the spring boot
3:04
extension pack so once it is installed
3:07
you just need to hit the shortcut key
3:09
control shift p to open this file
3:12
explorer and then just type spring and
3:16
here you need to
3:18
create a gradal project or Maven project
3:23
so there are two types here either you
3:25
can create a Gradle project or MAV so I
3:28
will just select here
3:31
Maven so Maven you can select either you
3:34
can select grel Maven is the latest one
3:37
in Spring boot so I will say Maven and
3:39
here you need to specify which version
3:41
of spring boot you want to install so I
3:43
will install the latest version which is
3:47
3.5.0 so after selecting it you will see
3:51
which language you want to work on so
3:53
you can even search you can also work
3:56
with cotlin and groovy as well but I
3:58
will select Java and here you need to
4:00
give your package name so let me say com
4:03
do coding uh coding s so you can give
4:06
your own package name after
4:10
that you need to provide a simple let's
4:14
suppose I say coding sixa project your
4:16
project name and then specify packaging
4:20
type so either two options jar is the
4:23
most popular one so simply select charar
4:26
and then the jdk version so I have the
4:29
latest jdk install which is 23 so I will
4:32
select 23 and now here you need to
4:35
select the dependencies so we will be
4:37
building a spring boot web application
4:40
simply select spring web so this is
4:43
useful for building your restful
4:45
applications web
4:46
applications and simply select this
4:49
dependency and now you need to select
4:51
the folder in which you need to actually
4:53
create this so I already created this
4:55
folder Java project let me generate this
4:59
into this folder so once it is created
5:02
this it will now say open this project
5:04
so I will simply say open and now it has
5:07
created your spring boot project so the
5:09
default structure of the spring boot
5:11
project will look something like this
5:13
you'll see we have this Source folder
5:16
and inside the main folder we have the
5:18
Java folder and it has a basic coding
5:22
sixa project application. Java file and
5:26
now do actually create a route inside
5:28
your web application we need to create a
5:30
controller so right in this folder you
5:33
need to
5:34
create new file and here you can simply
5:38
say
5:40
coding s project controller you can give
5:44
any name to this I'm just giving it like
5:46
this the same name but this will be the
5:49
controller file so coding sixa project
5:51
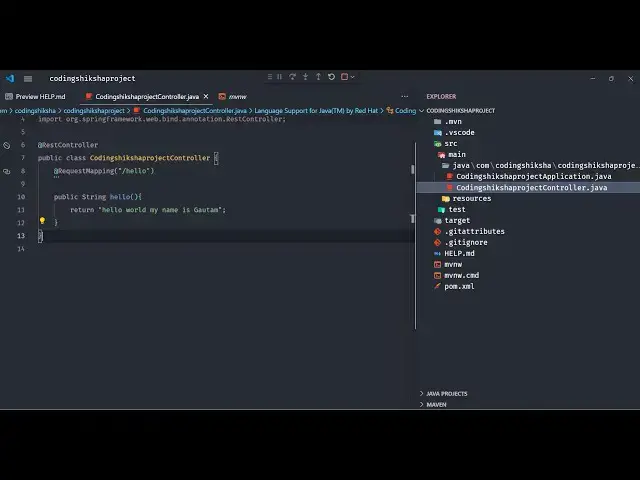
controller. Java and by default
5:54
automatically this code will be inserted
5:56
and this is your controller name and
6:01
now we need to create a simple
6:03
route inside our web application so we
6:06
need to give this rest
6:10
controller which is part of The
6:13
annotation which is part of your it will
6:15
be automatically inserted by vs code it
6:18
is it is part of the spring boot
6:21
framework and here after this inside
6:24
this you will write your mapping so
6:27
there is this request mapping
6:31
so here you need to import this as well
6:34
and here you will mention what sort of
6:37
route you want to create so let me
6:39
create a simple hello route so whenever
6:42
someone goes to the hello route we need
6:44
to displace a string so here you'll be
6:46
writing a public function string and you
6:49
can call this as
6:51
hello so this can be any name but I am
6:54
just saying hello and here when someone
6:56
goes to the hello route we will simply
6:59
return hello world so now this we have
7:02
basically made a simple spring boot web
7:04
application so when someone goes to the
7:06
hello route we are returning hello world
7:09
so now to run this application you see
7:11
these three dots now simply select run
7:15
Java so as you install those two
7:17
extensions this run button is
7:19
automatically provided to you and as
7:21
soon as you run this project simply
7:23
select this uh
7:25
controller this project here and as soon
7:28
as you select your project project and
7:31
it is saying that insert semicolon and
7:33
just make sure after you write
7:36
this string just make sure you end this
7:39
with semicolon that's the error and once
7:42
again run the
7:44
project and once again if you run this
7:47
you will see it will run this spring
7:49
Boot and it will start your application
7:52
by default you can see it is running
7:55
spring Boot and if you see it has
7:58
started your web application or port
8:00
number
8:02
8080 which is if you see it's a
8:06
tomcat it is using the Tomcat web server
8:10
and
8:12
uh so it has started this at Port number
8:15
8080 by default so if you go to your web
8:18
browser simply type Local Host
8:22
8080 and simply goes to the route hello
8:25
so now you will see Hello World will be
8:28
returned and this is your route and
8:31
let's suppose if I make any sort of
8:33
change here hello
8:35
world my name is CM so if I make this
8:38
change here automatically it will
8:40
restart this application and if you
8:44
refresh I
8:46
think hot Auto reloading is not
8:49
supported so once you make the change
8:51
you just need to click this button of
8:53
restart so this will restart your web
8:55
server these two buttons provided it is
8:58
the stop button button and this is for
9:00
restart so once you restart your
9:03
application you can see that so in this
9:06
way guys you can get
9:09
started of using spring boot inside your
9:12
vs code so I showed you how to run a
9:14
very basic web web application so this
9:16
is a step by-step process so if you want
9:19
to get started using Java you can watch
9:22
the my video the link is given and also
9:24
how to get this set up in vscore so all
9:28
the two videos links are given in the
9:29
description so you can check out those
9:31
videos as well so thank you very much
9:33
guys for watching this video and also
9:35
visit my website as well free mediat
9:37
tools.com uh which contains thousands of
9:41
tools regarding audio video and image
9:43
and I will be seeing you in the next
9:45
video
#Java (Programming Language)
#Development Tools
#Computer Education