Up next in 10

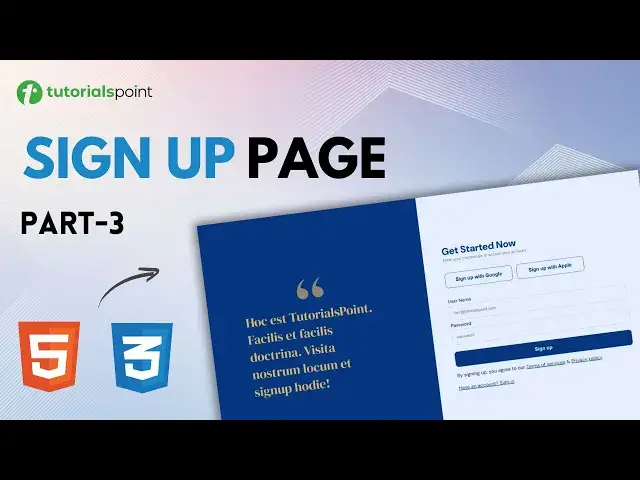
Learn how to create a simple and beautiful signup landing page using HTML and CSS. Perfect for beginners! Follow step-by-step instructions to design your own web page easily.
Get Certification in Web Development: https://www.tutorialspoint.com/certification/web-developer-guide-for-2022/index.asp
Use coupon ""YOUTUBE12"" to get “FLAT 12%’’ OFF at Checkout.
Quality Learning to UPSKILL yourself only at TutorialsPoint.
In this CSS course for beginners, you’ll learn important CSS concepts step by step to help build beautiful, responsive websites. This series will cover essential topics like Flexbox, Positioning, the Box Model, Layout, Typography, Colors, Project, and more to help you master web design. Whether you're new to coding or looking to refine your skills, this course will guide you through each concept simply, ensuring a strong foundation in CSS.
Tutorialspoint, a leading ed-tech platform, offers Simply Easy Learning at affordable prices.
Check out more Trending Courses to Learn: http://bit.ly/3KBW32w
Subscribe to our Channel to get more related updates and turn on the notification:
www.youtube.com/@TutorialsPoint_
#tutorialspoint #css #cssflexbox #cssproperties #cssproperty #csstutorial #webdevelopment #programming #webdeveloper #csstutorials #csscourse #cssforbeginners #csstutorialforbeginners
Show More Show Less View Video Transcript
0:00
hello and welcome to tutorials point in
0:02
this video we will continue to design
0:04
right side of our signup page using CSS
0:07
so let's not waste time and get started
0:10
now for the right side of the de let me
0:12
just Target
0:14
it for the right side of the de the
0:16
first thing is we are going to use a
0:18
different font family that we earlier
0:20
imported using Google fonts this one I'm
0:22
talking about DM Sans so for the font
0:25
family I'll write uh something as DM
0:29
Sans and in case of a fall back I'll
0:32
write serif okay let me just save it and
0:35
let's check the browser and as you can
0:38
see the font has changed next up we are
0:41
going to Target this H1 okay so I'll
0:45
write inside the right d there is a H1
0:49
tag targeted what about that H1 tag
0:52
we'll give it a different color and I
0:54
have already written that 02 3 as you
0:57
can see this blue color let me save it
0:59
and let's check
1:00
as you can see get started now is in
1:02
blue color right now same as this one
1:05
all right next up we're going to
1:07
increase the font size to 32 pixels
1:10
we'll give it a font weight of let's say
1:13
700 and let let me just save it and as
1:18
you can see it looks much better now we
1:20
can give it some margin
1:23
maybe all right or maybe we'll look into
1:26
the margin later on next St is we are
1:27
going to Target this paragraph element
1:29
all right so I'll again write inside our
1:33
right d there is a paragraph element all
1:37
right and for that paragraph element I
1:39
want the font color to be something like
1:43
747
1:44
577 light gray it is and the font size
1:48
should be close to 13 pixels let me save
1:51
it and as you can see here the paragraph
1:54
changes all
1:56
right next up what we are going to do is
1:59
we going to Target our form I'm talking
2:01
about this form right here okay so what
2:05
I'll do is I'll just give this form
2:09
maybe a ID right so that we can easily
2:11
Target it we can also write form here
2:14
and then Target it but um when you make
2:17
websites you can have multiple forms so
2:19
it is better to give them a class or in
2:22
our case we only have one form so we
2:23
will give it a ID so the ID will be
2:26
something like sign up form and me save
2:30
it and let's target this sign up form
2:33
using hash because it is a ID now inside
2:36
the signup form the first thing we'll
2:39
notice is if we go to images if we go
2:42
back to the image as you can see this
2:44
signup form they are on top of each
2:46
other all right so we need to give them
2:48
a display Flex so what I'll do is and
2:51
I'll give this a display of a
2:55
flex if we save it and go back to the
2:59
doc document nothing is happening uh
3:02
that's why because I made a mistake it's
3:04
sign up form and there is a spelling
3:07
error here so I'll write sign up form
3:10
and save it and let's go back now here
3:14
as you can see I'm given a display of
3:17
flex to the signup form next thing I
3:20
will give it a flex direction of column
3:23
and save it and if we go back as you can
3:26
see the direction changes of these
3:28
elements and now they are on on top of
3:30
each other all
3:36
right we can also give some gap between
3:39
the elements let's say a gap of six
3:41
pixels and save it and let me check and
3:43
as you can see there is some gap between
3:45
these
3:46
elements next up we are going to Target
3:49
these social buttons so here I'll write
3:55
social buttons and for the social
3:58
buttons firstly let's give them a width
4:01
of let's say 220 pixels let me save it
4:05
let's go back okay we can give it a bit
4:08
more maybe 225 or 224
4:13
pixels or not the social media buttons
4:16
we can directly give these width to the
4:18
buttons itself it won't work for the D
4:21
but it will work for these buttons so
4:23
let me just delete it and here I'm just
4:26
going to use display Flex so that we can
4:29
properly align the two buttons here the
4:31
sign up with Google and sign up with
4:33
Apple so if I save it as you can see
4:36
they are together now now the next thing
4:38
is to give it some Gap let's say a gap
4:40
of 14 pixels let me save it and go back
4:43
and there is some gap between these two
4:45
elements here next after we are going to
4:48
Target these buttons and we already have
4:50
given a class to these buttons as you
4:53
can see so I'll quickly
4:55
write ptn and for these buttons as I
4:59
told you clear the width will be 224
5:02
pixels save it and let's check and as
5:05
you can see the width increases next up
5:07
we are going to give them a height of
5:09
let's say 50 PX and we'll give them a
5:13
background color of
5:16
white also we'll give them a border of
5:20
one pixel solid and the color is going
5:23
to be the same blue that will match the
5:26
left
5:28
side and uh let me just save it we can
5:31
also give them a font color of the same
5:34
blue and let me save it and let's go and
5:36
check as you can see this is how it
5:38
looks we can also give them a border
5:40
radius and other stuff so after the
5:42
color what am I going to do is I'll give
5:44
them a font size of 16 pixels and then a
5:49
font weight of
5:51
600 border radius as I told you border
5:55
radius we can give something like 10
5:57
pixels and finally the cursor will be
6:00
pointer for this
6:01
button and I'll save it and let's go
6:04
back and as you can see the cursor is
6:06
now pointer for these buttons we can
6:09
later on add some H effects over these
6:11
buttons as well or what we can do is I'm
6:14
just going to add some H effects so that
6:16
they can look bit better so these
6:20
buttons I'll give them some hover
6:23
effects so this is how you give a hor
6:24
effect to a
6:26
button okay now for the hor effect I
6:29
will change change the font color to
6:32
white it is originally blue it will
6:34
change to White on hovering and the
6:37
background color will be blue here let
6:40
me save it and if I go back as you can
6:43
see the H effect is working correctly
6:46
for these three buttons now after these
6:49
button elements we are going to Target
6:51
our form so I'll just quickly copy the
6:55
ID for this form and let's start working
6:57
on it I'll write hash then signup form
7:00
now inside the sign signup form we are
7:02
going to Target our labels so we have
7:04
two labels one for the username another
7:06
for the password what about these labels
7:09
firstly the font color should be changed
7:11
and the font color is going to be hash
7:14
00 0 1 D 3 and C so something like this
7:19
and then let me just save it and check
7:22
first as you can see the color of the
7:25
username and password text changes we
7:28
can also capitalize I them so here is
7:32
how to capitalize using CSS what I'll do
7:35
is I'll write text transform property
7:38
and I'll set it to capitalize if I save
7:41
it and go back as you can see the first
7:44
alphabets are capitalized to u n and p
7:47
here okay let's go
7:49
back after this what I'll do is I'll
7:52
change the font size to something like
7:55
15 pixels and give it a font weight of
7:57
500 let me say save it and let's go back
8:00
and yeah they look much better next up
8:04
we're going to Target these inputs for
8:06
the username as well as for the password
8:09
so I'll again write hash and then sign
8:12
up form and inside sign up form we have
8:15
something called as inputs so for all
8:18
these inputs so for all these inputs
8:22
what will I do is I'll change the width
8:24
of these inputs so here I'll use CSS
8:27
functions how to use this function I'll
8:29
simply write calc which stands for
8:31
calculate and inside these parenthesis
8:33
I'll write 100 100% by this 100% I mean
8:37
the width of the parent uh here the
8:39
parent is the form element itself so the
8:42
width of the parent that is 100% and
8:44
I'll just subtract something like 50
8:47
pixels from it if I save it and let's go
8:50
check something like this all
8:53
right now after this width let's just
8:56
give them more properties let's see a
8:58
padding of 16 pixels and we'll give it a
9:02
border of none and we'll also save it
9:07
and let's go back to check and the
9:08
borders are not there so I'll add a
9:11
outline okay so I'll write outline and
9:15
it will be one pixel solid and then some
9:18
color I have already written this color
9:22
as you can
9:25
see something like this let me just save
9:28
it and go back and as you can see it's
9:30
working let me just give them some
9:32
border radius all right so here for the
9:35
input I will write a border radius of 10
9:39
pixels and save it let's go back and as
9:41
you can see the borders are a little bit
9:44
curved now all right now after this this
9:47
is the input I'll Target this
9:49
button this button right here the sign
9:52
up if we go back to browser this button
9:54
looks same but it should look a little
9:56
bit different because this is the form
9:58
sign up but button so what I'll do is
10:02
I'll Target this button for this button
10:05
it already has a class of BTN so what we
10:07
can do is we can say inside our signup
10:11
form here let me just copy paste
10:14
something like this inside our signup
10:16
form we have a button so Target that
10:20
button and for that button I want the
10:23
background color to be something like
10:25
the original blue right that is from the
10:28
left side and then then the text color
10:30
should be
10:32
white after that the width I'll again
10:36
calculate the width so it will be the
10:37
same as the input so I'll just copy and
10:41
paste it right here this will be the
10:43
width and we'll just give it some Marg
10:45
let's say top and bottom will be 18
10:47
pixels and left and right will be zero
10:51
let me save it and if we go back as you
10:54
can see this button looks much much
10:56
different now
10:59
after that we'll add some H effect over
11:01
this button too so I'll just quickly
11:04
copy and paste this and I'll say on
11:07
Hover what I want you to do is on Hover
11:11
I want the color to be the blue one and
11:15
I want the text color basically I want
11:19
the background color to be white let me
11:22
just save it and go back and as you can
11:25
see the buttons look a bit beautiful now
11:29
we go back to vs code now after the
11:32
buttons we are going to Target this
11:34
paragraph tag so for these paragraph tag
11:37
we can just
11:39
quickly just go here if we go to the
11:41
image first as you can see for these
11:44
paragraph tags here if I just maximize
11:46
it we have these links also for terms of
11:49
service and privacy policy so let me
11:51
just add these links here so here for
11:55
terms of services I'll add a tag and we
11:59
don't don't have any link right now but
12:00
let me just put the terms of services
12:03
inside this link tag and similarly for
12:06
the privacy policy as well we'll put
12:09
this inside
12:12
link and just save it and let's go back
12:14
to browser to check yeah there they are
12:18
we can change the color of these links a
12:20
bit so what I'll do is for the after the
12:24
signup form I'll just simply Target this
12:26
links because there are only three of
12:28
them in RP each and I'll just give them
12:31
a little bit of different color same as
12:33
our left side blue let me save it and go
12:37
back and as you can see they are same
12:39
now matching the accent of left color as
12:41
well now the last thing left here is
12:44
that we need to Center this entire thing
12:47
this entire de of right we need to
12:50
center it right here just like this
12:52
image let me just bring back the image
12:56
as you can see according to this image
12:58
we need to Center it right here to do
13:01
that what I'll do is where is my right
13:05
div this one so yeah for the right d
13:10
what am I going to do is so for the
13:13
right d what am I going to do is let me
13:16
just see the color is white but if you
13:19
want to be really specific if you want
13:21
to give it some other color you can
13:22
simply write background color and give
13:25
it another light color if I save it as
13:27
you can see but we don't need a gray
13:28
color color so we need pure white color
13:31
so I'll write ffff which stands for
13:33
white next thing here what am I going to
13:36
do is just to be specific we give this a
13:39
width of 50% so we will give this right
13:42
one also a width of 50% so you basically
13:46
understand as a beginner how you design
13:48
a page after this what I'll do is I'll
13:51
just simply use flexbox flexbox makes it
13:53
very easier so display flex and save and
13:56
as you can see all the elements are now
13:58
in row we need to change it from Main
14:00
axis what we basically will be doing is
14:03
we'll change the main axis from
14:05
horizontal to Vertical Direction and
14:07
that is how we do it is we write Flex
14:10
Direction and we set it to column and if
14:13
I save it as you can see all of these
14:15
things are back to
14:17
normal next up what we'll do is let me
14:20
give it some padding so from top and
14:22
bottom 50 40 pixels and from right and
14:26
left 64 pixels if I save it and let's go
14:30
back as you can see it's centered now
14:33
next thing we can do is we can give it a
14:35
gap of 30 pixels so I'll write 34 pixels
14:40
and save it and as you can see there
14:42
there is some gap between the elements
14:44
right now between these headings
14:45
paragraphs and next thing what we can do
14:49
is to make it more Center looking we'll
14:51
just simply write justify content Center
14:55
if I hit enter and save it as you can
14:58
see all of the the elements are centered
15:01
now now if we go back to the image to
15:03
check if we have completed so this is
15:05
the image and this is the final product
15:07
as you can see there is very less margin
15:10
between this heading and this paragraph
15:13
of enter your credentials but here there
15:14
is too much space so we can quickly
15:17
change it what I'll do here is I'll give
15:21
it a margin so I'll just go back to
15:24
visual studio code and here
15:29
for our right deal what I have done is
15:32
inside the right de I'll just write
15:35
margin bottom and I'll give it a
15:37
negative value all right so that there
15:39
is less space between them let's say 30
15:42
pixels I will save it and let's go back
15:45
as you can see the margin is less now
15:48
let us check the original image as you
15:50
can see this is the original image the
15:53
final image and this is what we have
15:55
created we also have a margin here if
15:58
you did notice we can use the margin
16:01
here or we can just have something else
16:04
maybe break the line element you know BR
16:07
tag we can use so here what I will do is
16:11
I'll write BR and let me just save it
16:16
and let's just go back as you can see
16:18
there is some space now let us compare
16:20
with this image so we are almost done
16:23
with this sign up page as you can see it
16:26
almost looks similar of course this
16:28
needs a lot of refining and a lot of
16:30
good practices are also needed here but
16:33
this was uh to show you guys how to
16:35
Target a design as a beginner so here I
16:39
have only used some basic properties of
16:40
CSS and we have used a CSS flexbox as
16:44
well so we have completed this website
16:46
and let's just quickly see what this
16:49
text
16:50
means I'll just go to Google
16:54
Translate and let me just paste it here
16:57
and this says this is tutorial point
16:58
Point easy and easy learning visit our
17:01
website and sign up today all right
17:05
so that'll be it for this video in the
17:08
next coming videos we will be learning
17:09
about more CSS concepts and properties
17:12
like CSS grid and much more so make sure
17:15
to subscribe to the channel hit that
17:17
like button and I'll see you in the next
17:19
one
#Programming
#Web Design & Development
#Computer Education