Up next in 10

Angular ngx-capture Example to Capture Screenshot of HTML Elements as PNG Image in TypeScript
Jan 30, 2025
Get the full source code of application here:
https://codingshiksha.com/angular/angular-ngx-capture-example-to-capture-screenshot-of-html-elements-as-png-image-in-typescript/
Hi Join the official discord server to resolve doubts here:
https://discord.gg/cRnjhk6nzW
Visit my Online Free Media Tool Website
https://freemediatools.com/
Buy Premium Scripts and Apps Here:
https://procodestore.com/
Show More Show Less View Video Transcript
0:00
uh Hello friends welcome to this video
0:02
so in this video I will show you a
0:04
angular package which allows you to take
0:06
screenshot of a web page or specific
0:09
HTML Elements which are present in the
0:12
web page so we have three buttons out
0:14
there if you see that if you click this
0:17
button it will only capture this portion
0:19
which contains the div
0:21
tag and there is also a full body
0:24
capture if you click that it will take
0:26
the full screenshot of the web page and
0:27
download this as a PNG image file so
0:29
let's supp I click this so what this
0:32
does you will see that as soon as I
0:34
click this button it taken the
0:36
screenshot of the specific diff and now
0:40
you can save this image inside your
0:42
computer as a PNG image file so if you
0:44
open this image you will see that
0:45
screenshot has been taken successfully
0:48
and now there is a second button out
0:50
there if you click this button it will
0:51
take the entire web page screenshot and
0:55
you will see that so now it actually
0:57
taken the screenshot of the full web
0:59
page so in this
1:01
way you can again save it as image file
1:04
and the third button is full body
1:06
capture and download as well so as soon
1:08
as you click it it will all take the
1:11
screenshot and also download the image
1:13
as a PNG image so it does the same thing
1:16
but also downloads automatically so you
1:18
need not have to manually download this
1:20
so there is a package here uh which
1:23
allows you to do this in angular if you
1:25
go to npmjs.com and search for this
1:28
package which is ngx capture this is
1:31
actually the package name here and it
1:34
actually does the screen capture in the
1:35
background and this is actually the
1:37
command here I've already installed it
1:40
it's having 6,000 weekly downloads so I
1:43
have written a step bystep blog post on
1:45
my website where I have written all this
1:49
example code so if you need this example
1:51
code you can go to my description link
1:53
so first of all let me show you how to
1:56
get started here so first of all you
1:58
need to have
2:00
some HTML which is need to be present
2:03
inside so we have already have this
2:06
basic HTML which is written in this app.
2:08
component. HTML file so we have these
2:11
two buttons out there which is this div
2:15
capture full capture and full capture
2:16
with download so three buttons so now in
2:19
the typescript code we need to Define
2:22
this
2:25
so so we have given the ID to the
2:28
element here which we you want to take
2:30
the screenshot so we have given this add
2:33
theate hash symbol screen so now to
2:36
Target this element in the typescript
2:38
code we will actually get this element
2:41
by using view child and here we will be
2:44
providing the same ID that you have
2:46
given which is screen here right here
2:48
and then it takes the second parameter
2:51
which will be static to
2:55
true and then we declare this variable
2:59
so at the very top you also need to
3:01
declare this import this NG capture
3:04
service which will be coming from this
3:06
package NG capture and also this tab rjx
3:10
operators so we have added these two
3:11
imported lines at the
3:19
top so after you do this we also need to
3:23
pass the service here in the Constructor
3:26
so we can directly pass it by creating a
3:29
private variable which is capture
3:32
service which is of the type ngx capture
3:37
service and then we need to declare
3:40
these three methods which will first of
3:43
all div capture which will take the
3:45
screenshot of the only a div element
3:47
then we also have the full
3:52
capture and the third method here will
3:55
be full capture with download so we have
3:57
the third method here full capture
4:02
with
4:05
download so now if you see on the right
4:08
hand side we see these three buttons out
4:10
there but as I click the button nothing
4:12
happens because we need to actually
4:14
write the code for this so now for
4:16
taking the screenshot of the specific
4:18
div element we taken this reference
4:21
right here if you see we have declared
4:22
this so we have given in the HTML file
4:26
we have given this hash symbol screen so
4:29
now to take the screenshot here we you
4:31
you we use this module here and this.
4:36
capture service and it actually contains
4:38
this method get image which will take
4:41
the screenshot and get return the image
4:43
to
4:48
us
4:49
so then we
4:52
simply use the pipe method
4:55
simultaneously and then we use the tap
4:58
operator which return the image to us
5:00
which is of the type base 64
5:03
code so here we display the image this.
5:07
image is equal to
5:11
image so we can even console log it so
5:14
this will return the base 64 code of the
5:16
image so as soon as you click the button
5:19
right here so what happens in the
5:20
console you will
5:26
see and
5:32
uh just wait here I think I made some
5:34
kind of type of mistake so what I will
5:36
do oh sorry we missed a line here after
5:40
we do this we need to subscribe to this
5:42
method so we just need to call the
5:43
Subscribe method
5:45
so so if you now hit the button right
5:48
here you will see the screenshot will be
5:50
taken and
5:52
this in the console here you will see
5:54
this base 64 code of the image will be
5:57
returned to us it will take the
5:58
screenshot of that specific div element
6:01
if you try to open this image in new tag
6:03
you will see that only that specific
6:05
portion of the div tag it taken the
6:09
screenshot and displayed this image and
6:12
now the second method which will take
6:14
the entire web page screenshot so for
6:18
this we again use this capture service
6:21
and it contains get image once again but
6:25
this time we'll be passing the entire
6:27
body which constitute the full page here
6:31
document. body so here we are passing
6:33
the entire web page and the second
6:36
argument will be true and again we use
6:38
the pipe method and the T operator and
6:41
this will return the image as a base 64
6:46
code and then we simply initialize this
6:49
image to the
6:51
image so now if you click the second
6:54
button you will see again we missed the
6:56
Subscribe method so we just need to call
6:58
the subscribe
7:01
so taken the full screenshot of the web
7:04
page and you will see
7:07
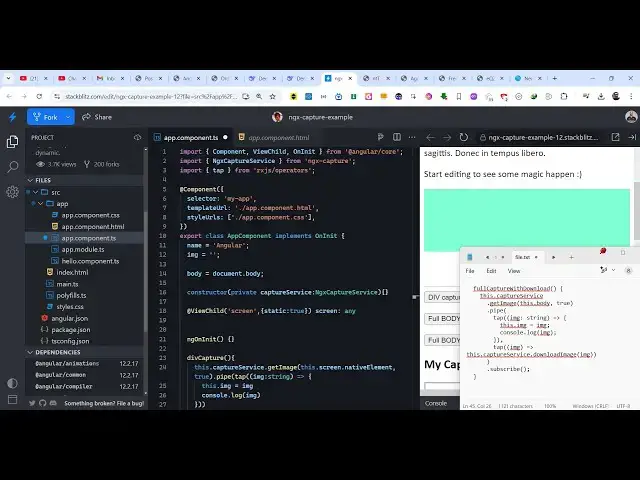
that so if you also want to download at
7:10
the same
7:15
time you
7:19
can full capture with download so
7:23
actually a method available right here
7:27
this do capture service download image
7:30
so it actually contains this method
7:32
download image which also downloads the
7:33
image after it taken the screenshot so
7:36
what now happens if I click the third
7:38
button it will take the screenshot and
7:40
also download this as a PNG image file
7:43
so you open this image you will see the
7:46
screenshot is automatically taken and
7:48
downloaded the image file so this is
7:51
actually the package here ngx capture
7:53
which you can directly use inside your
7:55
angular application to take the
7:57
screenshot and download the image as an
8:00
attachment so thank you very much guys
8:02
for watching this video and also check
8:04
out my website as well free mediat
8:06
tools.com uh which contains the
8:09
thousands of tools regarding audio video
8:11
and image and I will be seeing you guys
8:13
in the next video
#Programming