Up next in 10


In this video, I review the Earwax Remover Tool .
Check it out here:
USA: https://amzn.to/3T9fGSl
UK: https://amzn.to/4c1KQ6H
CA: https://amzn.to/48NQxlI
DISCLAIMER: This video and description contains affiliate links, which means that if you click on one of the product links, I’ll receive a small commission. This helps support the channel and allows us to continue to make videos like this. Thank you for the support!
Show More Show Less View Video Transcript
0:00
So I just got this earwax removal tool camera
0:02
So I want to do a quick unboxing and go ahead and test it out to see how well this works. That's everything that comes in the box
0:07
And we're going to have this plastic bit on top. And now on the front, we're going to have this manual that shows us how to go ahead and use it
0:15
And down below is going to be the tool itself, along with all the other accessories
0:19
Starting at the bottom over here, we're going to have this USB-A to USB-C flat charging cable
0:24
seven different picks of various shapes and sizes, a brush, ear pick accessories
0:29
And finally the tool itself. Now taking a look at the top part, this can go ahead and come off
0:33
and we can go ahead and place it with the other ones from here. There's going to be a button in the center and at the bottom is going to be the USB-C port for charging. So I scanned the QR code
0:41
over here and I downloaded the app and this is what we get. So it says please view the operation
0:46
video before use. Click connect to enter your mobile settings, display device, wi-fi id and click
0:55
So the first thing is to hold this button down for 3 seconds
1:01
And it went ahead and lit up. So now I can go to connect And now it going to go ahead and open up Yep right there is the network for the tool And as you can see it currently connected
1:14
So I'll go back. It says connected over here. So I can go home
1:20
Allow. And then there. Now the camera's in use. So now I can go ahead and point it at myself
1:24
And here you can see me. And as I go closer, it starts to get a lot more clearer
1:31
So before I go ahead and stick this in my ear, I want to go over some of the settings real quick, starting with the top here
1:36
So there's going to be two different options, horizontal and dynamic and horizontal
1:41
Basically, it adjusts. As you see, as I rotate the tool, it'll rotate itself
1:46
But if I click dynamic, it'll always go ahead and stay in place, no matter how I go ahead and rotate or orient the tool
1:52
And now taking a look at the right side, there's going to be this unlock or lock button. So if I go ahead and lock it, nothing can be done
1:58
I can't accidentally press anything. I can't record. I can't do anything. and the only way to get out of this screen would be just to press the unlock button
2:04
Now taking a look at the bottom, we're going to have an option for right or left ear. So right now
2:09
it set up right ear and in the center we going to have an option for the camera so I can take a picture and there a little check mark indicating the picture is taken or I can slide over to video and then I can go ahead and shoot a video and here you can see me and then at the bottom you see it recording and then I stop
2:24
And then finally there's photo album and here we can see the images that are shown
2:28
so that's what I just took. I can go back and then on the right side
2:33
this will be for videos right over here and here you can see the video that I took
2:37
and I can go ahead and delete that at the bottom corner over here
2:41
now confirm that and that's about it for that and then i can go ahead and press the back button
2:47
and then we go ahead and go back to the original screen where we're at so now time to go ahead and
2:51
stick this in my ear all right so i went ahead and left it in horizontal mode so it goes ahead
2:55
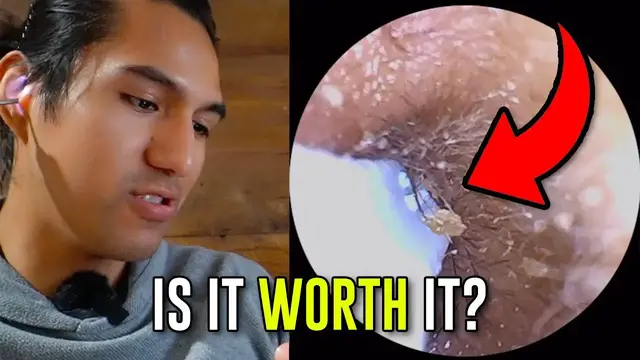
and changes as you see and i'll put this on my right ear and yeah i see a lot of hair wow that's
3:02
it's pretty gross and as deeper i can go i can go ahead and scoop it up oh wow it just
3:08
It gets scooped up and then here you can see it gets stuck on the tip itself and of course
3:15
can go ahead and kind of just wipe it right off. There are going to be a bunch of other attachments available here
3:21
You can see it with the little camera So I can just go ahead and take this one off And this is made of rubber so you do have to kind of get a good grip on it or start from the bottom and it comes off
3:32
And there's going to be five additional attachments and I'm going to opt for this one. And that's
3:36
because it has a little hook, so it'll make retrieving wax a lot easier. And I can put this on
3:41
and it just slides right in place. There, just like so. And here we could see that little hook
3:47
And now it's time for my left ear. And here. All right, there
3:52
Now you can see the inside. And as I twist it, I see like, yeah, a little bit on this side
3:58
So let me go ahead and kind of grab that big chunk. And when done using the tool, this can be held for three seconds
4:10
And it'll go ahead and turn off. And if you have too much wax in your ear, you might want to consider using these other metal bits
4:15
but of course you'd have to do it manually there's no camera involved but yeah overall using this
4:20
earwax removal tool camera was real easy I definitely got to see places I've never seen
4:26
before and I'm definitely glad that it does come with an app just so I can go ahead and actually
4:30
see inside my ear but yeah that's a quick look at the earwax removal tool camera
#Face & Body Care
#Unwanted Body & Facial Hair Removal
#Computers & Electronics