Up next in 10

Crochet Sweater Tutorial | Crochet Fisherman's Rib Sweater | Turtleneck Beginner Friendly Tutorial
Aug 20, 2023
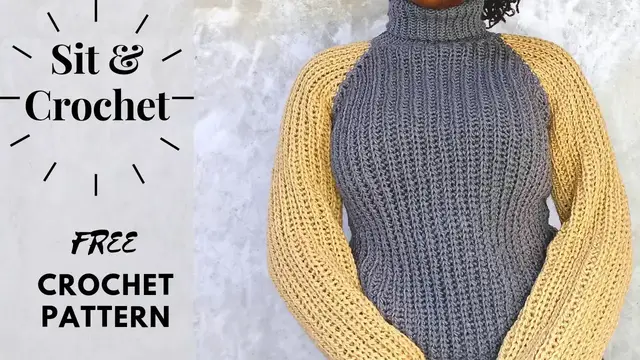
Crochet Turtlenecks Sweater Beginner Friendly Tutorial
Free Pattern: http://www.sitncrochet.com/?p=2829
Etsy Pattern: https://www.etsy.com/listing/1182933537/crochet-pattern-color-block-sweater?ref=shop_home_active_1
Be sure to subscribe!!!!!!
The link to materials is available on my website be sure to check that out!!!!!
Other free Patterns: www.sitncrochet.com
Show More Show Less View Video Transcript
0:00
Hello Makers and welcome back to the channel. In today's tutorial we will be making this
0:05
Teodoneck color block sweater which is available in nine different sizes so be sure to find the
0:11
free link to the pattern in the description box below. As for the materials that are required to
0:16
make this sweater they are also linked down in the description box below. So before we go any
0:21
further be sure to give this video a big thumbs up as it really does help my small channel and if
0:26
haven't already be sure to subscribe now let's get to the tutorial
0:42
so this is what the 60 rolls should look like after you're done and now what
0:48
we're gonna do is do a chain up of one and then we're gonna go through the sides of the slip
0:58
stitches placing one single crochet in each stitch in each row so at the end of the row you want to
1:05
have 60 single crochets so this was the last row that I just worked and we're gonna have a single
1:11
crochet in there and then the next one will be on this ribbed row and the next one will be in
1:15
between the ridge and then on the rib row and then in between the ridge and so on
1:21
At the end of the row you should have a total of 60 single crochets. After we're
1:26
done doing that we're gonna close it and sew close this side right here and then
1:31
we'll put it aside and we'll get started on the body. So let me just do that and
1:37
I'll meet you right back so that we can get started on the body together. So this
1:43
This is what it looks like, we are done working our collar, here is our single crochets and
1:47
this is where I trimmed everything off that. We will weave that in at the end. But at the end this is what your collar should look like
1:53
It will be a little tight around the opening so you are going to have to stretch it out
1:57
a bit and the space is big enough for your head to fit through. And as you know the slip stitch tends to stretch a lot
2:04
So now you are just going to put this aside and we will get started on the body
2:09
So for size small we're going to be doing a chain up of 61
2:16
So you go on make your chain of 61 and I will meet you after you're done
2:28
So I've just finished making my chain of 61. Now into the second stitch, second chain from the hook into the back bumps only we're going
2:37
going with a single crochet and we're going to place single crochets into the first ten
3:07
And that's ten. So now let me just scrub my stitch marker and place it in there so that
3:27
I don't get mixed up on my way back. Alright so from here on still in the back bumps, we'll
3:36
we'll be going in with a half double slip stitch. Yinding over, inserting that hook into the
3:43
slip stitching through. Just like that. So I'm going to continue doing this all the way
3:51
up until the very last stitch, last chain where we'll be doing an increase right in
3:58
there. So I will meet you there so that I can show you how we do that increase so that
4:04
we can do the increase together. So I've worked my way up and I am about to work into the very
4:12
last bump which is this one right here where we will be placing our increase. So we'll place one
4:20
half double slip stitch and then right into the very same arm chain we'll also place another half
4:31
double slip stitch just like that and then to begin our second row where we also have to make
4:37
another increase we will do a chain up of two in time this is how we'll be doing our increases as
4:46
we're going down so take note into the second chain from the loop you're gonna go in there
4:53
with a half double slip stitch There we go And then into the buck bumps only from here on We be placing a half double stitch in order to get that knit look that we going for
5:16
So you continue doing this, working your way downwards. And you knit down like this, this is what it looks like so far
5:24
So we're going to continue with our half double slip stitches going down. Once you reach the stitch marker, you're going to switch to the single crochets in the back loops only
5:31
chain one and turn back loops only single crochet and then back to half double slip stitch remember
5:37
to increase at the top I am going to do an increase for a total of 19 rows for this size small so you
5:45
do whatever size that's required and after I reach my 19th row then I'll meet you right back so that
5:50
we can start connecting to the collar together all right so I have just placed the stitch markers
5:58
where I've divided the back, front and sides where the arms will be
6:04
So between these two purple stitch markers I have my 20 stitches
6:10
This is for size small. There's 20 stitches. This is where the front will be
6:15
And then between these two there is 10 stitches. This is for one of the sleeves
6:20
And then back here there's 20 stitches. This is where the back will be
6:25
And then on the other side there's 10 stitches which is for the other arm. So if I lay it down like this, it's arm, arm, front and back
6:34
Alright, so right about now, pause the video, make sure you put your stitch markers where they
6:39
should be. I am about to start connecting the body now to the collar. So I have worked up on
6:47
my 19th row. And right about now, this is what it should be looking like since we're doing increases
6:54
to get to the stitch marker right here. Let me turn it around
7:01
This is where I want the front to be, to get to this stitch marker. So now from here on, instead of chaining one right here
7:09
we are going to connect to the purple stitch marker, the very first purple stitch marker
7:15
So I'm just going to remove it, making sure I don't lose it
7:20
and I will place my crochet hook and I will connect that row with a slip stitch
7:37
Okay, through and through, just like that. So that's the row done
7:44
Now to begin the next row as we do usually, we will locate the next single crochet
7:50
Instead I'll hook with a slip stitch. Now that's going to act as a chain one and then we'll work on
7:59
Going downwards we will continue with our half double slip stitches. Back loops only. Just like that
8:07
No increases, no decreases. We'll just be connecting as usual. And as we're going downwards, everything else is being worked the very same way
8:18
When we get to the stitch mark, I will be switching to our single crochets, chain one, and then working back upwards
8:27
So let me just explain this again. After we go down, we're gonna come back up. When we come back up, we're gonna locate the next available single crochet on the collar
8:38
and that's why we'll be placing our slip stitch to join the row and then to begin a new row we'll
8:44
slip stitch into the next available single crochet and work our way down that's and we're going to do
8:49
that all the way until we get to the very last stitch marker so i'm going to work up to this
8:54
stitch marker and i'll meet you once we're there so that we can now do the very opposite of what
8:59
we did this side which is now to decrease 19 rows so pause the video work your part your rows
9:06
and I'll meet you once I get this stitch marker. So I have just worked the 19 normal rows
9:14
These were the, I mean the 20 normal rows. There's 20 for the midsection and there was 19 rows that we increased
9:20
So after the middle section, we now want to do the other section
9:25
which is now the 19 rows of decrease. So to get started on that, we're just going to do a chain up of one
9:31
We're not going to slip stitch into the other single crochet spots
9:35
because now this is for the sleeves it's gonna make sense when we get there so
9:39
I'm just gonna do a chain up of one and turn so since we were increasing on the
9:45
other side it means that this said now we're gonna be doing decreases to do a
9:49
decrease what you do into that stitch right there because this is the slip
9:56
stitch that we did to connect to the single crochet into the first stitch
10:01
we're going to insert our hook, pull up a loop, and then into the second one, insert our stitch
10:06
pull up a loop, and then we'll just slip stitch into all of them, just like that
10:11
And that how we going to be doing our decreases when it comes to the collar section And when we get there all that we going to be doing is a chain up of one and decreasing normal connecting to the collar because now what we
10:28
trying to do is get a replica of the other side and you want to do that you want to decrease for
10:34
the same number of rows that you increased refer to the written pattern to know your size so that
10:39
you know the number of rows that you need to increase and decrease so after you're done you
10:45
You want to do the very same thing we did to the other side. This is my second side because I've already completed my front side
10:52
And this is what your work should be looking like. These were the 19 rows of increases
10:59
There's 20 rows in between right here. It may not show because you know the slip stitch, but it does stretch
11:05
There's 20 rows in between. And then we did a decrease of 19 rows right here
11:11
And then turning it around, we're doing the very same thing for the other side. and in between this right here the stitches that we have left is where we're gonna do our sleeves so
11:22
Finish off that side finish off the decrease rows after you've done the decrease rows
11:28
You want to do the very same thing start again from chaining Whatever number you need increasing connecting to the collar work no more rows and then decrease
11:34
Do the very same thing for the other side and then you will not fold your work so that they're laying flat on top of each other and you
11:40
want to and you want to seam the sides closed so that the front and the back portion are sewn closed
11:48
let me show you how you're going to do that you're just going to put the works together like this
11:57
the front panel and the back panel close it like this so the front and the back are laying together
12:02
then you're going to start from these tips and you will sew them closed with your yarn needle
12:07
and you do the very same thing for the other side and then I'll meet you so that we can now get started on the arm opening
12:16
So I have just finished seaming this part of the sweater and now I'm about to get started on the sleeve, the armhole anyway
12:24
So to get started on the armhole, we want to go around placing single crochets
12:29
so that we can make it easier for us to work the sleeve into. Alright, so you're going to connect your yarn at the tip, which is right there, of your sleeve, and then we're going to go around placing a single crochet in each and every row
12:46
So my first row was the ribbed row, so that would be one single crochet, then in between the ridges another single crochet
12:56
And then on top of that ridge or the ribbed row one single crochet because all of that is going to account for one row or chain one
13:05
So I'll be placing one single crochet in each spot. So I'm going to go all the way around placing my single crochets
13:16
And then once we get back to where we started we want to change now, grab the secondary colour
13:22
which is the nude for me or khaki for me. So let's just get to the colour section so that I can show you how you're going to work that area
13:40
Between and the ridges and between We are almost there
13:53
Alright so when you hold your work like this you will be able to notice the single crochets
14:04
right there. And what you are doing is you are just going to go on top of them placing more rows of
14:10
single crochets. So I am just going to have to go into that last and between row and then I will get started
14:14
on my single crochets. So it's gonna be like the neck will have the arm where the arms will be is gonna be like they'll have two rows of single crochets
14:23
And that's absolutely fine So you're just gonna continue doing this all the way around until you get to this side where we've started
14:31
And then I'll meet you that you're gonna do a chin up and then cut so that we can connect our second color
14:36
Then I'll meet you once I get there So I just finished going around placing my single crochets and now we're about to get started on the sleeve so
14:45
So right at the corner I'm just going to connect the yarn just like that with a slip stitch
14:59
And that should be nice and in place. Now we're going to make a chain long enough to make your sleeve
15:08
So you want to refer to the written pattern as to how many you need to chain for your size
15:12
So for size small and extra small, we'll be doing a chain of 61
15:16
So you just want to do that. Make a chain of 61, and after you're done making that chain
15:22
I will meet you right back. So you going to make the chains a little bit looser since we be working into the back bumps not too loose but loose enough for you to work into the back bumps properly without much struggles So I just going to do my chain of 61 and I will meet you right back
15:41
So I just finished making my chain and now we shall get started
15:47
get started. So we will be skipping the first chain as usual rather now into the
15:54
second chain from the hook into the back bumps though we'll go in with a slip
15:58
stitch and we will slip stitch into ten stitches ten chains
16:07
This is to give our sleeve that little hole that we want
16:37
That should be number 8. Two more to go
16:57
And finally, 10. So you want to grab your stitch marker right about now
17:03
Now we'll just grab mine and place it into that last stitch that we just made so that
17:12
we'll easily remember it as we're working back downwards. So from here on it's as we've been
17:18
doing but let me just give you a hint on this on the collar. So remember everybody should have an
17:23
even number on the sleeve section that's left right here on the collar so you're going to place
17:29
the stitch marker in the middle. Like for me there's ten so I'm going to place the stitch
17:33
marker in the fifth because from here on we're gonna start increasing our way
17:38
until we get to stitch marker from the stitch marker we will then start to
17:42
decrease going downwards so I'm gonna work up and I'll meet you right when I
17:46
get to the last stitch so I can show you how we increase and connect to the sleeve and then I'll let you carry on by yourself from there so I have just
17:55
reached the very last stitch and I'm placing my first half double slip stitch
18:00
and into the very same stitch I will be going in with my second half double
18:05
slip stitch as an increase. Now into where I have my stitch marker is where my
18:09
first single crochet is so I'll be connecting that row with a slip stitch
18:18
Now to begin my new row I will just slip stitch into the next available single
18:23
crochet just as I've been doing the whole time. Turn my work now into the
18:28
The first stitch, which is this one right here, because these two V's you see right here
18:34
these two are where we slip stitch to join the rows. So into the first stitch right here, I will be going in with my increase
18:42
So that's two half double slip stitches right in there. And just like that
18:48
Then I'll go on with my row as normal, remembering to switch to a slip stitch at the stitch marker
18:55
down here. So, you're going to go on doing that increasing at the top once you get here
19:04
on your way up and down at the top here only all the way until you get to the stitch marker
19:08
and then I will meet you right there so that we can start with the decreasing together. So, I have now reached where my stitch marker was which is right in this stitch which now
19:18
means we have to start with the decrease row for the other half. So, I'm just going to
19:24
show you this row, how we do a decrease. You will just run over, allocate your first stitch, which is
19:30
this one right here. Insert your hook, pull up a loop, you won't finish, you will go into the next
19:36
stitch after that. So now you've got four loops on your hook and you would just slip stitch through
19:41
everything. And that's how you do a decrease. So we're going to do that for the rest of the
19:46
remaining single crochet stitches until our entire arm is closed. So I'm gonna go on and I'll finish
19:55
off this sleeve and right after I'm done with this sleeve I'm gonna move on to the other sleeve and
20:00
you wanna do the very same thing. After you're done with this sleeve, do the very same for the
20:04
other one and then I'll meet you once I'll sweat it so complete. So this is what this sweater looks
20:10
like. I've turned it the other way around, I've weaved in all the funny ends and this is what
20:15
we've got so i hope you like this tutorial i hope it all made sense i hope you loved making it as
20:21
much as i did and be sure to join our facebook group so you can show us what your work looks like
20:27
and be sure to share it give this video a big thumbs up as it really really helps my small
20:32
channel we want to grow and get bigger so that other people can find our lovely tutorials
20:37
so until next time i'm gonna go start working on my next tutorial bye for now
#Hobbies & Leisure
#Hobbies & Leisure
#Crafts
#Fiber & Textile Arts