Up next in 10



Website:
https://www.proshaper.com
Our Amazon Storefront:
https://www.amazon.com/shop/proshaper
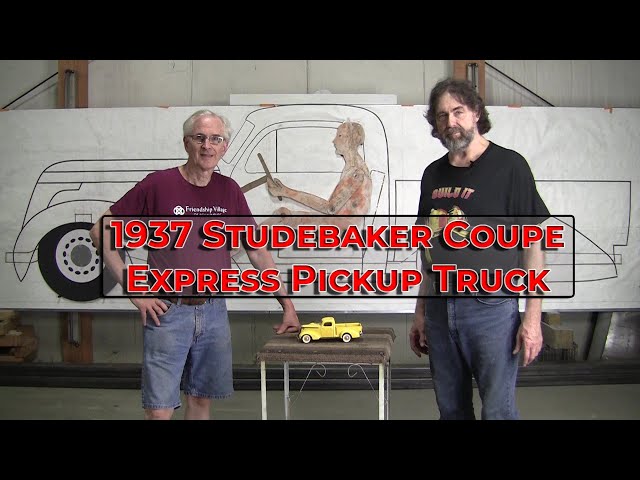
My coachbuilding student Peter and I have created a full-scale drawing of a 1937 Studebaker Express Pickup Truck. He has been wireforming the the rear fender. The intent is to make the fender a little wider to accommodate wider tires than the original 1937 Studebaker had.
We made a lot of changes to the Studebaker design to make the cab to make it roomier. My adjustable man was first seated in my 2014 Chevy Silverado which is very comfortable to drive so I locked his position and used it as the basis for how he would sit in the new Studebaker. After the Jaguar fender build we will be jumping into this build, filming everything from start to finish.
Email: [email protected]
Website: https://www.proshaper.com
Facebook: https://www.facebook.com/ProShaper/
Instagram: https://www.instagram.com/proshaper/
Twitter: https://twitter.com/ProshaperM
Linkedin: https://www.linkedin.com/company/proshaper/
Show More Show Less View Video Transcript
0:01
[Music]
0:05
hi it's ray from
0:06
pro shape a workshop in child
0:08
massachusetts
0:09
they haven't been here for a while but
0:11
i'm back again
0:13
next week i'm hoping to do a bunch of
0:15
videos that have been super busy
0:17
i've been working on the english wheel
0:19
if mark wants to pan over here
0:21
we're getting all the mechanism worked
0:23
out we got a big order for all the
0:25
water jet cutting and everything and i
0:28
had a couple classes
0:30
the lat the first uh the couple last two
0:34
weekends i guess
0:35
and peter came for the class this past
0:38
weekend
0:39
and he had bought the 130 hour package
0:41
so
0:42
he's been staying on until today was his
0:44
last day
0:46
and pete is from chicago he's been to
0:48
the class a couple times
0:50
and he wants to develop his own scratch
0:54
build project
0:55
and he's a very very good woodworker
0:58
making
0:58
rocking chairs and all kinds of nice
1:00
woodworking projects he's been doing
1:02
that for about
1:03
20 years or so and he wants to get into
1:05
metal
1:06
and that's why he took my class and he
1:09
hasn't really bought all the tools yet
1:10
and stuff but he's still investigating
1:12
he's taking his time
1:14
tiptoeing into it and the thing that
1:17
really baffled him was how i did these
1:19
drawings
1:20
even though i've got videos on stuff he
1:22
wanted to partake in doing one himself
1:24
so him and i worked two days
1:28
we had a few lines up there that one of
1:31
my volunteers
1:33
and actually another student had started
1:36
trying to interpret what i wanted
1:39
and i wasn't really happy with it so we
1:41
kind of basically
1:42
clean slated the whole thing and we
1:45
started from scratch
1:46
and just the two of us and what we used
1:49
was this little model here that i bought
1:51
it's a 1 18 scale model
1:54
i got it on ebay was like 54 dollars i
1:56
believe
1:57
it's a pretty good representation of all
1:59
the studebaker lines
2:01
i have a collection of pictures that
2:03
i've assembled but we really didn't use
2:05
the pictures
2:06
and one of the key uh elements i call it
2:08
the rosetta stone
2:10
was that uh i'm doing the the indy
2:14
race card a 1931 studebaker race car
2:16
with gary ash another student of mine
2:19
and he's really wound into the
2:21
studebaker clubs
2:23
and he connected me with a guy up in new
2:25
hampshire who's got a bunch of
2:26
studebakers
2:27
and he just happened to have a 1937
2:30
studebaker
2:31
front fender and it's severely rusted
2:35
it's
2:35
kind of thin and it's got you know
2:38
modeling all over from the rust and a
2:40
few little rust outs here it could be
2:42
possibly saved but it's
2:44
it's very marginal but the good thing is
2:46
it has all the nice lines to it and
2:49
shape and everything
2:50
so i was able to use that as the scaling
2:55
vehicle for scaling the whole car
2:58
now the the original studebaker is the
3:00
1937 studebaker express
3:03
pickup and i don't know what the
3:04
production on them was but it's one of
3:06
the most beautiful
3:07
30s vintage pickups i believe and that
3:11
is always appealing to me and a few
3:13
people have
3:15
street rodded them and they look really
3:17
nice street rodded well
3:19
what i didn't like about it was that the
3:21
cab is very small
3:23
and the seat is almost straight up and
3:25
it's kind of tight in there
3:27
so i figured i was going to make the cab
3:29
a little bit bigger and i didn't mind
3:31
messing with the lines
3:32
now i'm going to scratch build this
3:34
entire car
3:36
and i'm going to do it all in aluminum
3:39
so now i'm going to finish the the
3:41
jaguar nose
3:43
and then go straight into building this
3:45
studebaker and every aspect of it
3:48
will be videoed it'll be up on my
3:51
website
3:52
my youtube channel pro shape a workshop
3:56
so peter was invaluable in spurring me
3:58
on to get this thing going because it
4:00
might have been another two months or so
4:02
and we just dovetailed as far as what we
4:05
wanted done
4:06
so to have help and then he watched the
4:08
whole process and participated in it
4:11
and not only did we you know copy the
4:14
lines
4:15
pretty faithfully say like on the front
4:17
fender is going to be
4:19
pretty pretty much this original but the
4:22
back
4:22
fender uh doesn't have enough room these
4:25
ran really narrow tires
4:27
so we actually made the back fenders a
4:29
little wider of course you don't see it
4:31
in this
4:32
this view but peter's intent to come to
4:35
this class was to one
4:36
learn how to do all the lines on the
4:39
board how to blow it up and everything
4:42
and then two to make a wire form so in a
4:45
minute or so we're going to show you the
4:46
wire form it's got we got started
4:49
and uh i i don't know if anybody hasn't
4:52
watched my other video the way this
4:54
this system works is this board is a
4:56
piece of
4:57
galvanized uh sheet a bunch of four by
5:01
eight galvanized sheet on a little
5:02
three-quarter square or a half
5:04
i think it's half inch square tubing and
5:06
it's all pop riveted together with flush
5:08
pop rivets so you don't
5:10
and this is tyvek which you put on a
5:12
house
5:13
it's it's very very strong paper and
5:16
i found these magnets on ebay probably
5:19
10 years ago
5:21
and it's the same thing as refrigerator
5:23
magnet
5:24
and it's plastic with probably some
5:27
iron in it that's magnetized and it
5:30
comes in a half inch strip
5:32
i cut them in half and then you can use
5:34
them just like you do a cad line
5:37
and now you see peter's
5:40
put the line in here this is a magic
5:42
marker line so now i have a permanent
5:43
record
5:44
but that's how we create the line so if
5:46
we put the line like that and we see the
5:48
bump
5:49
we don't like it we just keep
5:50
straightening it out or put a ruler
5:52
under it and you get the straight line
5:54
and then
5:55
to arcs the same way if you have an arc
5:58
that you don't like it's too much too
6:00
little you just keep adjusting it
6:02
stand back and it's a really nice simple
6:05
system
6:06
so i also have mr adjustable in here i
6:09
made him
6:09
years ago and he has all these little
6:13
wing nuts
6:14
and what i did was i want to make sure
6:16
that this truck fits me i'm about six
6:18
foot three
6:19
and i took that i have a 2014 chevy
6:23
silverado
6:24
and i took mr adjustable out to my chevy
6:28
silverado
6:29
sat him in the seat put his hands on the
6:31
steering wheel his foot
6:32
on the pedal and then i tightened them
6:34
all up and then i set them in here
6:37
so that's how we got the seating
6:38
arrangement and everything we've
6:40
expanded the cab
6:41
this way i think about an inch or so and
6:43
a two or two or three inches this way
6:46
and we're going to expand the cab for
6:48
the wideness too but that'll come later
6:50
when we start doing the wire form
6:52
for this cab and we've laid in a
6:55
preliminary line here for our frame
6:57
we're going to build
6:58
this is the frame it's going to be a
7:00
scratch build frame
7:02
it's five inch by three inch by one
7:04
eighth inch wall
7:05
tubing which will cut and re-weld and
7:07
get it all tapered and everything
7:10
and we'll probably have like a fat man
7:13
aftermarket uh front end suspension on
7:17
it mustang two
7:19
and we might do a straight axle with
7:21
regular uh
7:22
some elliptical springs in the back
7:24
that's all to be determined later
7:27
uh and it's gonna be all aluminum body
7:28
aluminum floorboards aluminum cowl
7:31
it'll have some steel inner structure
7:35
it's all flat glass we rake
7:38
the windshield back just a little bit
7:40
probably
7:41
you know a couple degrees we raked that
7:43
back this studebaker grill is an
7:46
extraordinarily beautiful grill and uh
7:49
we've taken advantage of the beauty of
7:51
it and but we're also
7:53
raking it back a little bit to give it a
7:55
little more racy appearance
7:57
and it's a originally 115 inch wheelbase
8:00
and we stretched it to 117 inch
8:03
wheelbase
8:04
so we could center the wheels the
8:06
original the wheels are offset towards
8:08
the front a little bit in the
8:09
in the wheel opening so
8:12
from this front fender all these curves
8:16
and and basically from here back is the
8:19
exact same
8:20
fender shape as the rear fender so
8:23
that made the job of making that wire
8:25
form for the rear fender a lot easier
8:28
and peter
8:32
bent all the wires i showed him how to
8:33
do that and then it's all mig welded
8:36
together in a minute we're going to
8:37
show you that i've also got
8:40
the steering wheel in i've got a cowl
8:43
firewall
8:44
towel line in and the brake pedal
8:46
position
8:49
we just threw some wheels in here to
8:51
jazz it up a little bit
8:53
and mark made a really nice t-shirt
8:55
today and it should be up on
8:57
our teespring showing this as the build
9:00
and this will probably be at least about
9:04
a year-long build or more
9:06
the whole long series on youtube but
9:08
there'll be nothing left out all the
9:10
questions will be answered
9:12
okay so here's the re-offender for that
9:14
37 studebaker express pickup
9:16
and uh i gave direction to
9:19
peter and he i started out telling him
9:22
to go to make the
9:23
uh some kind of framework to hold
9:26
everything together
9:27
so i had a bunch of scrap one-inch
9:28
square tubing we cut that
9:30
up and kind of mixed it all together
9:33
doesn't have to be really fancy or
9:35
anything it's just something to elevate
9:36
it
9:37
uh off the bench so you can work on it
9:39
easy
9:40
and most of these lines were taken
9:42
actually off the front fender
9:44
and peter learned how to bend and the
9:47
bending process is very simple
9:51
we have this little bender that my
9:53
friend tom lipton made for me years ago
9:56
and i made one for peter to go home with
9:59
because he's going to be
10:00
bending some wire so i made actually a
10:03
little bit nicer one than that
10:05
we might even offer them for sale now
10:07
we've got a lot of the stock and stuff
10:09
so this is all made with quarter inch
10:13
hot roll
10:15
and peter had zero experience doing this
10:18
he bent
10:19
all these himself i showed him the
10:21
process
10:23
and what we did with this is because
10:25
we're going to have a little bit
10:26
bigger tires so we widen this out like
10:29
about an inch and three quarters or an
10:31
inch and a half or so
10:33
and and this still needs a little bit
10:35
over here
10:36
the way this works is the bed of the
10:38
studebaker
10:40
is got a relief underneath with a little
10:42
inner fender well
10:44
and the fender slides under and it's
10:46
bolted right here all
10:48
all along the perimeter so we fattened
10:51
it up a little bit to accept a bigger
10:52
tire
10:54
and uh we haven't checked the continuity
10:57
of all the flow of all the lines that's
11:00
done with
11:01
a wire like this and there'll be some
11:03
adjustment needed we've got to we've got
11:05
to check them all out to make sure that
11:07
they all touch
11:08
if they don't touch we cut them and move
11:10
them out a little bit and re-weld them
11:12
and that's the beauty of the wire form a
11:15
lot of people get
11:16
uh fall in love with cad and you're
11:18
scanning and i
11:20
fell into that trap too this is so much
11:23
better because you don't have to have
11:24
any of those skill sets all you have to
11:26
do is have a good enough eye
11:28
to know that a line is got a nice curve
11:32
to it that's
11:33
that's flowing properly if you've got a
11:35
little
11:36
inconsistency in the line you've got to
11:39
straighten it out
11:40
so and if you make mistakes you just cut
11:43
it
11:43
mig weld it back together again you got
11:45
infinite variety
11:47
of infinite variable factor to
11:51
change things it's not like you've cut a
11:53
piece of wood
11:54
and and then you're stuck with it and
11:56
you have to get another piece of wood or
11:57
something
11:58
it's so easy to modify these and another
12:01
feature of this the studebaker fender
12:03
has a rolled
12:04
lip edge similar to the fords and that's
12:07
very difficult to do
12:09
other than hammer forming it on
12:11
otherwise you have to stretch the edge
12:13
in order for it to make it
12:14
make the turn so now that we've got this
12:17
the
12:17
wheel opening defined we can get some
12:20
half inch
12:21
steel and bend that into the same shape
12:24
and just marry it on here with some mig
12:26
weld
12:27
and when we make the aluminum panels
12:29
they'll come down like this
12:31
you anneal that little section right
12:33
there and then just roll it
12:34
hammer form roll it right around that
12:36
wire
12:38
so it will work really nice so it still
12:42
needs
12:42
probably another day's work just to put
12:44
this little extension on the back
12:46
and then also it's see it's a little
12:50
buzzy here so we'll put some stalks
12:52
coming over here and that'll hold it
12:54
really strong
12:55
and uh after that it's just about done
12:59
so i just want to thank peter for doing
13:01
a really nice job and if he wants to add
13:03
a few comments he can well this is my uh
13:06
fourth summer here
13:08
and i usually come for about you know
13:10
four to seven days at a time
13:12
i don't do i haven't done anything at
13:14
home nothing at all
13:15
and uh having worked with gravis this
13:18
week i feel confident that i can go
13:20
home and actually make a wire form of a
13:22
vehicle from
13:23
photographs and from a model i think it
13:25
was a great experience
13:27
and it's a very nice relaxed casual uh
13:30
week
13:31
well thanks peter and i hope to see you
13:33
again he says he might come back again
13:35
next next year there's always questions
13:38
and you never
13:39
never stop learning so it's ray from pro
13:42
shaper thanks for watching
13:44
and we'll be getting on with some new
13:46
videos real soon
13:47
[Music]
13:59
[Music]
14:00
you
#Jobs & Education