Up next in 10

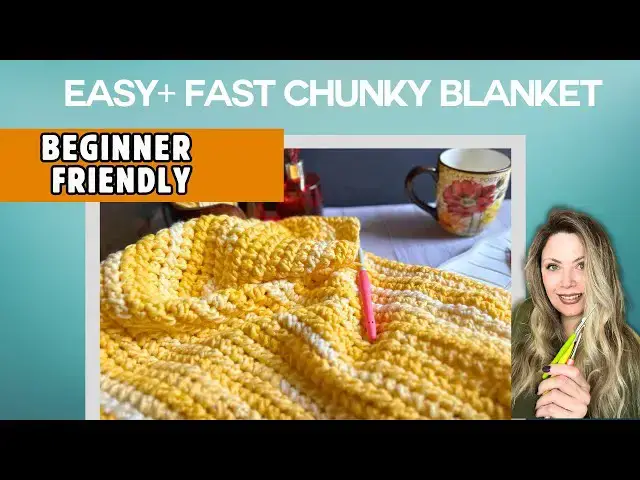
The Coffee Break Blanket — Easy Chunky Yarn Pattern for Beginners (Fast + Cozy!)
Dec 2, 2025
Learn how to crochet the Coffee Break Blanket — the easy, fast, beginner-friendly chunky yarn blanket you can work on during your favorite cozy moments.
This pattern uses simple stitches, works up quickly, and creates a warm, plush texture perfect for gifting, relaxing, or adding a handmade touch to your home.
Skill Level: Beginner
Yarn Used: Chunky 5 weight yarn
🪝 Hook Size: 8 mm
⏱ Project Time: Fast & relaxing
In this tutorial, I walk you through each step slowly and clearly so even brand-new crocheters can follow along with confidence. No complicated stitches — just simple, soothing crochet you can enjoy on your coffee break.
⭐ GET THE WRITTEN PATTERN HERE:
👉https://livechilllife.etsy.com/listing/4416343341/chunky-beginner-blanket-crochet-pattern
⭐ BLOG POST WITH PHOTOS + VIDEO:
👉 https://livechilllife.com/featured/easy-chunky-yarn-crochet-pattern-for-beginners/
(You’ll get the step-by-step instructions, printable pattern, and supply list.)
❤️ What You’ll Learn in This Video:
How to start a chunky yarn blanket
The easiest beginner stitches for a soft, textured look
How to keep your edges straight
How to finish your blanket with a simple border
🛒 Supplies I Used in This Tutorial:
Premier Yarn Karma: https://premier-yarns.pxf.io/09LvON
Knitpal Ombre Chunky: https://amzn.to/44IyvC6
🌿 Support the Channel
If this tutorial helped you, please like, subscribe, and share — it makes a big difference for my crochet channel and helps me keep creating free +patterns premium patterns.
💬 Have Questions?
Drop them in the comments — I’m always happy to help beginners!
Let me know what blanket or home décor crochet pattern you want next.
easy chunky yarn blanket, chunky crochet blanket tutorial, beginner blanket pattern, fast crochet blanket, quick crochet blanket, coffee break blanket, how to crochet a blanket, easy crochet pattern, beginner crochet project, cozy crochet, chunky yarn project
Show More Show Less View Video Transcript
0:00
Hello everyone. Welcome to the channel.
0:03
In this video, we're going to make the
0:06
coffee break blanket. And this is a
0:10
really simple stitch. It is beginner
0:12
friendly.
0:14
And there's just a little bit of a trick
0:16
that I'm going to show you how to work
0:17
it so that you get a great result no
0:19
matter your skill level. Now, I have
0:22
designed this to work with chunky yarn
0:25
and your yarn count will be in your
0:28
pattern.
0:29
And if you don't have the pattern, you
0:31
don't need the pattern to make this. But
0:33
I have a simple formula to calculate how
0:36
much yarn you're going to need based on
0:38
the yarn that you're using. And I will
0:40
link that in the description. So I have
0:42
it written on a blog post and I also
0:44
have a video tutorial if you want me to
0:47
walk you through it and whatnot. Okay,
0:50
so let's get started. I am going to
0:52
demonstrate how to make it with a solid
0:54
color yarn because it's just easier to
0:56
see what you're doing with solid versus
0:59
the variegated yarn. So, this one here
1:02
that this kind of pink raspberry sauce
1:04
looking, this is the Karma yarn from
1:06
Premiere. I have a review on this on my
1:09
channel. The yellow one you see in the
1:12
uh thumbnail is knit pal. It's on Amazon
1:16
and that is the ombre chunky. And that's
1:20
more of a squishy kind of a soft squishy
1:22
yarn. It doesn't drape as nicely as
1:24
something like this, but for the person
1:27
that I made it for, it's perfect. All
1:29
right, so let's get started.
1:41
Right. So, this blanket is made with a
1:46
variation of the linked crochet stitch,
1:48
which is one of my favorites. I have so
1:50
many patterns on my channel with
1:52
variations of the linked single crochet.
1:55
Excuse me. And I'm going to do the
1:58
tutorial with a solid color yarn just to
2:01
make sure that you can see what I'm
2:02
doing with my hook. Sometimes with the
2:05
variegated, it can be a little tricky.
2:07
So, I'm going to have you use stitch
2:08
markers at the ends. It's a It's simple.
2:11
This is beginner friendly, but just for
2:13
hook placement,
2:15
let's do a stitch marker
2:19
for each end. So, with the link
2:22
stitches,
2:24
because you're bringing one stitch,
2:27
you're you're linking it to the next
2:29
stitch, it can throw off your stitch
2:32
count.
2:33
That's um why we're going to use the
2:35
stitch markers. So to begin, and this is
2:39
for uh this is for the chunky version of
2:42
the blanket, the tutorial, you need a
2:44
really loose starting chain, otherwise
2:48
it's going to buckle. And I'm going to
2:50
show you how to make it loose. Not just
2:52
keeping your hand loose, but actually
2:54
making those stitches long. So I'm going
2:55
to do
2:57
let's do six 16 stitches.
3:03
Uh there's no stitch count. Just
3:05
whatever you want. Consider this all
3:06
single crochet. So, I'm going to go in,
3:11
pull up my
3:13
chain, pull it up like don't just make a
3:16
chain, pull it up, then work the next
3:19
stitch. Pull up. You see, I'm pulling
3:21
the yarn up
3:23
before I stitch. You can do foundation
3:26
single crochet, but I know a lot of
3:28
makers find those challenging. So, I'm
3:29
going to keep it easy by making these
3:31
loose starting stitches or one and two.
3:35
Again, I've pulled up this stitch.
3:37
Three. Pull.
3:40
Four. Pull. Five. Pull up. Nice and
3:44
loose.
3:45
Six.
3:48
Seven. Pull up.
3:53
Eight. Pull up. Nine.
4:00
10
4:02
11
4:05
12
4:07
13
4:15
14 pull up 15 pull up
4:20
16 pull up and then also and you may
4:24
have to play around. I would recommend
4:25
doing a test swatch because you want to
4:27
see how big of a hook you're going to
4:28
need for the yarn that you've chosen.
4:32
I have a 8 mm hook for this.
4:37
Now, from here, I'm going to add two
4:40
stitches. One and two. These are turning
4:45
stitches, so I'm not pulling them quite
4:47
as loose. Then yarn over. Skip those two
4:50
you just made. Go into that first
4:52
stitch. Pull up a loop.
4:56
Now I'm gonna stitch mark.
5:02
There's the one. Here's the second one.
5:05
Second one is my kind of my end turn
5:08
chain. I want to mark that to make sure
5:10
that I see it when I'm coming back.
5:14
And mark it as if that's where your hook
5:17
is going to go.
5:19
You see it's the two V's on the
5:23
marker.
5:26
Lock it your locking stitch markers.
5:29
Okay, back to where we were. So, I've
5:32
yarned over, gone into the first loop,
5:38
yarn over again. Don't do anything else.
5:40
Go into the next stitch. Pull up another
5:43
loop. Keeping it loose. Yarn over. Pull
5:47
through all five.
5:50
Now you see we have the stitch marker
5:52
because the first stitch and the second
5:54
stitch were joined into one which is
5:58
this stitch turn chain and then the
6:01
marked
6:03
chain first chain of the chain two.
6:06
It'll make sense as you're working this.
6:08
Now don't don't chain or anything. Just
6:12
yarn over. Go into the last stitch you
6:15
went into. Pull up a loop. It's that
6:18
same stitch that was just worked there.
6:20
Yarn over, go into the next stitch, thus
6:24
linking the two together with this
6:27
little bit of a cluster. Five loops on
6:29
hook. Yarn over, pull through. Don't
6:32
chain. Yarn over.
6:35
Go back into that same stitch. Pull up a
6:38
loop.
6:42
Yarn over before going into the next
6:45
loop.
6:48
Keeping it loose. Pull through. Yarn
6:52
over. Back into the same stitch
6:56
before going into the next stitch.
7:05
Pull through all five.
7:08
And you're starting to make some
7:09
clusters.
7:14
Let's do a couple more.
7:17
Yarn over back into the same stitch.
7:21
Pull up. Then yarn over. Go into the
7:24
next stitch. Pull up.
7:29
Keep things loose.
7:32
Pull through.
7:34
Yarn over.
7:36
Same stitch. Pull up a loop. Yarn over.
7:41
Go into the next loop. Five loops on
7:44
hook. Yarn over, pull through all.
7:54
All right. So, just keep this up till
7:55
you get to the end of the row.
8:11
All right. So, I finished my row. Should
8:13
look like this.
8:15
And I'm going to need my second stitch
8:17
marker.
8:27
Chain two.
8:30
I'm going to keep my eye right here.
8:35
I want my stitch marker to go into
8:40
the first stitch of the chain.
8:46
There's one. There's two. Right into the
8:49
base. Both loops on hook or both loops
8:52
on the marker.
8:55
Oops. It looks like I split my yarn.
9:00
There we go. See, I've got my V on
9:02
there. Close it up
9:06
and start this again.
9:12
Go in. Yarn over. Go into the first
9:14
stitch.
9:16
Yarn over into the second stitch.
9:22
Pull through.
9:35
Okay. So, this is row two. This will be
9:36
your repeat.
9:41
Gosh, this chunky yarn
9:45
you it gets eaten up so quickly,
9:47
especially with these thicker stitches.
9:49
Okay, yarn over.
9:51
Go into that stitch. Yarn over before
9:54
going into the next stitch like we have
9:56
been.
9:58
Pull up.
11:07
Right.
11:33
So, I'm coming to the end.
11:38
And this is where we have to consider
11:40
that we are essentially losing a stitch
11:43
when we make the first stitch of the
11:45
row. So it's made up on the end here.
11:50
Okay. So let's look. This is the last
11:53
visible stitch up here. The top that
11:56
first
11:59
stitch we went into when starting this
12:02
yarn over. Go in there. All
12:08
right. So, now we're going to utilize
12:11
the marked stitch to add in the last
12:16
stitch of the row. So, go back like you
12:19
have been into the last stitch. Now,
12:21
look, make sure you're in that stitch
12:24
and yarn over and go into this marked
12:29
stitch down here. So, let's see. Where's
12:31
it? There are the loops.
12:33
Got both loops on hook. Pull up
12:37
nice and high.
12:39
Pull through. Take out your marker.
12:46
Chain two.
12:48
One, two.
12:51
Mark that first of the two chains cuz
12:56
we'll work into that coming back.
13:00
And then repeat row two again.
13:04
Go into the first stitch, pull up a
13:05
loop.
13:07
Then next stitch, pull up a loop.
13:11
And so on,
13:13
really simple.
13:22
And then you'll see when you come down
13:24
here to finish this stitch, your um your
13:29
two loops on the or two the V the stitch
13:34
on the stitch marker. That is where you
13:37
put your hook in.
13:39
Come in right here.
13:44
See, it's right where the marker is.
13:47
and finish your round. So, your last
13:50
stitch. Let me finish this row. We'll do
13:52
it together. Just one more. Get you
13:55
comfortable with it.
14:13
All right. So, I'm coming to the end.
14:17
Yeah. Start this stitch. Whoops.
14:21
Okay. Find that last top stitch which is
14:24
here or the first the top of the last
14:27
stitch of the row. Five loops on hook.
14:30
And then we've got to add another one in
14:32
there. So we yarn over, go into that
14:35
stitch again. Yarn over. Then find where
14:39
this marker is
14:43
and the two
14:46
loops it's holding. Go down in there.
14:51
Pull up the loop.
15:00
Chain one. Chain two.
15:09
my stitch marker and put it back into
15:12
the
15:15
this one here. The first
15:19
chain two,
15:21
the first of the chain twos. There we
15:23
go. At the base.
15:26
Okay, so the base stitch and then the
15:27
turn chain
15:29
is how I like to think of that. chain
15:31
two
15:34
and then you just keep working it until
15:36
it is the size that you want.
15:44
And you'll want to do a really simple
15:46
border on this. I you could do an
15:47
elaborate one, but with the chunky
15:49
blanket, I don't know how elaborate of a
15:51
border you want to do, but your single
15:53
crochet borders are going to pull this
15:55
out nicely. And then you see with our
15:58
really loose uh chain base, there's no
16:01
pulling. Everything's just laying nice
16:03
and smooth. It's not
16:07
um you know, narrow cuz because it was
16:10
too tight down there. But this starts to
16:12
make almost like a braided look. Really
16:14
pretty and pretty with um the thicker
16:17
yarns.
16:22
Did you know I designed project
16:24
trackers? Large print and regular print
16:27
for small, medium, and large size
16:29
projects. The link is in the description
16:32
to get your own or you can try it for
16:34
free.
16:36
There's a download on my website, link
16:38
in description.
16:43
So, I've made this the width that I
16:46
want. This is This is such an unusual
16:49
size I feel for a blanket, but it's a
16:51
custom size request. So, it's a very uh
16:56
very much kind of a slim rectangle. It's
16:59
very a little youngster that likes to
17:02
hold it a certain way.
17:05
Um, for chunky blankets especially, my
17:09
personal taste is I don't like much of a
17:12
border. This stitch I feel does need a
17:16
little bit of a border just to keep the
17:18
edges clean. My other chunky pattern.
17:20
Maybe I have two, but I don't have
17:23
borders on them.
17:25
But this one I feel because of how that
17:27
last stitch is worked, it's still pretty
17:29
clean and straight, but I feel like it
17:32
needs that single crochet all the way
17:35
around working the three stitches in the
17:37
corners as you come around. Right. So,
17:40
no stitch count. I'm just going to
17:42
single crochet around. Now, your
17:44
preference, you know, if you like
17:45
something different, of course, it's
17:47
your blanket. You do what you like, but
17:49
I'm going to start working a single
17:51
crochet around. And of course, you will
17:53
see how it looks in the thumbnail.
17:56
So, let me let's see. I ended here. So,
17:59
this is my last stitch. So, I'm going to
18:00
chain one and then do the quarter turn
18:08
and start working
18:11
across the shorter edge.
18:18
My wrist is still it's feeling better,
18:21
but it's still a little weird. If you've
18:23
been following me, I have a wrist
18:25
injury. Now, what I would say is make
18:29
sure that you get two loops on the hook
18:31
for a secure
18:33
stitch with your edge, but not more than
18:36
that. So, I'm going to do one
18:40
in that kind of finishing cluster, and
18:44
then my second one will be in the more
18:46
open space below it. And that should
18:50
kind of be the right amount of stitches
18:55
per
18:57
row. Okay. So, let's do another one.
19:00
Come back to the side. Find
19:03
where that hook should go. Since it's
19:06
kind of twisted together, you'll have to
19:09
sort of fish around. Get in there and
19:12
keep them loose so that it's not
19:14
buckling.
19:17
Right. And I'm going to go in here.
19:18
There's kind of a little bit of a space.
19:23
Go back and look.
19:25
Find
19:27
where I want my stitch.
19:32
Now that's looks a little loose.
19:47
And then of course you can adjust as you
19:49
go. If it seems like it's getting
19:50
buckling, like a little bit too tight or
19:52
flaring, you can go back and adjust. I'm
19:56
just going to slowly do a baseline of
20:00
single crochet around. See how it looks.
20:02
See if I want to, you know, finish maybe
20:05
with a yarn over, slip stitch, something
20:07
like that. Let me work this round and
20:09
then I'll come back and we'll see what
20:11
some other options are
20:15
to, you know, gild the lily. But see how
20:18
that makes it look a little bit more
20:20
clean.
20:22
Now here I want to call your attention
20:24
when you're to the bottom. So this is
20:26
that starting chain row we did. Now
20:28
remember I made really long stitches,
20:32
right? So you're going to have these big
20:33
openings in between. So, this will not
20:35
be a one for one stitch placement. And
20:39
some of these you're going to want to
20:40
work two stitches so that you do not
20:43
have the buckling. So, not every stitch
20:45
will need two in it, but I would say
20:48
kind of watch how how it is when you're
20:51
going along. This is going to vary based
20:53
on the yarn you use cuz these bulkier
20:57
yarns, they're really tricky and also
20:59
they magnify everything you do. So for
21:03
me so far working I don't know I've done
21:06
about 30 stitches. I would say every
21:09
eighth ninth stitch I've put two
21:11
stitches in one just so that there's no
21:15
pulling or buckling going on
21:19
because that will ruin the effect. The
21:21
blanket will not lay flat. So here you
21:24
see I'm doing my two crochet. Make sure
21:25
you get two loops on the hook so that's
21:29
nice and secure.
21:31
I'm just working. Here's three.
21:36
Four. I'm just going to be checking as I
21:39
go. Make sure it's still laying flat.
21:41
No, no bunching, buckling, none of that.
21:45
Five. So, now it's starting to feel like
21:47
I'm really extending and reaching my
21:49
hook into that next stitch. Here's six.
21:53
So, I'm going to put another one in
21:54
here. So, just kind of feel it around as
21:57
you go
21:59
on at least on this side. Your other
22:01
side should be just fine.
22:08
All right. So, I finished my single
22:09
crochet around. It's just really subtle.
22:12
So, now I'm going to do a yarn over. If
22:15
I can get my yarn a yarn over, slip
22:19
stitch.
22:22
Yarn went under the chair.
22:25
Okay. So, this is I did my three in the
22:28
corner and now I'm back to the very
22:32
first stitch I made, which was right
22:34
here. So, this was my finished row. I
22:36
chain one, did a quarter turn, and now
22:39
here I am. So, I'm going to slip into
22:41
here
22:42
and then same stitch,
22:46
yarn over, go in, pull up, and then you
22:50
want to keep the Oh, I'm twisted right
22:52
there. I don't want that. Yarn over,
22:56
pull up. So the yarn over, slip stitch
22:58
can get tight if you don't keep your
23:00
tension a little bit loose. So pull up
23:03
and slip. Yarn over, go in, pull up, and
23:10
slip. That gives just a little more of a
23:13
decorative edge instead of just a
23:16
regular slip stitch. You've got that
23:18
extra
23:20
bit of yarn.
23:25
You see how it's kind of giving more of
23:27
an edge? Kind of lifting it just a
23:29
little bit to frame the blanket.
23:33
So that's how I'm working this. And if
23:36
you want to, if you're doing a larger
23:38
blanket, since this is a smaller size, I
23:41
just need a delicate little edge of one
23:44
row of single crochet. If you're doing a
23:46
larger size, you might want a second
23:48
round or do half double crochet as your
23:51
edge.
23:53
instead of single. I I don't know that I
23:55
would do a double crochet. You can try
23:57
it. See how it looks in proportion to
23:59
your blanket. And of course, the yarn
24:01
you're using is going to dictate some of
24:03
this.
24:10
All right. So, that's how I make the
24:12
coffee break blanket.
24:15
Let me know what color you're making in
24:17
the comments if you're making it. I
24:18
always love to know what colors people
24:21
are working with.
24:25
And thanks for watching.
Hobbies & Leisure
Hobbies & Leisure
Crafts
Fiber & Textile Arts