Up next in 10


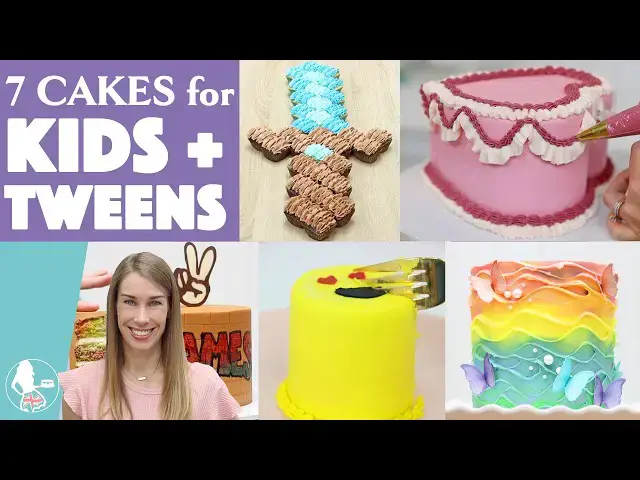
In this step by step cake decorating tutorial I'll show you 7 fun and creative cakes for kids and tweens, including number cakes, emoji cakes, Minecraft cupcake cakes, vintage heart cakes, graffiti cakes, and more beginner-friendly birthday cake ideas.
⭐Join my channel for members-only perks!
https://www.youtube.com/channel/UC1k3PDqnjUG8wMH1vY3yojA/join
🥣My Recommended Cake Decorating Tools: https://www.britishgirlbakes.com/my-recommended-tools-for-cake-decorating
💫Start your FREE 7 day trial on my cake school: https://britishgirlbakes.teachable.com/p/all-you-can-cake
🎂Take my FREE course on 10 Frosting Techniques: http://britishgirlbakes.com/free-course
👩🏼🍳My 4 Minute Buttercream recipe
https://www.britishgirlbakes.com/recipes/buttercream-frosting/
📄READ a written version of this tutorial (with photos!)
https://www.britishgirlbakes.com/cakes-for-kids-and-tweens
👍Please LIKE and SUBSCRIBE to my channel for a new cake decorating tutorial every week!
💬 SAY HI!
Website: https://www.britishgirlbakes.com
Instagram: https://www.instagram.com/britishgirlbakes
Show More Show Less View Video Transcript
0:00
Need cake ideas that look impressive but don't require professional cake decorating skills?
0:04
Here are some of my favourite cake ideas for kids and tweens. Starting off with a number cake, bake
0:10
a rectangular sheet cake and use a piece of paper that's half the size of the cake to draw your
0:15
number. Place the paper number onto the cake and cut around it twice to cut two identical number
0:20
shapes from the same cake. This is much easier when the cake is cold because the cake is firmer
0:25
and less crumbly. Even if your cakes don't look perfect as you're cutting them out, by the time
0:30
you've covered them in piping and decorations, it will look great. To attach your first number,
0:34
use two dots of buttercream on the cake board underneath the cake to hold it in place and then
0:39
pipe your filling onto the cake. Buttercream is the best for this because it will hold its shape
0:43
even when the next layer is placed down on top of it, whereas something soft like whipped cream will
0:48
be squashed. Lower the second cake layer on top, lining it up carefully so it sits directly on top
0:53
of the bottom cake, and then use any piping style you like to decorate the top of the cake. This is
0:58
a 1M star tip for these rosettes and also this wave or shell piping. And use any petal-shaped
1:05
piping tip to make these ruffles. And then star-shaped tips to fill in any of the gaps. Now
1:10
for the fun part: cover the top with decorations! Chocolates, candies, macarons, flowers, sprinkles,
1:15
whatever matches the theme or colours. This is a really fun cake for kids to help decorate
1:20
themselves because there are no technical parts to get right. It's just choosing what you want to use
1:24
and arranging those decorations on the cake. Next up, an emoji cake. To make a mini cake, you can
1:30
cut layers out of a larger cake. This is a 6 inch cake and a small round cookie cutter, but you can
1:35
make these with normal sized cake layers instead. Attach the first cake layer onto a cake board with
1:40
a dot of buttercream to keep it secure and then layer cake and filling and add a crumb coat,
1:45
which is a thin layer of frosting to trap any crumbs that come off the cake. Let this set in the
1:49
fridge for about 30 minutes and then add a final coat of frosting. And to create the emoji face,
1:54
you're going to make your own homemade stencils. Use parchment paper or wax paper and draw the
1:59
facial expressions of your chosen emoji and cut those out, leaving the surrounding paper intact,
2:04
which will become your stencils. Chill the cake so the frosting is really firm and then press the
2:08
stencil against the cake. Spread buttercream over it to leave a smooth, thin layer and then peel
2:14
the stencil away to reveal the emoji design. The peel is so satisfying. This is a fun one for kids
2:19
because they can choose their own favorite emoji - a smiley face, heart eyes, sunglasses, whatever
2:25
they like. And like all buttercream cakes, these taste best when served at room temperature. This
2:30
next one has a Minecraft theme. Bake cupcakes in a square cupcake pan using regular cupcake liners
2:36
and as the cupcakes bake, they'll expand to fill the square shape. Square cupcakes are so unusual
2:41
and fun compared to regular round cupcakes and you can use them to build any shape. Use
2:46
any cupcake flavours you like and then arrange the cupcakes into the shape of your design. I'm making
2:51
a Minecraft sword. Arranging them first helps you figure out how large your cake board needs to be.
2:56
And if you don't have a big enough board, you can improvise. Here I'm using an IKEA tabletop
3:00
to arrange my cupcakes on. Double check that your finished design fits on the board before attaching
3:05
anything and then melt chocolate chips and use the melted chocolate like glue underneath each cupcake
3:10
to prevent the cupcakes from sliding around when you're transporting the cake. Once all of the
3:14
cupcakes are attached, start decorating. I'm using my 4 Minute Buttercream, tinting half of it brown
3:19
using the melted chocolate from earlier. And this is a 1M piping tip, which is so versatile because
3:25
you can use that for lots of different piping styles. I'm piping these wavy swirls using the
3:29
chocolate buttercream on the chocolate cupcakes and then tinting the rest of my buttercream to
3:34
make two shades of blue to try to match that Minecraft pixelated look. Cupcake cakes are so
3:40
much easier to serve than regular cakes because there's no slicing involved so it removes some
3:44
of the chaos from a children's birthday party. You can make these cupcake cakes a day ahead,
3:49
but the cupcakes really need to stay airtight so that they don't dry out. I'm using these
3:53
shelf dividers and then wrapping the whole thing in cling film or saran wrap and the shelf dividers
3:58
just raise up the cling film or saran wrap so that it doesn't touch the cupcakes and damage the
4:02
frosting. Fast forward to the birthday party and it was a huge hit! Now for a really pretty cake.
4:08
I know this tutorial is cake ideas for kids and tweens, but this is actually the birthday cake I
4:13
made for myself this year. Tint buttercream in all of the colours you want to use, choosing colours
4:17
that blend smoothly into each other in a gradient like rainbow colours do. Layer the colours on top
4:22
of each other in a piping bag and then pipe your frosting onto the cake and you'll see the colours
4:27
as they push through each other in the piping bag will blend together slightly on the cake,
4:32
creating this beautiful rainbow ombre effect. Smooth the frosting with a cake scraper and leave
4:36
it like this or add some texture. I'm turning my cake comb on its side and using that end to wiggle
4:42
up and down gently against the frosting to make this wave texture. If you want to add sprinkles
4:47
like these sugar pearls, do it straight away while the frosting is still soft and sticky so that they
4:52
attach easily. And I'm adding some wafer paper butterflies as well. It's such a fun girly cake.
4:57
I'm obsessed with it! This next one is a graffiti cake and I'm starting with rainbow cake layers,
5:02
dividing my batter into different bowls and then pouring the batter in rainbow order into each pan
5:07
so that the batter spreads out into rings. This is a really fun cake to cut into. Layer the cake and
5:13
cover it with buttercream tinted a brick colour. I'm taking a shortcut by melting chocolate chips
5:18
and adding those to the buttercream and then just a tiny bit of orange. I heard from lots
5:22
of comments on YouTube that it wasn't accurate and you can absolutely make a darker, more red shade
5:27
if you prefer. Chill the cake until the frosting is firm and then use a zigzag textured cake comb
5:32
to imprint horizontal lines into the frosting to make a brick wall effect and then use a petal
5:37
piping tip or a toothpick to score the lines in between each brick. This works best when the
5:41
buttercream is really cold and firm so put it in the fridge for an hour first since if the frosting
5:46
is still soft and sticky, it will drag and create unwanted texture. To create the graffiti effect,
5:51
mix clear almond extract or vanilla extract with a drop of food colouring and then use a
5:55
paintbrush to paint words or designs onto the cake. You could let your tween or your kid
6:00
choose their own graffiti message. For an edible chocolate cake topper, melt chocolate chips in
6:04
the microwave at 50% power and that lower power prevents overheating or burning the chocolate.
6:09
Spoon the melted chocolate into a ziploc bag and snip a tiny corner off so that you can use it as a
6:13
piping bag. Draw your design on paper and cover it with parchment paper or wax paper and then
6:18
pipe the design with chocolate. Here I'm making a peace sign. Freeze it for about 5 minutes to set
6:23
the outline and then flood the center with white chocolate, pressing a wooden skewer into it before
6:28
it sets. Freeze it again until it's firm and then peel it away from the paper and push it into your
6:32
cake as an edible cake topper. This next design is very beginner friendly. Frost your cake smoothly
6:37
and I have lots of tutorials on smooth frosting techniques if you need help with that step. Just
6:41
go to my channel page and scroll down to where it says SMOOTH FROSTING. Place your cake onto a tray
6:45
so that you don't make a huge mess and then pour sprinkles around the bottom of the cake, pressing
6:49
them into the frosting while it's still soft and sticky so that they attach easily. Tap any
6:53
excess sprinkles off the cake board onto the tray and then lift the tray up to pour the sprinkles
6:57
back into the jar or container to reuse later. Fancy sprinkle mixes can get very expensive,
7:03
so it's definitely worth saving them. Spoon your leftover buttercream into a piping bag. This is
7:07
a double swirl, which adds nice texture and height without adding too much frosting. If you're adding
7:13
sprinkles on top of these, add them immediately while the buttercream is still soft and sticky.
7:17
This is one of the simplest cakes to make, but it still feels really fun and celebratory.
7:21
Vintage heart cakes have become really popular and as long as you have a few piping tips,
7:25
they're actually surprisingly easy to make. If you don't have a heart-shaped cake pan,
7:29
start with round cake layers and cut a small piece off two of the sides of each cake layer
7:34
and then spread some buttercream onto the curved edge and press those cut-off pieces against it
7:38
to make the top of the heart. Add filling and then repeat to build a heart-shaped layer cake.
7:44
Chill the cake before frosting because like all cakes, this is much easier when the cake is cold,
7:48
but this is especially true for cakes that you've cut or carved or sculpted because they're much
7:53
more crumbly. Spread on a crumb coat, chill again to set that frosting and then add a final coat of
7:57
frosting, taking your time to smooth the frosting before you start piping. Use a variety of piping
8:02
tips for different textures and details. A petal tip is great for ruffles - this is a Wilton 104.
8:08
And you can use cookie cutters to press against the frosting to give you a guide before piping
8:12
these curved swags. Using star- shaped tips for beading adds lovely texture and you can layer
8:18
this piping above other piping. Finish with a piped message and you have an elegant vintage
8:23
heart cake! I hope you've seen some ideas you'd like to try. From themed cakes to number cakes,
8:28
simple to more elaborate, beginner-friendly cakes that will make any celebration feel extra special.
8:33
Subscribe for more free tutorials, join my channel for my members only course on
8:36
Perfectly Smooth Frosting and lots more perks, And visit my cake school on www.britishgirlbakes.com
8:42
to learn hundreds more cake decorating techniques and designs. See you there!
Hobbies & Leisure