Up next in 10

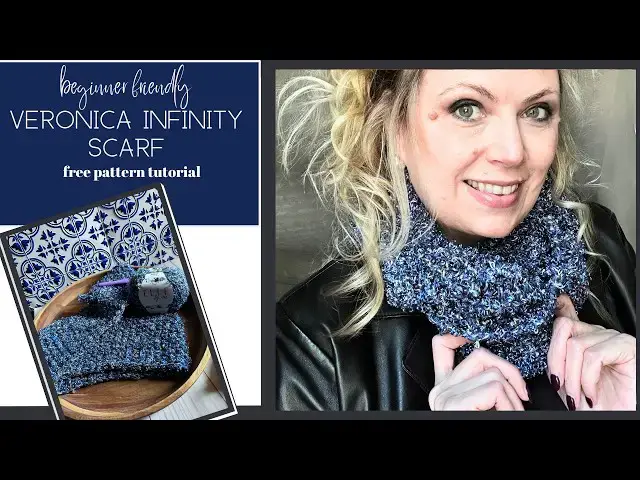
The Veronica Infinity Scarf takes a beautiful but notoriously tricky textured yarn and makes it approachable for a comfortable beginner. With its rich, jewel-toned texture, this crochet infinity scarf looks like wearable jewelry — the kind of piece that instantly elevates a simple outfit. It's a fast, easy weekend project, and makes a beautiful handmade gift.
In this video, I'll walk you through every step, including how to work with this yarn's tricky texture, closing the round without a mattress stitch, and finishing with a rope-style border.
FREE WRITTEN PATTERN:
https://livechilllife.com/crochet-and-knit/veronica-infinity-scarf-crochet-pattern/
📌 SUPPLIES USED:
10mm hook
Premier Elle by Me yarn, Aurallie colorway, Bejeweled
Stitch markers
Large eye tapestry needle
Ruler or tape measure
💛 MORE DIFFICULT YARNS MADE EASY:
Pumpkin Wrap: https://livechilllife.com/crochet-and-knit/latte-cakes-free-crochet-wrap-pattern/
Rosemary Wrap: https://livechilllife.com/featured/easy-crochet-shawl-wrap-pattern/
Daydream Chenille Blanket: https://livechilllife.com/crochet-and-knit/how-to-crochet-a-beginner-friendly-chenille-chunky-blanket-for-cozy-effortless-comfort/
Skill Level: Comfortable Beginner
Finished Size: 60" x 6" (easy to modify wider — details in video and written pattern)
LET'S BE FRIENDS:
Buy me a coffee: Ko-fi.com/livechilllife
Subscribe to the newsletter for monthly discounts, tips and free patterns: https://livechilllife.com/
Try my project tracker for free: https://livechilllife.com/crochet-and-knit/project-tracker-page-for-crochet-and-knit-patterns/
My books:https://livechilllife.com/shop-my-books/
My vintage recipe cooking channel: https://www.youtube.com/@100yearoldrecipes
My Etsy shop: https://livechilllife.etsy.com
#crochettutorial #infinityscarf #crochetpattern #beginnercrochet #textyarnproject
Show More Show Less View Video Transcript
0:07
Hello everyone. In this video I'm going
0:09
to show you how to make the Veronicas
0:11
scarf and the star of the show of course
0:13
is this beautiful yarn. This is from
0:16
premiere and can I tell you I was so
0:18
excited when I saw it available because
0:22
about 4 years ago Isaac Mizrahi did a
0:26
yarn for premiere and they had it in the
0:27
Michael's stores. Maybe you saw it and
0:30
one of my favorite things to wear every
0:32
season. I still have a skein left. I
0:34
have all the colors that was offered.
0:37
Um and you'll see some similarities in
0:40
the two.
0:42
As I knitted so I used the garter stitch
0:45
to knit my cowl and I will put it up
0:49
here somewhere for you to see and it
0:50
always feels like I'm wearing jewelry.
0:53
So I can have just a really simple
0:55
something on and throw on a scarf or
0:58
cowl made with this kind of yarn in a
1:00
very simple stitch and look so chic and
1:03
put together. Now you may be looking at
1:06
this even if you're experienced and
1:08
think oh my goodness this is a difficult
1:10
yarn. I will just go crazy.
1:13
Lucky for you I am a difficult yarn
1:15
whisperer and you'll see how easy it is
1:18
to make this yarn. Now if you're a very
1:20
very beginner you might find this a
1:22
little bit challenging but anyone who's
1:25
had you know a little experience under
1:27
your belt with crochet you'll be able to
1:29
make this just fine. I promise it's
1:31
simple. Now let's look at the anatomy of
1:33
this yarn. What makes it look like it
1:35
looks?
1:38
We've got three strands here.
1:41
We've got kind of a standard
1:43
category four yarn.
1:45
We've got this fancy thread with some
1:48
loops in it and a little bit of a sheen
1:51
kind of like embroidery thread has. And
1:53
then of course to gild the lily and
1:56
fancy it up. We have metallic.
2:00
Okay, and they're spun together to
2:01
create this yarn and
2:05
this is what we're going to be making in
2:07
this video.
2:09
And I'm going to talk to you about how
2:10
to customize your size.
2:12
So, this is all single crochet. There's
2:15
no
2:17
like a stitch count repeat. You can
2:19
chain it as long as you like or as short
2:22
as you like and I'm going to give you
2:23
some guidelines.
2:24
Now, the first step is a big hook. Even
2:28
though this looks kind of thin, it is
2:29
still considered a chunky yarn. And I'm
2:32
using a 10 mm hook for this pattern.
2:37
So, what what size are we making? All
2:39
right, my basic
2:41
size for about a 60-in infinity, if you
2:45
would like to take your tape measure,
2:47
which is the same length, 60 in,
2:50
wrap it around your neck twice and kind
2:51
of see how it hangs and if you like that
2:54
length. If you are very tall or very
2:56
petite, you might want to add or remove
2:59
some stitches. And then if you want the
3:02
balaclava style where you can wrap it
3:04
and put part of it over your head, you
3:06
might want to make a wider infinity.
3:11
And then if you're plus size, you might
3:12
want to make one a little longer and
3:15
then wider to flatter your physique as
3:18
best you can because we all want to look
3:21
our best no matter what size we are. So,
3:23
that's just some things to think about
3:25
when you're doing your starting chain.
3:28
Now, the starting chain in the pattern
3:30
to make a standard 60-in infinity, we'll
3:33
be chaining about 104 to 106.
3:38
And when you measure it, it's going to
3:39
be longer than 60 in, but it will come
3:41
in as you're working the pattern.
3:44
And then if you're making a very wide
3:48
scarf, that also will require a little
3:51
more length. Otherwise, you're just
3:52
going to almost choke yourself when
3:54
you're wrapping it around your head. So,
3:56
I would allow an additional 6 to 8
3:59
stitches.
4:01
Right now, how you chain will be
4:03
important. So, I've got my slipknot
4:05
here.
4:07
And I want to pull it out. Let me get a
4:09
ruler so you can see what I'm doing.
4:15
Rather than eyeball it, just give you a
4:17
really good idea of
4:20
how long to make your chains. Because if
4:23
they're not pulled long enough, it's
4:25
just going to like seize up right at
4:28
that edge, and we don't want that, okay?
4:30
So, I'm going to do about an inch, 3/4
4:32
of an inch to an inch. Let me show you
4:34
how to make those long chains.
4:38
You might think of it as loosely
4:39
chaining, but I think a stretched or a
4:41
long chain is a better way to describe
4:44
it. So, I'm going to make my single
4:46
crochet and pull up.
4:49
Pretty long. 3/4 of an inch to an inch.
4:53
Do it again. Pull up.
4:56
Again. Pull up.
5:00
And then just keep doing that. That
5:01
one's too short.
5:03
Pull up.
5:05
And so on.
5:08
Pull up.
5:12
And so, let's look at it on the ruler.
5:18
Look at our chains. We can pull them
5:21
out.
5:22
And they are coming in. Let's do one of
5:24
these middle ones.
5:27
Here to about here. So, it's just below
5:32
1 inch, but between 3/4 of an inch to an
5:35
inch will give you a great result.
5:40
And it doesn't have to be exactly
5:41
perfect, but just kind of try to stay in
5:44
that area. Okay, so keep chaining your
5:49
104
5:51
or more or less depending on
5:54
what size you want to make.
5:57
And you can frog this yarn. It's not
5:58
going to ruin it if you need to, but
6:00
it's a lot of chains to have to undo.
6:07
And then another thing I'm going to do
6:09
to make this a little bit easier
6:12
and beginner-friendly, a little
6:14
unconventional. I'm going to work rows
6:16
before I join it.
6:18
Because trying to join this and then
6:20
working in the round with this
6:23
difficult-to-see
6:24
stitch yarn
6:26
is a challenge. So, we're going to do an
6:29
unconventional method.
6:37
All right, so once you finish your
6:38
chain, make sure you have that
6:43
um
6:46
your stitch. For turning, I wouldn't
6:48
make it quite as loose because that'll
6:51
make your join a little bit more
6:54
wiggly, jiggly. Trust me, when you come
6:57
back to it, you'll see what I mean. So,
6:58
keep more of a regular tension for that
7:01
turn. Okay? And as usual, you're going
7:03
to skip that first stitch and now we're
7:05
going to work the extended single
7:07
crochet.
7:09
All right, so go into your
7:14
loop
7:15
or your stitch, rather.
7:18
Two on hook.
7:20
Come up. Keep your stitches loose. You
7:23
don't really have to pull, but don't
7:25
make them tight.
7:27
And then yarn over, pull through the
7:29
first loop.
7:34
Yarn over again, pull through two loops.
7:37
And that's the extended single crochet.
7:39
So, you're going to do that across the
7:41
row. And again, I'm going to look for my
7:46
V there.
7:50
Pull up my loop.
7:53
Pull up Pull the yarn. So, you're going
7:54
to be doing a lot of this, like flexing
7:57
your fingers out. Keep that yarn loose.
8:01
Yarn over, pull through one, yarn over,
8:03
pull through two.
8:07
Next stitch. We just keep doing this. Go
8:11
in there. Make sure I've got my two
8:13
loops or the V on the hook.
8:18
Come up.
8:20
Stretch.
8:22
Yarn over, go through the first, yarn
8:24
over, pull through all two remaining
8:28
loops on your hook.
8:31
Okay, and just continue down. And I will
8:34
meet you at the end of your
8:37
row.
8:40
Pull through one, yarn over, pull
8:42
through two.
8:45
It'll start looking like this.
8:48
All right, so I've finished working this
8:50
whole this whole long chain.
8:53
Now, because I care about you, I'm not
8:56
going to have you connected just yet for
8:59
the simple reason that by the time you
9:01
try to keep this chain straight because
9:04
it's just so incredibly long, it's going
9:07
to twist. You're going to get frustrated
9:10
and
9:12
I don't want to say throw in the towel,
9:13
but
9:14
let's just let's work another row and
9:16
then we can look at connecting
9:20
it and working it in the round, okay?
9:23
So, chain one and go back
9:26
the way you came working the same
9:29
extended single crochet. We're We're
9:31
working this stitch in the whole
9:33
uh for the whole thing until we do the
9:35
borders, okay?
9:36
So, I'm going to just keep working all
9:38
the way back. Keep the stitches loose.
9:42
Keep this drapey and airy.
9:45
And keep the stitches easy to see.
9:57
Like so.
10:00
And then when I finish the row, come
10:01
back
10:03
we'll start joining it and working in
10:06
the round.
10:11
And that's just so that we don't have
10:13
this kind of unsightly seam.
10:17
We could work it as just a big, you
10:18
know, like a blanket square. But then
10:21
we're going to have a seam and that's
10:22
not the point of an infinity scarf,
10:25
right? It should just be looking like
10:27
one big circle, an infinity circle with
10:30
no begin and no end.
10:38
So, just keep working.
10:42
Like so. And you still see there's a lot
10:44
of drape.
10:45
Nice and airy still. Well, airy look,
10:48
it's still going to be a warm, somewhat
10:50
warm yarn, you know, not not like
10:53
Alaska in the dead of winter, but it'll
10:56
offer some warmth.
10:58
But it's I'm making it more to be a a
11:00
fashion accessory.
11:08
All right, so I have finished row two.
11:13
And I have a smaller piece here because
11:14
I want to show you what's going to be
11:16
going on with this. Take your hook out
11:20
and make sure that everything
11:23
is face up, right? So, we have that
11:25
starting tail, right? That's facing down
11:30
here, right?
11:31
Top cuz we're going to keep building up
11:33
here. We're going to be working in the
11:35
round, and you want to make sure when
11:36
this is together, everything is flat,
11:39
there's no twists.
11:44
And we're going to join it. Okay, so
11:46
take your hook out
11:49
and find the first stitch from row two.
11:54
Okay, this is the end of row two.
11:56
Bring your
11:58
uh working
12:00
stitch through.
12:02
Pull it tight.
12:06
Uh that's the tail. Pull snug.
12:14
I'm just going to chain one so that we
12:16
can work back in that stitch without the
12:18
stitch coming undone.
12:21
Okay, again, make sure everything
12:24
straight. Bottom is on the bottom
12:27
and your row three is landing on top of
12:30
the stitches from row two, or uh now
12:35
we'll be calling it round two. That tail
12:37
always on the bottom. And I'm not going
12:40
to join just yet, and I'll tell you why.
12:43
Because
12:45
the whole point of this exercise is to
12:48
give a seamless
12:50
worked in the round look. And if we
12:53
start weaving in right now, it's going
12:54
to look a little lumpy right here, and I
12:57
want to be able to kind of snake it
12:58
through more of the finished piece. And
13:01
I'll show you in the next clip some
13:03
options for doing that, but if it's just
13:05
you just have to secure it right now, go
13:07
ahead and get a stitch marker or
13:08
something and just pin that closed.
13:12
Okay, so chain one just to secure
13:15
and we're going to be working spiral
13:17
now. So, no more counting rounds. You'll
13:20
always know where you are because your
13:21
tail will tell to you. Pull up and keep
13:24
working those extended single crochets.
13:30
Just like so.
13:39
Again, this is going to say in your
13:41
pattern, round three.
13:45
Make sure Oops.
13:48
Make sure keep this down so it's not
13:50
spinning. Make sure you're always
13:51
working in the top part of
13:55
row two.
13:58
And if you feel like because this is a
13:59
very long piece you're working with, my
14:01
sample piece is simple. If you feel like
14:03
you want to just pin parts of it to keep
14:05
it from twisting as you work your way
14:07
around, do that. Just make it easy on
14:10
yourself. This is like I said,
14:12
challenging yarn, we're making easy
14:14
stitches, but any kind of flip-flopping
14:16
around is just going to frustrate you.
14:18
So just, you know, put get you a big
14:20
safety pin if you have the bigger stitch
14:22
markers that can hold some of these
14:24
together as you work. Just, you know,
14:26
release them as you go or adjust them as
14:28
you go just to keep everything straight.
14:34
Right now, you can use a stitch marker
14:37
or a pin, something like that to keep
14:40
these edges secured together. But
14:42
because of the texture of this yarn
14:44
again, we've got a
14:46
different rules, right? For these kind
14:48
of yarns. I'm not going to use this.
14:49
It's going to get tangled up and
14:50
snagged. So instead, I'm going to use a
14:53
piece of yarn to tie it together just
14:55
loosely or I can, you know, snip it away
14:58
when I'm done making my piece.
15:01
And just bring up
15:03
one tail here
15:05
and then the other tail through the
15:07
other side,
15:08
the other end.
15:14
Just hold this so it doesn't come
15:15
through. So I have a length of 8 inches
15:17
or so and I'm just going to tie it up
15:20
here.
15:22
A little do a little bow.
15:25
And then keep working so it'll be
15:27
secure. Now, when you look at your yarn
15:29
your your yarn your piece upwards like
15:31
this, you'll just be working around.
15:34
Your tail will be on on the bottom and
15:38
then you'll be coming around along the
15:40
top. So, at this point because we've
15:43
already worked these rows, it shouldn't
15:45
be twisting on you. That's why I did it
15:47
this way. Just you know, a little a
15:49
little unconventional but this is
15:51
unconventional yarn. So, new rules to
15:54
make it easy for us. Okay? Keep
15:56
stitching and I'm going to check back
15:58
with you after I do a couple more rows.
16:00
All right, so I'm on round Oh, I think
16:02
this will be the sixth round.
16:05
And
16:06
excuse [clears throat] me.
16:08
You can see I'm going to work some more
16:10
stitches. Just really easy to go into
16:13
these bigger spaces. The thing with this
16:16
yarn is the It might take you a little
16:19
longer. You can't kind of whip through
16:21
your stitches like you would with a more
16:23
standard yarn because you're doing large
16:27
loose
16:28
stitches. And this yarn doesn't quite
16:31
flow. It flows okay through the finger
16:33
but it's not going to flow. It's kind of
16:35
got Oh, shall we say speed bumps on it?
16:42
And I think you could work up your if
16:45
you you know, if you had a long weekend
16:48
to yourself, you could get this done
16:50
pretty quickly. Depending how wide
16:52
you're going to make it. So, it's still
16:55
I wouldn't say quite wide enough. I'm on
16:57
my second skein
16:59
um to be an infinity scarf.
17:05
Probably by the time I get to the end of
17:06
the second ball, I'll be there. Let me
17:09
see my measurement at this point where
17:11
I'm at.
17:13
There's a thunderstorm outside. I'm
17:15
sorry if you hear some rumbling, that's
17:16
what that is.
17:18
So, I'm at 3 and 1/2 in
17:20
and about a quarter of the way into my
17:24
second skein of the yarn and I'm
17:28
I have a particular look I'm going for.
17:32
And then of course, you have your my my
17:35
little bow migrated around. You have
17:38
your tail here that we're going to use
17:41
when instead of weaving it in, we're
17:43
going to actually use it to close up
17:46
these two open rows from the beginning
17:50
and no one will ever be the wiser. And
17:52
then I'm going to work a little bit of a
17:54
finishing border on this. So, I'll just
17:57
keep working to my width and then I will
18:00
come back and we'll talk about a
18:02
finishing border stitch that will add an
18:06
extra
18:07
you know, a little I don't know if you
18:09
want to say a wow factor. This is
18:10
already such a wow factor yarn, but I
18:13
think it needs us just a little oomph to
18:16
make sure it looks really, you know,
18:18
top-notch.
18:21
My friend um that's going to get this as
18:23
a gift who is Veronica.
18:26
She is a very stylish lady. She likes
18:29
nice things and she will have a handmade
18:32
unique piece
18:34
to use as an accessory
18:36
for fabulous clothes.
18:51
Right, I'm not quite done with the whip
18:53
yet, but what I don't want to do because
18:56
this is just from the, you know, going
18:58
around and around, it's starting to
18:59
become undone and it's making this just
19:05
flop around, which I should have done
19:06
this sooner. So, I'm going to close up
19:09
the end here.
19:11
So, I've got a length about 12 in and
19:14
and my
19:16
I've a large eye needle. And if you
19:19
don't have one of these
19:22
that'll hold your
19:24
yarn use a very small 2 mm crochet hook
19:28
and kind of work the yarn through that
19:30
way. I have a video on
19:32
um the many ways I like to use that 2 mm
19:35
hook that's probably in your bag and you
19:36
don't use it. So, for closing up
19:40
I would not recommend just doing that
19:42
the normal kind of looping around and
19:44
around because that will show up. Even
19:46
though a lot is disguised, this is a
19:49
very forgiving yarn with the texture. We
19:51
still don't want to have that obvious
19:55
um
19:56
look. So, I'll get Make sure you get
19:59
both ends and I'm going to kind of sneak
20:01
it around
20:03
through. So, I'm going to leave
20:05
Oh, I want enough to knot it and I'll
20:08
I'll tell you why
20:10
in a bit. So, let me kind of sneak
20:12
through here.
20:19
Come down under.
20:26
Go back up here.
20:29
So, that it starts to blend in and look
20:31
like part of the stitch without adding
20:34
bulk.
20:36
Come over here through the stitch.
20:47
Come down.
20:49
Make sure these are lined up. We are
20:50
going to do a border. So, if you have a
20:52
little bit of a disjoint looking, which
20:56
um that'll get covered.
20:59
Come through here and go
21:02
a little more over to the side again.
21:06
Just disguise in the yarn. Make sure
21:09
it's not
21:11
pulling, catching.
21:16
Here are my ends.
21:19
Make sure they're both in there.
21:25
And then now here it's still it's kind
21:27
of loosey-goosey from when you started,
21:29
so
21:30
should be okay to give it that little
21:32
bit of a
21:34
wrap around kind of a
21:39
stitch, if you want to call it that,
21:41
just to kind of secure it.
21:48
And then I'm going to look, make sure it
21:50
looks
21:52
together with no
21:54
noticeable seam.
21:57
I have these ends everywhere.
21:59
So for the ends, like these two down
22:02
here, I will knot them
22:05
together with that first
22:08
um
22:09
um the starting chain
22:12
strand. I'm going to knot that.
22:16
And remember, it'll get covered by our
22:19
uh the border stitch, but just to really
22:21
secure it.
22:25
Do that.
22:26
And then this strand up here that was
22:29
that tail from when I started the
22:32
few inches left of that 12-in tail. I'm
22:34
going to kind of weave that through here
22:37
just a little bit. I'm not going to make
22:39
a knot with it.
22:42
I just let it look like it's part of the
22:44
fabric that we're creating with this
22:46
stitch.
22:48
And then trim it out.
22:50
When you're done, I'll probably weave
22:52
the whole thing in, but give it a really
22:54
good weave so it doesn't come out.
22:56
Even though this is a textured yarn,
22:59
um the yarn can still slide through
23:03
on itself.
23:06
These stitches.
23:11
Okay, and I'm going to work a few more
23:13
rounds and then I'll show you how to do
23:17
the finishing border for beautiful
23:19
finish.
23:30
I'm on the last stitch of my last round.
23:32
So, I'm going to slip into it.
23:37
And then immediately start working the
23:39
border for this the we'll call it the
23:42
active edge. So, chain one and I'm going
23:44
to work a
23:46
sorry, I can't talk. A crab stitch to
23:48
get that kind of ropy look.
23:51
And that's just a reverse single
23:53
crochet. So, you will go back into the
23:57
stitch you just worked. Pull up your
23:59
loop.
24:02
And pull through.
24:06
Again, find that next space for your
24:08
next stitch.
24:11
And pull through. Just regular single
24:13
crochet, not those extended style
24:16
stitches we were doing before.
24:18
Now, find my next one.
24:21
Uh
24:33
And as you see as I'm working, it gives
24:35
that kind of that ropy finished edge.
24:38
Now, if you've never worked a crab
24:40
stitch, this is the last stitch you can
24:42
work. You cannot work into the crab
24:43
stitch.
24:45
Cuz it doesn't have that kind of top V
24:49
that you're used to seeing with other
24:50
stitches where you can work in. So, it's
24:52
definitely a finishing border stitch.
24:56
Let me work just a few more and you can
25:00
get a good idea of how it looks. Make
25:02
sure you're staying nice and loose. You
25:04
don't want this
25:05
kind of grabbing.
25:08
Right. So, you can see it's
25:11
kind of a wrap wrap around ropy look.
25:15
And that will complement this
25:18
yarn with this stitch really nicely.
25:22
And then you'll do the same on the
25:23
opposite side when you're done with this
25:26
side and then your infinity scarf is
25:29
complete.
25:32
So, it was really easy stitches with
25:34
this
25:36
yeah, kind of ornate yarn that creates
25:40
really pretty kind of a jewelry look to
25:43
your fall and winter styles.
25:47
May be surprised how much you reach for
25:49
it.
25:58
Okay, so I finished all my crab stitches
26:00
and then you see at the end you've got
26:01
your little gap here where you just want
26:04
to close it up. So,
26:05
I'm going to use a small hook.
26:09
I like to use these for
26:14
um doing my ends. And then for this
26:16
because it's such a kind of a chunky
26:18
yarn
26:20
and it can be hard to thread, I'm going
26:21
to pull through
26:23
and I might even split the yarn a little
26:25
bit because it's the three different
26:27
strands.
26:30
And they're not going to come unwoven
26:32
likely because these kind of grab on
26:34
each other.
26:35
Let me first get this worked through
26:37
here a little bit.
26:39
And then I can look at splitting.
26:45
Yeah, see it already wants to kind of
26:47
come apart
26:48
for me. So, that's what I'm going to do.
26:50
So, I'll start pulling out the shiny.
26:54
Certainly don't need it this long.
27:01
And go in different directions.
27:08
At this point, you can use your needle
27:09
if you prefer. I'm just going to keep
27:11
using the hook. So, I came out here.
27:14
Come
27:24
too far.
27:39
Like so.
28:03
And then, make sure that I get this one
28:06
secured as well.
28:12
And you can knot them together, you
28:13
know, when you start bringing them
28:15
closer to each other, you can do a knot
28:17
and then keep weaving.
28:19
Just make sure it's in there well
28:20
because this type of thing will get some
28:23
wear and tear
28:26
just by
28:27
virtue of what it is, right? So, you're
28:29
going to be wrapping it
28:32
around the neck, maybe even the head.
28:38
And then, this type of yarn, it
28:39
certainly is washable, but I find with
28:42
some of the yarns that have more
28:44
texture,
28:46
they lose some of their beauty when they
28:48
go through the regular
28:51
washing machine style wash. So, I would
28:54
hand wash, you know, use your Woolite or
28:56
whatever gentle detergent you have and
28:59
then just flat dry. I wouldn't do any
29:01
heat because there's acrylic in here.
29:04
I'm working on the opposite side now.
29:05
So, this was the round with that kind of
29:08
long extended
29:10
starting stitch
29:12
>> [clears throat]
29:12
>> so that our piece does not buckle while
29:14
we're working it. So, they're going to
29:16
be, you know, loosey-goosey. You want to
29:18
make sure when you're working
29:21
the stitch that you've got both loops on
29:24
the hook. Otherwise, you're going to
29:25
have this kind of big hole and because
29:28
this type of accessory gets gets some
29:32
wear and tear and you're wrapping it
29:33
around your head a couple times or it's
29:35
just, you know, day-to-day it might grab
29:37
on things.
29:39
This kind of open stitch if you don't
29:41
have both
29:43
loops secured, it might catch on
29:45
something.
29:46
So, let's make sure that we're doing
29:48
both loops.
29:52
This is part of this. Let's put my
29:54
finger in there and then I know where to
29:56
put my hook.
29:57
Come through and you'll see as you go as
29:59
you're working, as you start working one
30:01
or two, you'll see I have them pretty
30:02
secured here.
Hobbies & Leisure
Fiber & Textile Arts