Up next in 10

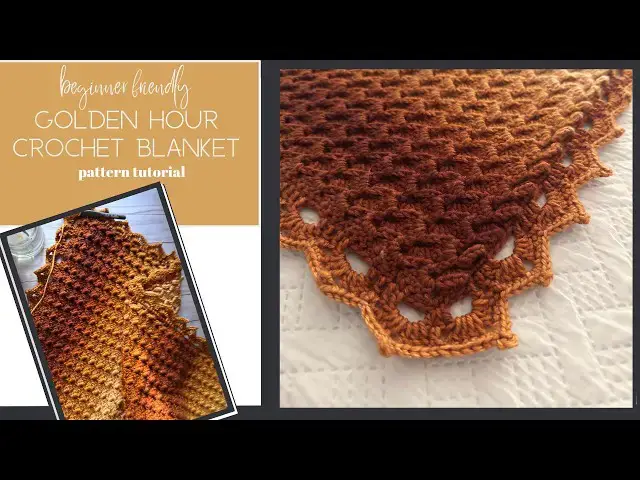
Golden Hour Blanket Crochet Tutorial — Easy Free Crochet Blanket Pattern with Gothic Shell Border
Jul 16, 2026

Learn how to make the Golden Hour Blanket, an easy crochet pattern featuring a textured cluster stitch body and a gothic shell stitch border. This tutorial walks through the small size step by step — perfect for a baby blanket or lap throw, and a great next project if you've made a blanket or two before and want to try something more textured.
The full written pattern for this size is free on the blog, linked below. The complete pattern with all three sizes (Small, Throw, and Full/Queen) is available as a paid download for anyone who wants to make this blanket in every size.
Get the free pattern: https://livechilllife.com/featured/the-golden-hour-blanket-a-free-easy-crochet-blanket-pattern/
Get the full pattern (all 3 sizes):
My shop: https://livechilllife.com/downloads/golden-hour-crochet-blanket/
Ravelry: https://www.ravelry.com/patterns/library/golden-hour-blanket
Etsy: https://livechilllife.etsy.com/listing/4538756323/golden-hour-blanket-crochet-pattern
In this video:
Foundation chain and Row 1 setup
Working the cluster/shell stitch body
Gothic shell stitch border, rounds 1–4
Troubleshooting tip for picot curling
Materials used:
Premier Yarns Everyday Worsted Anti-Pilling Gradient yarn (200g / 360 yards per skein), 5mm hook, stitch markers, tapestry needle, scissors
Skill level: Easy — comfortable with basic stitches and ready to learn a new textured repeat.
For pattern support, please reach out directly at [email protected] rather than in the comments, as questions there can get missed.
Let's be friends:
Blog: livechilllife.com
Facebook: https://www.facebook.com/people/Live-Chill-Life/61559059162110/
Instagram: @livechilllife
#crochetblanket #freepattern #crochettutorial #gothicshellstitch #easycrochetpattern
Show More Show Less View Video Transcript
0:00
In this video, I'm going to show you how
0:02
to make the small size of the Golden
0:05
Hour blanket.
0:07
This is a free pattern. It's on the
0:09
blog, which I will have linked in the
0:11
description, and the larger size options
0:13
are available in the paid PDF pattern,
0:16
which will also be linked below. So,
0:19
this is a lap blanket size, kind of a
0:23
oh, maybe a crib blanket. I love a lap
0:25
blanket. I have three. I keep one in the
0:27
car when my legs get cold in the winter.
0:29
I have one on my sofa for the same
0:31
purpose, and then here in the design
0:33
studio, which is a little drafty. I have
0:35
a lot of windows, and it's nice when my
0:38
legs feel cold.
0:40
The size before the border is 27 and 1/2
0:44
by 36.
0:47
So, let's talk about the yarn. Beautiful
0:49
gradient, probably caught your eye.
0:52
I used
0:54
Premier anti-pilling everyday worsted
0:57
gradient. This is a category four yarn.
1:00
However, it is a thin category four. So,
1:03
you can use a category three yarn or
1:05
this. Now, I have worked up a swatch in
1:09
a more standard or a little bit heavier
1:12
category four to show you the
1:14
difference, and also this is multi-color
1:16
instead of gradient. Just if you're
1:18
curious how it's going to look with a
1:20
non-gradient yarn. See, it doesn't quite
1:23
show this the definition as well, but
1:25
it's still really beautiful. And this is
1:28
the I love this yarn
1:30
in peacock tails if you happen to like
1:32
this color.
1:35
And you can see
1:37
because it's a thicker yarn,
1:40
it is going to expand the size of your
1:42
blanket.
1:44
I would say by 15 to 20%, and you will
1:46
also have to use a larger hook just to
1:49
get some drape. So, for the pattern used
1:53
with the
1:54
uh made with the yarn that I'm showing
1:56
you, I used 5 mm hook. Now, if you're
2:00
going to go up to the more standard or
2:02
thicker category 4, I would go up to a
2:04
5.5 or even a 6, just so that you get
2:07
some drape and not have a stiff blanket.
2:13
All right, so get your hook and yarn,
2:14
follow along, and we will make this
2:17
beautiful blanket.
2:30
All right, so you will start by chaining
2:32
106
2:35
stitches.
2:36
And I'm going to work a smaller size to
2:38
show you how to work the stitch repeat.
2:41
So, once you've chained your six
2:43
stitches,
2:44
we will go in,
2:46
skip the first chain, and single crochet
2:49
across.
2:53
So, your final row count for row one
2:55
will be 105 stitches, and then for the
2:58
other sizes, you will see what that is
3:00
inside of the pattern.
3:21
All right, so when you get to the end of
3:22
the row, you're going to chain one and
3:25
turn.
3:27
Single crochet in the first stitch.
3:36
Then, chain two.
3:38
One,
3:39
two,
3:40
and go back into the first stitch
3:42
creating four double crochet.
3:46
So, I'm going to yarn over, go into that
3:48
same first stitch,
3:52
and double crochet.
3:54
And three more times. Yarn over, go in
3:57
the same stitch. Okay, so we're creating
3:59
a cluster here.
4:01
There's two.
4:03
Here's my third one.
4:05
And one more makes four.
4:11
Right, and it should look like this.
4:19
Now, your first row is going to look a
4:20
little like that, but we will correct
4:23
that when we get to the next row. So,
4:25
let's just work this first row, which is
4:28
row two. Now, we're going to skip three.
4:32
1 2 3 and do the same cluster again in
4:37
that fourth stitch. Go in and make a
4:40
single crochet.
4:43
Chain two.
4:45
And again, four double crochet in the
4:48
same stitch.
4:52
One.
4:56
Two.
4:58
Three.
5:01
And four.
5:02
And we'll just repeat this across the
5:05
row. Skip three, 1 2 3, and work that
5:09
cluster.
5:11
Single crochet.
5:13
Chain two and four double crochet into
5:17
the same stitch.
5:30
And I will meet you at the end of the
5:32
row.
5:38
Right, and I'm at the end. You should
5:39
have 1 2 3 stitches left and then that
5:43
final for the fourth stitch that you
5:45
work in.
5:46
So, from here you will only crochet a
5:49
single crochet into that final stitch.
5:54
Like so.
5:59
Chain one, turn.
6:02
And then we work our repeat. So, this is
6:04
a one row repeat pattern.
6:13
Single crochet in the first. We're going
6:14
to work the same shells. Chain two.
6:20
And then the four double crochet.
6:24
One.
6:28
Two.
6:30
Three.
6:32
And four.
6:38
This is where we do a little bit of a
6:39
change.
6:41
Get some more yarn here.
6:46
You'll still be working these clusters,
6:47
but they'll be worked a little bit
6:49
differently to give the beautiful
6:51
texture.
6:52
Right? So, we go 1 2 3. Skip over those
6:56
first three double crochet.
6:58
Then work a single crochet front post
7:02
stitch in the fourth one. So, go behind
7:05
the post
7:07
and work that single crochet.
7:11
Then chain two as we have been. And
7:14
you'll work four double crochet and
7:15
you'll work them into the chain two
7:17
space from the previous row. Do not work
7:21
down here. Remember we skipped three to
7:25
create our clusters in the last row. Do
7:27
not work down there. You are working in
7:30
the chain two space
7:33
of the cluster before. On the uh on the
7:36
previous row. So, I'm going to go back
7:38
in there and make my four double
7:41
crochet. One,
7:45
two,
7:48
three,
7:51
and four.
7:57
All right, let's do the next one. Skip
7:59
the one, two, three first double
8:01
crochets. Go into the fourth one, that
8:04
post, pull it push it forward, put your
8:06
hook behind there. Then work your single
8:09
crochet.
8:10
Chain two,
8:13
and work your four double crochet
8:16
in the chain two space back here, not
8:19
down here.
8:24
One,
8:26
two,
8:29
three,
8:33
and four.
8:36
And you'll start to see that texture
8:39
develop.
8:41
And it looks the same on both sides as
8:43
you're working through.
8:45
So, the blanket looks beautiful no
8:48
matter which way you turn it.
8:50
All right, keep doing that and I'll meet
8:52
you at the end of the row.
8:55
All right, now I'm at the end of the
8:56
row. How do we finish these rows?
8:59
Go again, work that front post single
9:02
crochet.
9:15
And then single crochet into the top of
9:18
the turning chain before.
9:21
So, let's find that.
9:27
Here's the turning chain. We did the
9:29
chain one.
9:35
And if you're really struggling, you can
9:38
just go into that chain space that's Oh,
9:41
let me pull this out and show you.
9:43
It won't It won't really impact
9:45
anything. You know how we have this
9:46
chain space? We did the single crochet
9:48
chain two and started the cluster in the
9:50
previous row. If you just want to work
9:52
it in there, that would be fine.
9:57
If you're fiddling too much here trying
9:58
to get your hook in that chain, um it
10:01
might split your yarn and take away your
10:03
joy of working your beautiful blanket.
10:06
So, that's how it looks. Now, with the
10:08
small size that you're making that this
10:11
tutorial is for, you will have 26
10:15
shells.
10:17
>> [music]
10:26
[music]
10:30
>> If you like the look of how my
10:34
um gradient looks, I This is the method
10:37
I used for all my gradient. I got my cat
10:39
got on here.
10:40
I make it look more dramatic by lining
10:43
up the the deep and the light. Let me
10:46
explain what I mean. So, I started
10:48
center pull
10:50
here,
10:51
the light color, and then of course it
10:54
works up to where the dark is. Then when
10:57
it's time, this is where I added in my
10:59
next row. It got a little kind of a marl
11:02
look at the end.
11:04
So, I worked from the outside of the
11:06
skein,
11:08
so I would continue that dark tone
11:10
gradually going back to the light tone.
11:13
Now, on my third skein, so this is two
11:16
skeins, light,
11:18
then to the dark, then this is the
11:20
outside of the second skein, working all
11:23
the way to the inside to the lightest
11:25
color. And now for skein three, which I
11:28
am attaching here, I've got a magic knot
11:31
here where I've just joined it and then
11:33
I'll just continue working the light
11:35
color and depending how
11:39
um
11:41
long this goes, it's how much of the
11:43
deep tone will show up before I start
11:45
working the border. So, that's how I
11:47
join my
11:49
ombre yarns. I did that with uh I have a
11:51
shawl, I'll put it up in the up here in
11:53
the card somewhere and you can see I use
11:55
that same effect with it.
12:00
All right, now that you've got all of
12:01
your rows worked, I'm going to have you
12:04
get out your stitch markers and we've
12:06
got to do the final close-up row,
12:09
which is here. So, we've got our last
12:11
row of shells. It looks kind of raw,
12:14
right? Because it's not a finished
12:16
closing straight edge, which is what
12:18
we're going to do now. So, the border
12:21
needs to be a very specific stitch count
12:24
that does not line up with the stitch
12:26
count of our blanket. So, we're going to
12:28
fix that now.
12:32
And for your size small, the free
12:34
pattern, I'm going to have you mark
12:36
stitches. You have uh 26 shells. You're
12:38
going to mark stitch uh or shell number
12:42
nine,
12:44
18 with a stitch marker, and 25.
12:47
And the reason we're going to be doing
12:49
that is all of our shells will get four
12:52
single crochet in the top of each of the
12:54
double crochet except for the three
12:57
marked
12:59
shells. Those will only get three and
13:01
then we'll have our correct total,
13:04
which will be 101.
13:07
Now, if you're making the larger sizes
13:09
in the um PDF pattern, your shells to be
13:13
marked is written in there, but you'll
13:16
follow the same technique. So, I'm going
13:18
to chain one just to turn
13:20
and these stitches we'll work in for
13:23
four are the four double crochets that
13:26
make up that shell cluster. Don't worry
13:29
about the single crochet and the chain
13:32
space, only the four double crochet
13:35
unless it is a marked shell, which gets
13:39
three.
13:42
All right, so we're going to do single
13:43
crochet into the first of the four
13:46
double crochet of the shell.
13:49
One.
13:51
Two.
13:54
Three.
13:57
And four. You might want to mark that
13:59
first stitch because as we come up these
14:01
sides, it all starts to blur together.
14:04
So, I'm going to put a different color
14:06
marker in that one.
14:10
>> [clears throat]
14:13
>> One, two, three, four. So, this is the
14:15
first one. And then when I come up to
14:18
this
14:19
this the space before that will be my
14:22
corner and final stitch of the row as
14:24
I'm coming back this way, but we have a
14:26
ways to go before we get there.
14:30
All right, then the next shell is not
14:32
marked. So, going to work four again in
14:35
the top of those double crochets.
14:37
There's one,
14:38
two,
14:40
three,
14:43
and four.
14:45
Skip over to the next shell. Again, four
14:48
single crochet in top of the four double
14:51
crochet.
15:00
Next shell, same thing. There's four.
15:03
And so on.
15:06
I'll work the next few until I come up
15:08
to my stitch marker and I'll show you
15:10
how I work the three
15:13
uh single crochet on that shell. Okay,
15:16
so here is my marked shell. So, I'm
15:18
going to skip the first
15:21
double crochet here that kind of leans
15:23
to the right. Just skip over that and
15:26
work the top three that are highest up.
15:30
One,
15:33
two,
15:35
and three.
15:38
And then continue to work
15:40
four
15:43
until I get to my next marked
15:46
cluster stitch.
15:51
Four.
16:05
You have a nice
16:07
straight edge. No puckering, no pulling,
16:10
just nice and smooth.
16:13
My
16:14
uh file that I had for this tip got
16:17
corrupted. I'm here editing.
16:19
When you come to your corner and work
16:22
your three stitches, do mark the second
16:25
of the three, so the center of that
16:27
corner stitch, because as you're
16:29
working, especially when you're using
16:31
these multi-color yarns, it can get a
16:33
little difficult to see. So, like with
16:35
my sample that I started with, that kind
16:38
of peacock, I think it's actually called
16:39
peacock. Especially with something like
16:41
this, if you like the look of this and
16:43
you want to use this, it's going to be
16:45
extremely difficult to see those corners
16:48
when you've got, you know, sometimes
16:50
two, three, four colors in a strand as
16:53
you get there. So, mark those corner
16:55
center stitches. This is not a difficult
16:58
border, just watch your um the
17:01
the stitches in the corner. One, two,
17:03
three, one, mark it, two, three. Okay?
17:08
Back to the tutorial. All right, so the
17:11
101 stitches with the three corner
17:15
stitch marked the second stitch. I will
17:18
keep reminding you to do that. So now to
17:21
work down the side here.
17:24
This is again, we have to kind of
17:26
fool with our stitch count to get the
17:28
right amount. So for this size blanket,
17:30
we need to do 126
17:33
stitches down the side of
17:36
And that comes out to be about three per
17:39
shell, give or take. So you need to
17:42
count as you go and then of course we'll
17:44
finish with the three corner stitches.
17:48
So I'm going to just keep working.
17:51
Let's see. Do
17:56
one
17:57
and two. So what I do is I put two in
18:00
that kind of chain two space and then
18:03
one where it's more um
18:07
tight and together. But kind of count,
18:10
watch your spacing.
18:13
The thing with this border setup is it's
18:17
better to err on the side of too few
18:19
than too many, otherwise that uh that
18:22
shell border will flare out. And that
18:26
looks uh a little bit unsightly, in my
18:29
opinion.
18:30
You do what you like, but that's just
18:31
how I've structured the stitches for the
18:33
blanket sizes. All right, so one, two,
18:36
three, keep going, four.
18:43
Five.
18:47
It's a chain two space. I'm going to put
18:48
two in there.
18:52
Six.
18:58
Seven and so on. And then as you kind of
19:01
get towards the end, when you have about
19:03
this much left, that's where you can
19:05
kind of play around and and um
19:08
get your stitch count right where it
19:09
needs to be. If you need to
19:11
add in a couple more
19:14
re-space a little bit to remove a couple
19:17
more.
19:18
But, this should this adding two in
19:21
these chain spaces and one in the
19:24
more dense area should get you pretty
19:27
close to that count.
19:38
It's not a perfect science
19:41
on the side like it is with some of our
19:43
other stitch counts.
20:02
All right, so I finished my first long
20:04
side. So, I've got my 126 stitches, then
20:07
the three corner turn, and I've marked
20:10
the center of that corner, which is the
20:12
second stitch of the three, with a
20:14
stitch marker. Now, we're at the side
20:18
where our starting chain was, and our
20:20
starting chain was not 101 stitches.
20:23
It was a few more than that, uh six
20:25
more. So, we're just going to carefully
20:27
place our stitches so that we have 101
20:30
before we get to the corner where we
20:32
will make our
20:34
three corner stitches totaling 104
20:37
stitches.
20:40
Now, if for some reason you're off by
20:41
one, it's not a big deal.
20:45
But, try to stay as close as you can to
20:47
the stitch count so that your border
20:49
looks
20:50
uh correct. All right, so I'm going to
20:53
start working. Place for my stitch. And
20:56
I'm going to count as I go
20:58
to make sure I get that 101
21:01
stitch count. So, it won't be stitch for
21:04
stitch, which it's kind of a tricky with
21:06
a chain anyway because it doesn't look
21:09
like the finished edge of a
21:12
final
21:14
row when you're working a project.
21:19
Unless of course you do foundation
21:20
stitches, but
21:22
we did not do that with this.
21:26
It's going to kind of work. Make sure
21:27
you get two loops on your hook so it's
21:29
sturdy.
21:33
And then I'll meet you back at that end
21:36
of this side of the blanket.
21:43
All right, so I'm at stitch 100.
21:46
And
21:47
I'm going to put my corner
21:50
here.
21:51
So I'll do my stitch 101 here and then
21:55
work my three
21:57
single crochet into that corner there.
22:00
So
22:01
you see how this intersection has all
22:03
kind of this going on. I want a pretty
22:06
sturdy corner. That's why I'm going to
22:08
go inside this shell, that chain two
22:11
space of that first shell
22:14
and work my corner.
22:17
So I'll do my one,
22:20
two,
22:24
and three.
22:26
And then I'll mark that
22:28
second of the three stitches so that I
22:31
know where my corner is. Can be just a
22:33
little tricky
22:35
cuz you're coming around and to save
22:37
your eyes as we work the next row, just
22:40
put that stitch marker in there.
22:44
All right, so now
22:49
I'm going to work up this side just like
22:51
we did with the other side.
22:54
And so I've got 125 stitches. Now I've
22:57
got to do my final one to make 126.
23:04
So here's the first stitch that I made
23:06
of that finishing round for that um
23:10
the final row of the shells row 40 and I
23:12
marked the first stitch. So I'm going to
23:14
work my corner right around in here. My
23:17
three
23:21
one
23:24
two
23:28
and three.
23:30
And you know what I'm going to say?
23:31
Going to mark that stitch.
23:37
The second one
23:39
there
23:41
cuz I will be working into that
23:44
as I come around again.
23:46
Okay, so now what? Keep working.
23:51
So from here
23:52
going to chain three one
23:56
two
23:57
three.
23:59
Skip three. So first stitch, that's why
24:01
I left the stitch marker in here.
24:04
Because that's the stitch. One, two,
24:07
three.
24:09
Then work four double crochet in the
24:11
next four stitches.
24:14
One
24:22
two
24:26
three
24:28
and
24:29
four.
24:33
Chain three
24:35
one, two three
24:37
skip three.
24:40
Where's that? One, two, three.
24:42
And again, work four double crochet.
24:45
I'm going to do this all the way across
24:49
the row.
25:01
>> Chain three.
25:04
Skip three. 1 2 3.
25:07
And work four double crochet.
25:10
I said keep doing that and I'll meet you
25:12
at the end to show you how we work the
25:13
corners
25:15
of this round.
25:31
So, I'm coming to the corner
25:33
and it should look something like this.
25:37
I've worked my group of four.
25:40
Chain three. 1 2 3. And there's that
25:43
stitch marker in the center. Okay? So,
25:46
we're going to work into that next.
25:49
So, I'll do my chain three.
25:51
1
25:52
2 and 3. Yarn over and work three double
25:56
crochet into that corner
25:59
stitch.
26:03
1
26:04
Take the marker out.
26:15
So, three into the same stitch.
26:19
2 and 3.
26:27
Chain three.
26:30
Then we'll exit out of the corner. Skip
26:33
three.
26:34
You skip the third stitch in that corner
26:37
stitch. 1 2 3. And then do your four
26:41
double crochet again. So, you do all
26:43
this same way around the whole outside.
26:58
>> three and four.
27:02
Chain three.
27:06
Skip three.
27:11
Work here.
27:14
That is a one, two, three key here.
27:20
And then work my four double crochet.
27:25
All right, so finish your whole round
27:27
and then we will work our shell stitch
27:29
round next.
27:43
All right, so I'm at the end of the
27:44
round. I have my chain three and I'm
27:47
going to work my final
27:49
uh three double crochet into that center
27:52
stitch of the first
27:55
um round. One,
27:58
two,
28:02
and three.
28:07
All right, so
28:13
All right, now from here, I don't need
28:15
this stitch marker anymore. Let me take
28:16
this out from the previous round.
28:19
So, we have that chain three from the
28:22
first round, which is right here, right?
28:25
Slip into that space.
28:29
Chain one.
28:31
Then we'll start working our clusters as
28:33
follows.
28:36
Three double crochet
28:40
into the chain three space.
28:45
Two, three.
28:48
And I want to point out now
28:51
depending on your tension, the yarn
28:53
you're using, you know, whatnot. If you
28:56
notice your shells after you've worked
28:58
maybe three, they look like they're
28:59
flaring a little bit, go down a hook
29:02
size. So, I'm using 5 mm for this. I
29:05
could go down to a 4.5 or even a 4, just
29:08
depending how it looks. So, I'm going to
29:09
work a few stitches.
29:12
Especially, sorry about that. And you'll
29:14
notice that when you're using a heavier
29:17
category 4 yarn.
29:20
Chain two, then go back into that same
29:24
chain three space and work three more
29:27
double crochet.
29:29
So, it's three double crochet, chain
29:32
two, and three double crochet.
29:38
Like so.
29:43
Then,
29:45
chain one.
29:49
And let's look at our four double
29:51
crochet where the top of the stitch is.
29:53
So, I'm going to move this 1 2 3 4. Skip
29:58
this one. Then, we're going to single
30:01
crochet two together.
30:03
So, go into the second stitch, pull up a
30:05
loop, go into third stitch, pull up a
30:08
loop, yarn over, pull through all three.
30:11
Chain one and skip the fourth double
30:13
crochet from the previous row and work
30:16
the shell cluster again into the chain
30:19
three space here.
30:21
Right? So, there's one. I'll do a few of
30:24
these with you.
30:26
Two.
30:29
Three.
30:32
Chain two.
30:35
Three double crochet.
30:37
One.
30:39
Two.
30:42
And three.
30:53
Then
30:55
chain one,
30:56
skip
30:58
single crochet the middle two of the
31:00
four together.
31:03
Pull up a loop. Third one, pull up a
31:05
loop, yarn over, pull through all, chain
31:08
one, then work the shell again in the
31:11
next chain three space.
31:21
Three, chain two.
31:24
And then
31:26
another cluster.
31:36
You can kind of start to see if you want
31:39
to go down
31:41
a hook size or two at this point.
31:44
I think I'm okay here.
31:48
But just, you know, see how things look
31:51
for you.
31:53
And uh
31:54
you know, just pull it out now and try
31:56
with your smaller hook before you get
31:58
too far in. And then I'll meet you at
32:00
the corner. Going to work this row.
32:05
All right, so I'm at my corner here. So
32:07
I've done my single crochet two
32:10
together, chain one, and I'm going to
32:12
work a final shell before the corner. So
32:15
the corner is the three double crochet.
32:20
All right, so let's work that last
32:21
shell.
32:24
Three double crochet, chain two.
32:30
Three double crochet.
32:39
All right. chain one
32:42
and work a double crochet into the top
32:45
of the second crochet in that
32:49
three
32:50
stitch space, three double crochet
32:52
space. Chain one and just keep it
32:54
moving. We'll we'll go right immediately
32:56
into the next chain three space and work
32:59
our next shell stitch. So, it's just
33:03
that simple working the corners for this
33:05
round.
33:09
Okay, three.
33:11
We do finish it and then we'll look at
33:14
it.
33:22
Two and then
33:24
I have one more.
33:27
Oh, I worked four. That's one too many.
33:29
That's going to make it too big.
33:33
See, when I'm talking
33:36
I'm not counting as well. All right.
33:38
Chain two and then work the three in the
33:41
double
33:43
three and three double crochet in the
33:45
chain three space.
33:49
Here we go.
33:50
All right. So, there's our We're
33:53
rounding the corner, right?
33:55
Um
33:58
cluster stitch or the shell stitch,
34:00
crescent stitch, whatever you like to
34:02
call it. Then there's our three stitches
34:05
in the corner. We just worked a chain
34:07
one double crochet into the top of that
34:10
center stitch, chain one to exit that
34:13
corner, and then continue working the
34:16
cluster stitches, crescent stitch, or
34:19
cluster stitch, however you like to
34:21
refer to it.
34:23
And that's how you work this round.
34:25
Really easy.
34:26
I thought I finished my round of shells
34:28
and put my
34:31
I did a chain one and put a final single
34:34
crochet in the top of that center
34:36
cluster from the first round.
34:38
I'm going to chain one
34:42
and we'll work the final row sort of
34:44
gilding the lily.
34:46
And then each of the three
34:51
stitches for the the top of each double
34:53
crochet that leads into that chain two
34:55
space, that will get a single crochet.
34:58
So, you're going to work three single
35:00
crochet.
35:03
One,
35:05
two,
35:07
and three.
35:10
Then in the chain two space, we'll do
35:12
this picot stitch cluster. So, you'll
35:16
first work two single crochet
35:19
inside that space.
35:21
Then picot by working one,
35:27
two,
35:28
three chains then slip stitch.
35:33
Okay, here. Let me show you.
35:37
The top first loop of that
35:40
um
35:41
first stitch, then down here
35:44
the front loop
35:46
of the chain.
35:50
And you'll see it as you're working it.
35:51
It'll be really visible to you. So,
35:53
bring your hook down into the front of
35:56
that first chain
35:58
and then that next loop
36:00
kind of catty-corner or slanted down
36:03
this way. Then bring
36:05
your yarn over through and slip the
36:08
stitch.
36:09
Just like that and that will make your
36:11
picot.
36:12
Then we need two more single crochet
36:15
inside that same space. Just like we
36:18
started with the two single crochet
36:20
picot, we're going to finish with two
36:22
single crochet. So, there'll be five
36:25
stitches inside of this
36:28
uh chain two space.
36:30
Then we need three more, one at the top
36:33
of each of the three remaining double
36:35
crochet for the shell.
36:37
And the first one's going to be kind of
36:39
hidden behind this cluster. Just stick
36:41
that get that hook in there.
36:44
1
36:45
2
36:47
and 3.
36:51
Then we have this stitch down here that
36:53
is between the
36:56
um the shells.
36:58
Slip stitch into that.
37:02
That'll give us a dramatic
37:06
up and down kind of look.
37:08
Okay? And then we'll do the same thing
37:10
again with the next cluster.
37:13
Okay, so let's do another set together.
37:15
Three single crochet in the top of the
37:17
three double crochet.
37:19
2
37:21
and 3.
37:23
Then we've got our chain two space to
37:24
work the picot cluster, as I call it.
37:28
My yarn.
37:29
There we go. Okay? Two single crochet.
37:33
1 and 2.
37:35
Okay? You see I'm working in that chain
37:36
two space.
37:38
Then picot. 1
37:41
2 and 3 chains. And then slip stitch
37:45
into this front loop and this other
37:48
front loop.
37:51
Yarn over, pull through.
37:54
And slip this stitch.
37:56
Then work the remaining two single
37:58
crochet in that chain two space.
38:04
Then three single crochet into the top
38:06
of each of these double crochet.
38:10
1
38:12
2
38:14
and 3.
38:18
Slip stitch into this stitch, that
38:20
single crochet.
38:28
And continue.
38:29
See? Not hard. You can do it.
38:33
Two and three. All right, so I'm going
38:35
to finish this row and the corner is
38:37
really simple, but I will, of course,
38:39
show you how to work the corner when I
38:41
get to it.
38:42
All right, so I'm coming up at the
38:43
corner.
38:45
And I've got one more single crochet in
38:47
the top of the double crochet.
38:53
All right, so here's our corner. We just
38:54
have the one single double crochet in
38:58
the center of the three corner stitches
39:01
from the prior row.
39:04
And you'll work it just like you did
39:05
these in between sections. Just slip
39:08
stitch into it. No chaining, none of
39:11
that.
39:12
I'll just go in, slip stitch, and then
39:15
keep working as I have been
39:17
with the single crochet in the top of my
39:20
double crochets in the clusters.
39:24
Okay, so finish your work all the way
39:25
around and then you are done. You weave
39:27
in your ends and you have your beautiful
39:30
golden hour blanket.
39:37
If you enjoyed this video, please give
39:38
it a like and consider subscribing if
39:41
you enjoy crocheting and join my
39:44
community. I'd love to see you again.
Hobbies & Leisure