Up next in 10

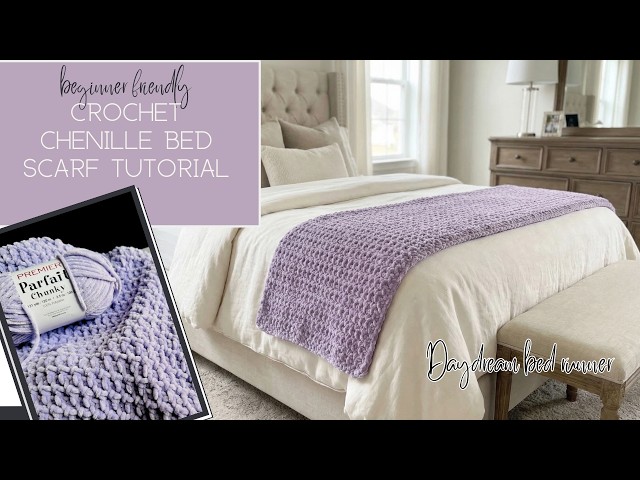
Welcome to the tutorial for the Daydream Bed Scarf, a soft and elegant crochet bed scarf pattern designed for beginners. This cozy crochet bed runner is made with plush chenille yarn and easy-to-see stitches, making it a relaxing and beautiful project for your home.
The Daydream Bed Scarf adds a boutique-inspired touch to the foot of the bed and is a lovely way to bring handmade warmth and texture into your bedroom or guest room. In this video, I’ll walk you through the pattern so you can crochet your own with confidence.
Printable PDF pattern:
My site: https://livechilllife.com/downloads/daydream-crochet-bed-scarf/
Ravelry: https://www.ravelry.com/patterns/library/daydream-bedscarf
Etsy: https://livechilllife.etsy.com/listing/4469693329/daydream-bed-scarf-crochet-pattern
Recommended yarn:
https://premieryarns.rfrl.co/5w3y2
🌿 Support the Channel
If this tutorial helped you, please like, subscribe, and share — it makes a big difference for my crochet channel and helps me keep creating free +patterns premium patterns.
Buy me a coffee: Ko-fi.com/livechilllife
Subscribe to the newsletter for monthly discounts, tips and free patterns: https://livechilllife.com/
Try my project tracker for free: https://livechilllife.com/crochet-and-knit/project-tracker-page-for-crochet-and-knit-patterns/
My books:https://livechilllife.com/shop-my-books/
My vintage recipe cooking channel: https://www.youtube.com/@100yearoldrecipes
My Etsy shop: https://livechilllife.etsy.com
If you make this hat, tag me on Instagram so I can see your version!
Happy stitching, Makers. 💛
Show More Show Less View Video Transcript
0:00
In this video, I'm going to show you how
0:02
to make this easy and beautiful chenille
0:05
crochet bedcarf.
0:20
Hello everyone, welcome to the daydream
0:22
bedcarf video tutorial. So for the first
0:26
part of this video, I want to talk about
0:28
chenille yarn. specifically. While this
0:31
is a beginner friendly pattern, chenille
0:33
is not what I consider a beginner yarn
0:36
for a few reasons, and I would like to
0:40
go over that. If you don't want to hear
0:42
all of this, I will put a timestamp on
0:45
the screen where you can go directly to
0:47
the pattern. But, uh, there's some
0:49
things we need to talk about with
0:51
chenille. Not all chenille yarns are
0:54
created the same. the one I use for this
0:56
pattern. This is one of the better ones.
0:58
And I'm going to talk about what makes a
1:00
good one and what makes a bad one. Now,
1:03
we love chenille yarn because it looks
1:05
so velvety. It's very soft, plush
1:08
looking. It feels wonderful against the
1:11
skin and it's something you just want to
1:13
cozy up with, right? But the issues are
1:17
first of all the structure of the yarn.
1:19
These yarns are not like our typical ply
1:23
yarns that have several threads kind of
1:25
spun together. The everyday acrylics you
1:27
might use, some of the beautiful wools
1:29
and cotton, those are a completely
1:32
different animal than um chenille. So
1:36
chenille is a excuse me a think of a
1:40
thread like a needle and thread kind of
1:42
thread that really thin
1:46
string just thin uh thin that you put on
1:48
a needle you might use in a sewing
1:50
machine that type of thread and the
1:52
fiber is connected to that thus making
1:55
it less
1:57
stable when it's frog so the stitches
2:01
pull apart and here I've got one that's
2:04
see the thread underneath hair very thin
2:06
and the fibers connected to it. This
2:09
causes issues when you have to frog it.
2:12
And whether you're a beginner, expert,
2:15
frogging happens. You get distracted.
2:17
You miss a stitch. Stitches are also a
2:19
little more challenging to see with this
2:21
type of yarn.
2:24
And what happens is the thread here
2:28
tangles. And can you imagine trying to
2:31
unnot
2:33
thin string like this? It's It's
2:36
incredibly frustrating and many times
2:40
you'll find you just have to cut it and
2:42
then start working from an untangled
2:45
area of the yarn. So, you're wasting
2:47
your yarn in the process. Now, this one
2:51
from Premiere,
2:53
I find that if I need to frog it, I can
2:56
frog it two, maybe three times very
2:59
gently, and it doesn't lose its
3:01
integrity like some of the other brands
3:04
of yarn.
3:06
Right? These bald spots look awful in
3:09
your finished item. There's not really a
3:11
way to hide it. They're going to show
3:12
up.
3:16
Now, this pattern solves the problem of
3:19
hard to see stitches. So, I created it
3:22
to make it a beginner friendly pattern.
3:25
I had to play around a lot with hook
3:27
size with the actual stitches so that it
3:29
would come out to be an really pretty uh
3:33
home decor style item.
3:36
Now, if you have other challenges with
3:38
Chanel, I'd love to hear about it in the
3:40
comments. I think I've addressed the
3:42
main ones that bother uh us as makers,
3:46
but we're we are going to end up with a
3:49
really pretty bed,
3:52
either a bed runner or a bed scarf,
3:55
whatever you like to call it. And I have
3:57
in the pattern, you can adjust the width
4:00
that goes across the bed.
4:03
I don't know if we're going to call that
4:04
length or width. I'm calling it the
4:06
length that goes across the bed. And
4:07
then our starting chain is the same for
4:09
all sizes. And then you just adjust if
4:11
you want it to come to the edge of your
4:13
bed or if you like a little bit of a
4:14
drape over the side. All right, so get
4:18
your hook. We're going to be using a 7
4:20
mm hook for this pattern and a category
4:23
six chenille yarn. Most of them are this
4:26
size unless you get a really chunky one.
4:31
So if as a safety measure you want to
4:34
get comfortable with the stitch first,
4:36
work a swatch along with me. I'm going
4:39
to show you the pattern repeat, but work
4:40
a swatch with a oh, some kind of sturdy
4:45
just maybe acrylic that you have laying
4:46
around in your stash so that you're not
4:50
pulling out and disrupting the integrity
4:52
of the yarn of your finished blanket,
4:54
right? We don't want any uh bald spots
4:57
and like times are hard. We don't want
5:00
to be wasting yarn, right? And you need
5:03
a lot of yarn to make a blanket scarf,
5:06
right? So to make a little swatch, I've
5:08
chained 15 stitches. This is this the
5:12
same pattern that is in the written
5:15
pattern for the size. Now, if you're
5:17
just ready to dive in and start making
5:19
it, chain 63. That will be your width
5:22
for any size bed.
5:25
Now, skip the first chain, go into the
5:29
second stitch, and work a single
5:31
crochet.
5:33
This is a modified moss stitch. Really
5:36
simple. Chain one,
5:41
skip one. So, let's look at our little
5:44
like caterpillar. Skip this one. Go into
5:47
the next and make a single crochet.
5:51
Pull up that back loop up there. Now,
5:53
don't or the I should say the top part
5:56
of the loop. Don't work into the bump. I
5:58
know a lot of people like to work in the
6:00
back bump for that. Don't do that with
6:02
this
6:04
chain. One, skip one,
6:08
skip this, go into the next.
6:11
Keep stitches nice and loose. We want a
6:14
beautiful drape. Chain one,
6:18
skip one, go into the next. Okay, so I'm
6:21
going to keep doing this to the end of
6:23
the row. Chain one,
6:27
skip into the end.
6:34
chain one, skip,
6:37
work in the next single crochet. Right,
6:40
so I'm coming to the end and you will
6:42
end with two single crochet. So I
6:44
finished my chain one, skip one, single
6:47
crochet, and now I have one stitch left.
6:49
So I'll put an extra single crochet in
6:52
there.
6:55
Chain one, turn, and then we start on
6:58
row two. All
7:02
right. So, now let's look and see where
7:04
we are.
7:08
We've got our first stitch here. So,
7:10
I've chained one.
7:13
I'm going to go in there and work a
7:14
single crochet. Always first and last is
7:17
just regular single crochet. So, on the
7:20
previous row, the stitch before the last
7:24
was a single crochet. So, we need to
7:27
create a space on top of that with a
7:29
chain one.
7:32
Then, we'll skip over it. So, you always
7:36
know it's a stitch by looking at it this
7:38
way instead of this way.
7:41
There's going to be a V here that goes
7:44
with this stitch up here. That is the
7:46
stitch. The space between is between the
7:49
V here and the V here.
7:54
So, I'm going to go into the space and
7:57
pull up a loop. And this is called an
8:00
extended single crochet. This is, you
8:03
can think of it as a hybrid of a single
8:05
crochet and a half double crochet. So,
8:08
you start the stitch like you would a
8:10
single crochet. All right, that's what
8:12
I've done. Then, yarn over, pull through
8:14
that first loop. Now, you've got two
8:17
loops on hook like you do with a half
8:18
double crochet. Yarn over, pull through
8:21
two.
8:23
All right. And then here we've got the
8:24
V. What's my cat doing?
8:28
Chain one.
8:30
Skip that stitch. And here's the space
8:32
between the two V's.
8:36
All right. My cat gets a little jealous
8:37
when I'm distracted by other things that
8:40
aren't him. All right. So, I've chained
8:43
one and now I'm looking for my next
8:44
chain one space. So, here's my B. Here's
8:47
my B. And then here's the space. So
8:50
again, let's work an extended single
8:52
crochet in there. Draw up a loop.
8:55
Yarn over, pull through one. Yarn over,
8:58
pull through two. Chain one, and then
9:02
skip this V here, that stitch. Go into
9:05
the next, and another extended single
9:10
crochet
9:13
V here. So, we're going to do a chain
9:15
one and skip over it. Then find that
9:18
space and work another extended single
9:22
crochet.
9:25
Chain one,
9:27
skip this, and there's my space.
9:31
Extended single crochet.
9:34
Chain one.
9:37
V. So, we've got one chain one space
9:40
left and the last stitch. So, we'll work
9:44
two stitches at the end. first extended
9:47
single crochet and then always start and
9:51
end with the single crochet.
9:58
And that is row two. All right. So next
10:00
we have row three. This will be your
10:02
pattern repeat. You will work this for
10:05
the entire
10:07
uh width or length depending how you
10:09
refer to it of your piece. All right.
10:12
Always start and end with single
10:14
crochet. Right.
10:17
So now let's look at our work. The next
10:19
stitch is the V.
10:24
So we're going to chain one, skip one
10:26
over that because there's already a
10:27
stitch there.
10:29
And we need to create that chain space
10:31
above it here. Here's our first chain
10:35
one space. So go in and work that
10:37
extended single crochet stitch. Chain
10:41
one, skip the next V, and work the
10:45
extended single crochet in next. Right?
10:48
So, we're just going to repeat this to
10:50
the end of the row.
10:52
Chain one, skip, extended single
10:56
crochet.
11:00
There's V.
11:06
Extended single crochet. Chain one. Skip
11:16
chain one,
11:19
skip,
11:22
and now there's just the last stitch of
11:24
the row left, which is the single
11:27
crochet stitch.
11:30
And if you want to just check your
11:31
stitch count.
11:35
Okay. Stitch one, stitch two, space.
11:39
That's 3
11:42
4 5 6 7 8 9 10 11 12
11:50
13 and the last stitch is 14. So the
11:53
starting chain was 15 and the swatch
11:57
size is a 14 stitch count. Okay. So then
12:01
just repeat row three for however far
12:04
you want to take it.
12:13
Right. So I've reached my length. My
12:15
length is for a queen bed and I've made
12:17
it 96 in long or across. But I'm calling
12:22
the shorter part your starting chain
12:25
your width.
12:27
Although I guess technically it is the
12:30
len I don't know that's just what I'm
12:31
calling it in the pattern. Okay.
12:34
Um so for your final row once you've
12:40
reached that keep keep going your uh
12:44
right to left and work now do your chain
12:48
one and work half double crochet all
12:51
across this row.
12:55
And then when you get to where your
12:57
chain one space is, go down into that
13:00
chain one space.
13:03
And then your regular stitch, just work
13:06
into that half double crochet all the
13:09
way across
13:17
just like so.
13:20
Nice and easy.
13:27
All right. So, I'm finishing my row of
13:29
half double crochet.
13:31
Here's my last stitch.
13:36
Then I'm going to chain one, turn, just
13:39
one quarter turn. So, now we're going to
13:41
go down the long side
13:44
and work slip stitches. So, to I'm off
13:48
camera here. I'm so sorry. Go into the
13:51
stitch. Now, kind of space these so that
13:53
you don't have any flare that you're
13:58
uh staying flush with things. Whoops.
14:01
Not too tight.
14:04
Pull through next stitch. Going to get
14:06
that hook in there. Find a place for it.
14:09
Slip stitch.
14:12
Keep my loop
14:15
not too high, but high enough that it's
14:17
not going to pucker. Don't want to
14:18
pucker on our bed scarf left. And you
14:24
can just Now, this is where you might
14:25
have to frog at some point. So, work a
14:27
few stitches. See how it's looking with
14:30
your spacing and your tension and see if
14:34
you have to adjust. All right, that
14:36
already looks like it's puckering a
14:37
little. Gently pull it out. So, I need
14:41
denser
14:43
spacing of my slip stitch.
14:47
Pull up. Pull through. Pull up.
14:56
Okay. Pull up.
15:06
Like so. I've got a long ways to go. So,
15:08
I will meet you when I get back to the
15:10
end of this.
15:12
All right. My uh I'm refilming this
15:15
section. my file corrupted for what
15:17
happens when you get to your
15:21
um the end here of your slip stitch row.
15:25
So, I'm on the wrong side.
15:30
Yeah, I had to adjust all that. This
15:32
this piece is so large trying to put in
15:34
this filming area. All right. So, here I
15:36
finished the slip stitch row and then
15:39
you're going to of course match and work
15:41
another half double crochet. This is the
15:43
shorter end. Your starting length, your
15:45
62 stitches. All right. So, I finished
15:47
my slip stitches here.
15:50
Now,
15:52
the end of the last half double crochet
15:55
row or the first row that you worked
15:57
before the slip stitch, it was a chain
15:59
one, turn, then you would have worked
16:01
about two slip stitches here. Here,
16:04
because of the height, you'll need to
16:05
chain two. That way, we want to ensure
16:08
we don't have any buckling. This will
16:09
keep it. See how it's just nice and
16:11
straight and square? So, this is the
16:13
first row coming down of the slip
16:16
stitches that you worked the first. Yes.
16:19
Chain two, turn. Then work your 62 half
16:23
double crochet across.
16:27
Then chain one, turn. I wo in my end.
16:31
And work your two slip stitches in that
16:34
half double crochet so you don't get any
16:35
buckling. Then you'll slip stitch nice
16:38
and loose, even spaces down. And I'm
16:41
coming to where I'm going to join the
16:44
final stitch to the first row of half
16:47
double crochet.
16:53
So at the very end, once you've
16:55
completed your second row of slip
16:56
stitching, you'll see you have your
16:58
little kind of gap here. So this is the
17:02
this was chain one, half double crochet,
17:04
and you look at the spacing here.
17:06
There's two stitches. So, you're going
17:09
to work two stitches into the side of
17:12
that half double crochet. And it should
17:16
line up perfectly
17:20
like that. Then you'll cut your yarn and
17:23
weave in your end. You'll probably have
17:25
quite a few tails from all the joins of
17:27
new skins. So, use your
17:31
um wideeyed tapestry needle or you can
17:34
use the method I'll link it where I like
17:37
to use my little small 2mm crochet hook
17:41
to do detail work like weaving in. If
17:44
you don't have a large tapestry needle,
17:46
I will link that and you can see how I
17:48
use it to weave in ends. And then you're
17:51
done. You have your beautiful textured
17:54
drapey chenille bed scarf.
Hobbies & Leisure
Fiber & Textile Arts
Bed & Bath