Up next in 10

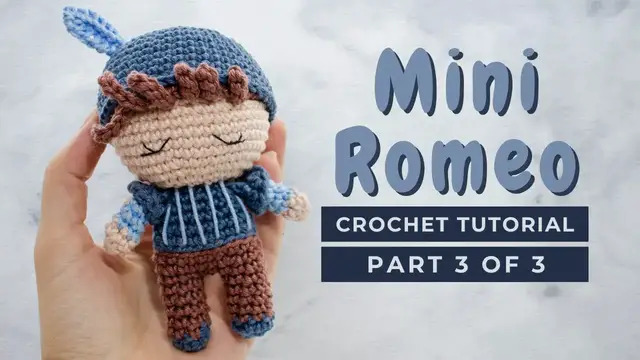
Romeo amigurumi mini doll crochet pattern! Romeo doll amigurumi pattern super easy and has beautiful details! Great stuffed doll DIY project for Valentine's day!
FOR PART 1: https://youtu.be/0Uk7QAjOdKY
FOR PART 2: https://youtu.be/ocUyqcxafu8
Chapters:
00:00 Hair
04:52 Romeo hat
08:08 Feather
12:49 Assembly
15:17 Embroidering the eyes
You can find the complete Romeo mini doll crochet pattern free on my website here:
https://littlecrochetfarm.com/mini-romeo-doll-free-amigurumi-pattern/
For a low cost (3 USD) and printable pattern, you can find it here:
Ravelry: https://www.ravelry.com/patterns/library/mini-romeo-valentine-amigurumi
Etsy: https://www.etsy.com/listing/1175461919/mini-romeo-amigurumi-doll-pattern
If this video was helpful to you, consider supporting my channel by doing one of these little actions below:
Show More Show Less View Video Transcript
0:00
And this is your result after round number five. Now going for round number
0:05
six, you work four single crochet, one increase, repeat six times, and you should
0:10
have a total of 36 stitches at the end of this round
0:16
Right! Very nice hair. Great! So let's count this single crochet. One, two, three
0:29
four, one increase. Okay? Repeat all the way until the end. And now for round number
0:35
seven you will work five single crochet, one increase, repeat six times and you
0:40
should have a total of 42 stitches. Maybe by now you know all the math of the
0:46
number six, alright? 6 times 1, 6 times 2, 6 times 3. We are here now on 6 times 5
0:56
Super good! 1, 2, 3, 4, 5 and one increase here. You see on Little Crochet Farm, you also
1:04
learned some math. Great! So now for round number 8, you will work 6 single crochet
1:11
1 increase, repeat 6 times and you should have finally 48 stitches, which is what
1:17
the amount of stitches that we are searching for. Okay, so now here my increase
1:27
1 and 2. Super good! Repeat all the way until the end. And we have here now we'll
1:37
start for the round number 9. It's a bit different than the other rounds because
1:41
you work with double crochet. Okay, so you work 14 double crochet, 26 single
1:47
crochet and 8 double crochet, right? So in case you don't know how it's done
1:52
the double crochet, it's yarn over the needle, inside the stitch, yarn over the
1:59
needle, pull it inside the stitch, yarn over the needle, inside the two first
2:04
loops, over the needle and inside the two other loops of your hook. Repeat all the
2:11
way, and not all the way, 14 times. So here you should have 14 double crochet
2:16
now you will work 26 single crochet very it's a single crochet you know so I'll
2:22
just move forward and now here I'm still on round number nine you'll work again
2:29
double crochet all the way until the end okay all right super good now for round
2:39
number 10 don't let this scare you off the instructions it's very easy okay we
2:47
will work the hair hair strings or whatever so here you will work 14 double
2:53
crochet like the previous round all right so work here once you work the
2:59
double crochet here you work six single crochet here where I just did it now you
3:03
will chain seven. So one, two, three, four, five, six, and seven. You skip the first
3:16
chain, this one you skip, and then you start working slip stitch here. So you
3:22
work six slip stitch inside the six chain you have it here. Alright, so one
3:31
and two. Okay, here you work your slip stitch, I'll move a little bit faster
3:39
Three. Alright, once you reach at the end here, you will join with a single crochet
3:47
First you will skip one stitch, you skip this and you join with a single crochet
3:53
And this you will repeat three times. Alright? Chain seven, skip the first chain
3:59
six single crochet, skip the first stitch and make one single crochet to connect
4:04
this hair string. You will do three times and three times you'll do with chaining
4:09
just five. You see? Three here with seven chains and three here chaining five
4:16
chains. Okay? Now you will continue here working single crochet on top of single
4:21
crochet and double crochet on top of double crochet. Once you're done this is
4:25
how it should be looking like okay Follow the pattern stop the video here it just the big instructions but it very easy and simple to follow Okay I will just pull this yarn to the back so it helps me here when I ready
4:42
to sew this. Okay? And then we will settle this on the side for now because then
4:49
we will start working the head, the beautiful head of this toy. Okay, for here
4:54
we will repeat round first and second of the hair. I will not work this again
4:59
because you work just 6 single crochet inside the magic ring, following by 6
5:04
increases. And you arrive here, you see? Now for the third round we'll do a little
5:11
bit different because we'll start increasing 12 stitches here. So you will
5:16
work 12 increases, okay? So you will make one increase inside each stitch here. And
5:23
And we work kind of similar for the head, so you know what you're doing. Okay
5:30
Super good! This is how it should be looking like. Now for round number 4
5:37
You will work 1 single crochet, 1 increase. Again, you will repeat 12 times or you repeat all the way until the end
5:44
You should have here 36 stitches at the end of this round. Once I will tell you about overlapping
5:49
see this stitch is very hard to see but it's here. Because the tension of the
5:54
stitches it's a lot of increases in the same amount of space so the stitch can
5:59
be pulling one to another. And your crochet will start you know to be a
6:03
little bit floppy, don't worry. So now for round number five you will work two
6:09
single crochet, one increase, repeat 12 times and you should have 48 stitches
6:15
which is what we are working for, we are looking for. And I will tell you here
6:20
once again, and I'm sorry if I'm being very repetitive, count how many stitches
6:26
you have, you see, because this is, you can easily eat up the stitch. Super good
6:32
Once you finish this round, round number five, you'll have this floppy detail
6:38
don't worry here. Now we will work 48 back loop, here we go again with the back
6:43
loop single crochet okay here just work 48 back loop single crochet okay this
6:55
you know I like very much this back loop single crochet gives such a nice
7:00
effect okay great now we have this detail and will work only here single
7:08
crochet here to make the height of this head. So for round number 7 to 13 you will
7:14
work just 48 single crochet in these rounds. Okay? So here you can stop the
7:19
video, continue working your single crochet and I will catch you up once we
7:24
finish this round and then we will start organizing this toy because we're
7:30
almost done. Super good! This is the head. Alright, let us count. This is the back
7:35
loop and this is around 7 8 9 10 11 12 13 okay super good now let's just cut this thread here
7:48
and fasten off the hat you don't need to leave a table for sewing because we don't need to sew the
7:54
hat on the hair on the head if you want it's optional to you I will not sew my hat here
8:00
because I like everything is very tight so it can be just here closed okay so
8:06
here you just fasten off and make it not there now let's work here the feather
8:12
because I like this detail on the feather so here you will chain seven so
8:18
one two three four five six and seven now I'm gonna go slow here to show you
8:26
how it's done, these beautiful feathers. Keep the first chain and now as you will
8:32
do a single crochet here, you pull the yarn, hold it here with your finger and
8:37
then you insert the needle on your second chain, you pull the yarn a
8:44
bit higher than the previous one, again you insert the needle on the next
8:49
chain and you pull the yarn a bit higher than the previous one, hold here your
8:56
insert your needle on the other chain, pull it even higher than the previous one, alright
9:04
So you go making these stairs higher higher and now the last two you just pull it with some kind of normal height
9:15
All right? Yarn over the needle and you start inside the first two loops
9:21
Okay? Yarn over the needle again inside the two loops. Yarn over the needle inside two loops
9:31
yarn over the needle inside two loops, yarn over the needle inside two loops, and now the end
9:41
Over the needle, the last two remaining loops, we have one side of the feather. So now here you
9:47
chain one, turn your work, and you will do the same thing on the other side, okay? So let's work
9:56
here in yarn and just count here counts for you not to be lost where is you need
10:02
to insert your needle so we have one chain here one two three four five and
10:09
six so it's this one so here we need to insert the needle pull the yarn normal
10:16
with a good height pull the yarn again bit higher pull the yarn again higher
10:23
than the previous one, yarn again, this is the highest, yay! Super good! And now just
10:32
a normal height here for the last two of these chains. Again, now we come back, yarn
10:40
over the needle inside two loops, yarn over the needle, two more loops, over the
10:47
needle, two loops, over the needle again, two loops, over the needle, two loops, over the
10:55
needle, two remaining loops. Super good! Turn your work and make one single crochet
11:01
here in the chain that you made once you were turning your work. One single
11:08
crochet. Tada! And it's ready! That's it! Look how cute is this! Let's just
11:16
organize this a little bit. It's super cute. I like very much this feather. Alright, now let's fasten
11:23
this off and sew this on the top of the hat. Okay, so here I will just hide this tail on the back side
11:35
of the feather here, so I insert this tail in the sewing needle
11:47
Okay, that's super good. I will just hide this here. That's great. I will cut this
11:59
thread now and we will sew this on the top of the hat, okay, on the top side
12:04
corner kind of. Okay, so here, good. So this is the back side, right, and we want on
12:13
the side more near to the front of the toy, but here you don't need to have
12:18
super exact position, although I put the exact position in the written pattern
12:22
it's in the description below. Just tight a simple knot here to secure that this
12:29
feather is in this in this part of the head. Okay? Here it's a very simple not
12:36
just secure this feather here. Super good. This is looking very nice
12:44
All right. This is enough. Super good. Now here we will sew the hair. Here is the
12:52
thing. If you really hate sewing the hair or sewing pieces together in
12:58
amigurumi you can just glue this here, all right? This is up to you. I like to sew and
13:04
I have no problem with this. I hope you can choose what you want here. I'll just
13:10
add pins to fasten where I want the exact position, so in the central part
13:17
here from the hair and from the head. All right, this is super good. And now I will
13:24
just fit very nicely this hair, okay? Because we have 48 stitches in every
13:33
piece here, so everything is nice and tight because it's with the same exact
13:38
size So fasten some pins here and we start sewing this hair Sewing this hair is very simple here You will grab one stitch from the hair You see you have the hair
13:53
line here exactly where you should sew it. So you take one stitch from the hair
13:58
and then you take one stitch here from the hair. See this is one stitch. Very
14:08
simple and that's it. This is the only thing you need to do. One stitch from the
14:12
head down here. Yes, one stitch here from the head, you see? And now you take one
14:25
stitch here from the hair. That's very nice here, one stitch from this hair. And
14:36
And that's it. And this is how you should work all the way around this hair
14:41
You grab one stitch from the head, one stitch from the hair. And this repeat 48 times, right
14:48
Because you have 48 stitches in around the hair and around the head. Okay
14:55
And here I will leave you off so you can continue sewing your hair
15:01
and I will catch you up at the end. You can see it here. You see where it's
15:06
bin sewed. Super good! This is how it should be looking like. It's very nice. I like his hair
15:14
it's kind of to the side a little bit. Now we'll embroider the eyes. Okay, so with the black thread
15:21
you make a sepal knot at the edge and here you insert your needle. The exact position of the eyes
15:30
is in the written pattern in the description below. Here I'm just doing with the video where I think
15:35
it looks nicer, okay? And for this toy I'll work at sleeping eyes like this. I'm
15:41
just gonna measure here the size. This is three stitches, right? I think it's a bit
15:48
bigger. It's a bit big. Okay so I'll make it a little smaller. Yes, two stitches
15:54
size. This is looking very nice. So I'll insert my needle here and bring this
15:59
thread to the downside here a little bit. Alright, so I bring this thread here to
16:10
this down round. Okay, this is a good size of this ice. It's pretty good. I'll pull this a little bit
16:23
so it's a bit tight. Okay, now I need to move, yes, I'll need to move to the side
16:29
here, it's not enough space, so we have some lashes here for the closed eyes of
16:37
this Romeo. Okay, just bring here. Now let's organize the size here of this
16:44
Okay, super good. I will insert my needle here, so I will secure that this is round
16:52
and closed and I will already bring my thread to the other side to embroider the
16:57
other eyes. Okay? And that's it. This is very simple sleeping eye to embroider. I
17:04
like it very much. It's no complication at all. Okay, you see? Super good. Oh, he's so
17:12
cute and in love. Okay, also the other one and I will come back here. That's great
17:17
We have our little boy done. You see he's looking very nice even without his head
17:23
So cute! I'm so happy with the result. Now we'll just add the head
17:27
Alright? Here everything is very tight because everything is with 48 stitches
17:34
So you don't need to sew it anything. You just make sure that you fit a very nice
17:39
in case you can squeeze a little bit the head so it's everything on its place
17:45
organize his hair and your toy it's ready look at how beautiful I'm in love
17:51
with him I really hope you like this pattern it was super good for me to
17:54
create it for you alright I'd see you in the next time bye
18:15
Thank you
#Arts & Entertainment
#Crafts
#Fiber & Textile Arts