Up next in 10

This tutorial was contributed by creator Softoni! Subscribe to their channel: https://www.youtube.com/@softonimotion
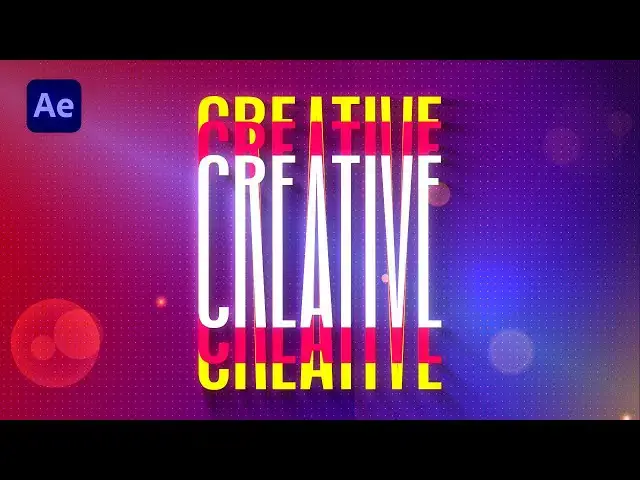
Here's more from the creator: 'Hey everyone! Get ready to elevate your text animations with a unique stretch effect! In this After Effects tutorial, we'll explore how to create dynamic stretch text animations that add flair to your projects.
WHO AM I?
👋 I am a motion graphic artist and 3D animator with ten years of experience in design. For many years, I have collaborated with various global brands, and I am pleased to share at least some of my knowledge to make your first steps as easy as possible. On the other hand, more experienced creators will surely find useful tips and techniques to further enhance their work. So, follow my tutorials and 'Stay Creative' :)'
View Softoni's store here: https://filtergrade.com/vendor/softoni/
View all After Effects Templates on FilterGrade: https://filtergrade.com/product-category/after-effects-templates/
- - - - - - - - - - - - - - - - - - - -
Follow FilterGrade!
Instagram - https://www.instagram.com/filtergrade/
TikTok - https://www.tiktok.com/@filtergrade_
Facebook - https://www.facebook.com/filtergrade
Twitter - https://twitter.com/filtergrade
Pinterest - https://www.pinterest.com/filtergrade/
Show More Show Less View Video Transcript
0:00
hello guys soft Tony here welcome back
0:02
to my channel and in today's video we
0:04
will be creating a stretchy text
0:06
animation that looks really cool and
0:09
before we begin make sure to subscribe
0:11
to my channel hit the like button and
0:13
turn on the notification Bell so you
0:14
don't miss any of my future video
0:17
tutorials and without any further Ado
0:19
let's dive into after effects and start
0:21
creating
0:24
[Music]
0:34
all right we're here in After Effects
0:36
and like always let's create first new
0:38
composition hit on this little icon or
0:39
control or command plus n on your
0:41
keyboard and this is going to be final
0:43
and of course you can type here your own
0:45
name for me this is going to be 9020 x
0:47
1080 30 FPS and for the duration it's
0:51
also up to you but for me it's okay to
0:53
go to around 10 seconds hit okay and for
0:56
Next Step let's create the background go
0:58
right click to create new solid list
1:00
this is going to be background also
1:02
90/20 x 1080 hit okay now go here in the
1:06
fact and preset and if you can't find
1:07
this option just go on window and you
1:09
will find effects and presets here now
1:11
let's type ramp effect okay just trck
1:14
and drop onto this solid layer and here
1:17
let's also make further adjustments for
1:19
the start of the ramp upper left corner
1:21
and of the ramp lower right corner and
1:23
also here you can play around with the
1:25
colors pick whatever color you want for
1:27
me I will go red and blue combin ation
1:30
hit okay and for the second one let's
1:32
find here random blue color like this
1:36
and of course later on in every moment
1:38
you can change the colors hit okay and
1:40
for next effect let's type here noise
1:43
okay find here noise just drag and drop
1:45
onto solid layer and here for the noise
1:48
type let's uncheck this option use color
1:50
noise and let's go 5% okay now let's
1:54
duplicate this background hit control+ D
1:56
or go edit and then duplicate okay this
2:00
is going to be Ball action all right
2:03
change colors to pure white color for
2:05
this ramp color okay for this ball
2:08
action layer and now go here in the
2:10
facts and preset and type Ball action
2:13
also Dragon job onto this solid layer
2:16
and here for grid spacing instead of
2:18
five change to 10 also for the ball
2:20
sides let's change to 10 okay and now as
2:22
you can see we have cool looking dots
2:25
background Also let's change blending
2:27
modes from normal to Overlay and if you
2:29
can find modes just hit here Tuggle
2:31
switches and modes to find this option
2:33
modes and then go and find overlay now
2:36
let's duplicate this once again hit
2:38
control+ D for better seeing these dots
2:41
here in the composition and this is our
2:43
cool looking simple background now let's
2:45
close this effects control what we can
2:48
do also is to precompose also the
2:50
background select everything go right
2:51
click precompose and just type
2:54
background for these three layers hit
2:56
okay and now it's time to create our
2:58
text hit Control Plus or go hit here on
3:01
this little icon I'm using this oswal
3:03
medium font for the font size 200 and I
3:06
will type random text creative okay
3:10
select it then go here on align align it
3:13
to the center if you can find also align
3:15
option just go window and you will find
3:17
aign here next thing what we're going to
3:20
do is to create shapes from this
3:21
creative text go right click find here
3:23
create and select this option create
3:25
shapes from text and now we don't need
3:27
this text layer anymore you can delete
3:29
it press delete on your keyboard okay
3:32
and now select this creative outlines
3:33
and type here pad okay and now as you
3:36
can see we have this each individual
3:38
letter separated and go left Mouse click
3:41
to select every letter here okay and now
3:44
for each of the pad let's create first
3:46
key frame here at zero frames okay then
3:49
go all the way to the 1 second or so and
3:51
now hit V on your keyboard or go here on
3:54
this selection tool and left Mouse click
3:56
to select upper parts of this creative
3:59
text okay now you can hold shift on your
4:01
keyboard and move all the way to the top
4:04
of the composition like so and for the
4:07
next step let's select lower parts of
4:09
this creative text something like this
4:12
and move this lower part of this
4:14
creative text all the way down like so
4:17
and now as you can see we have this
4:19
basic animation okay now select this
4:21
creative outlines again hit U and also
4:24
from down to top let's select first key
4:27
frames hit control+ C to copy and then
4:29
go to 2 seconds and paste it hit
4:31
control+ V okay and as you can see we
4:34
have this basic animation of our
4:36
creative text now select all the key
4:39
frames here okay hit F9 on your keyboard
4:42
or go right click key frame assistance
4:44
find here easy EAS okay then go to the
4:47
graph editor and if you can't find curve
4:49
like this go right click find here edit
4:51
speed graph and now let's draw a curve
4:54
like this okay for this first part and
4:58
also for the second part curve like this
5:01
one something like this and now let's
5:04
hit zero again here in the finals and
5:07
our animation is looking great next
5:09
thing what we're going to do is to
5:10
select every key frame again hit
5:12
control+ C and then go to 3 seconds
5:16
paste it hit ctrl+ V now go all the way
5:18
to the 6 seconds or so paste it and now
5:21
we will have looping animation of our
5:24
creative text okay and now when we hit
5:27
zero this is looking great
5:30
great all right for the next step let's
5:33
precompose this creative outlines go
5:35
right click precompose this is going to
5:37
be text 01 make sure to move all
5:39
attributes into the new composition hit
5:41
okay now go here in effects and pres it
5:43
find fail effect drag and drop on this
5:46
text o1 all right you can change
5:48
whatever color you want here this is
5:50
going to be white color now let's
5:51
duplicate this text o01 hit control plus
5:54
d and this bottom one move maybe five
5:57
frames ahead or so you can always play
5:59
around with those options and for the
6:01
second color I will use maybe this red
6:03
color and let's also duplicate this text
6:06
on one once again hit control+ D and
6:09
this third one move to around 10 seconds
6:11
or so and change color to maybe blue
6:14
color or whatever color you want you can
6:16
also change this layer colors for easy
6:19
recognition now hit zero and our
6:23
animation is looking great maybe for the
6:25
third one let's try maybe yellow color
6:27
or so something like this now hit zero
6:31
again and our animation is looking great
6:35
all right for the next step let's also
6:37
precompose text once again select them
6:40
again go right click precompose this is
6:42
going to be Text Plus elements hit okay
6:46
now let's duplicate this new composition
6:48
once again and for the lower one I will
6:51
rename this one to Shadows okay now
6:55
select this Shadows composition go here
6:57
on the effects and pres it again and
6:58
find radial fast blur CC radial fast
7:02
blur Dr and drop onto the shadows and
7:04
here let's play around with the options
7:07
for this Center let's go to upper left
7:09
corner somewhere around here okay for
7:11
the amount let's go 85 and let's also go
7:15
here again in the effects and pres and
7:16
find fill effect drag and drop onto the
7:19
Shadows composition change color to pure
7:22
black color and then hit okay and now
7:24
when we hit zero in our final
7:26
composition we have this great looking
7:28
Shadows here in the preview you can also
7:31
play around with the amount with the
7:33
length everything is pretty much here up
7:35
to you and for our final step let's
7:38
create adjustment layer go right click
7:40
and create adjustment layer this is
7:42
going to be Spotlight okay select this
7:45
adjustment layer go here in effects and
7:46
preset and find Spotlight effect drag
7:49
and drop on the adjustment layer and
7:51
also you can play around here with the
7:52
parameters move this one to somewhere
7:55
around here for the intensity let's go
7:57
to around 60 for the edge softness let's
7:59
go to 100 or so and you can play around
8:02
here with the height and Cone angle
8:06
something like this maybe to lower down
8:08
intens to around 50 or so play around
8:12
until you're satisfied with your own
8:13
final results and for me this is looking
8:16
great now hit zero again and as you can
8:20
see we also have this cool vignette in
8:22
our final composition all right guys
8:25
that was everything for today's tutorial
8:27
as you can see this was cool technique
8:29
to create this stretch and awesome text
8:31
you can add a bit more effect like
8:33
curves lens flares light sweeps and so
8:36
many more just play around until you're
8:39
satisfied with your own final results
8:41
you can also take a look on my channel
8:42
for more great tutorials also hit like
8:45
And subscribe if you haven't already you
8:47
can write me down below in the comment
8:49
section what to do next and until next
8:52
time stay creative and bye-bye
8:59
sh
9:03
[Music]
#Arts & Entertainment