Up next in 10


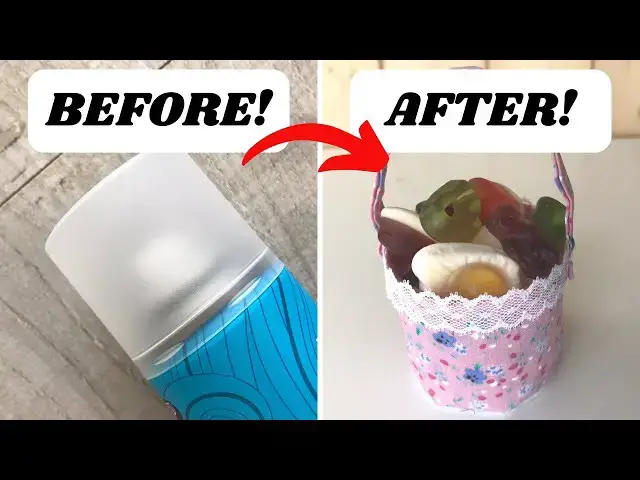
Don't just throw those aerosols away as they are! Remove the lids before recycling the actual aerosols and use them for craft projects.
In this video I will show you how to make gorgeous miniature gift baskets for pot-pourri, lavender, sweets, chocolates, etc! They are super quick and easy to make and great for fundraisers!
If you are interested in one of the retractable Reidea tapes then check out my video review at https://youtu.be/wEPo5Vv7mi8
If you would like to make a gift box out of your aerosol lid then check out https://youtu.be/i4jrb3u8x2s
If you enjoy crafting my blog is full of great ideas and tutorials. Plus if you subscribe you gain access to my free resource library, which includes a home crafts e-book, planners and much more, and get to hear about my latest projects first. Take a look at https://christines-crafts.com/
Enjoy watching and creating your own miniature baskets. Please leave me a 'thumbs up' if you enjoyed this video and subscribe so that you get to see all my videos as they are posted.
You can also find me across social media. To see all my information and ideas find me at https://linktr.ee/Christines_Crafts.
If you are thinking of opening an Etsy store then use this link and get off to a great start with 40 free listings https://etsy.me/32xoPdg
Show More Show Less View Video Transcript
0:00
Turn those old aerosol lids into cute little baskets full of potpourri, lavender, sweets, whatever you like
0:07
So, hopefully you've got an aerosol lid similar to mine, it doesn't matter what size
0:12
And the first thing you're going to do is get yourself some felt or some thick fabric, just something that's going to act as the base
0:19
And draw around your lid. Don't worry what you draw around with, you see I'm just using a biro, because we're going to cut that off, you're not going to see it
0:29
Because we actually want to make that circle a tiny bit smaller than the actual lid, so you won't see it really
0:38
So as you can see, I'm just going to cut inside that line
0:43
So you'll end up with a circle that's a tiny bit smaller than your aerosol lid
0:48
Obviously you can do this with any lids, but really you want ones that have got a straight up and down side, you don't want it sloping
0:55
Hence aerosol lids are perfect. So now we're going to turn our attention to the fabric
1:01
So the first thing we want to do is cut out a handle. Now strictly a handle can be any size, but I'm going to tell you the size I cut mine out
1:09
And don't get too long in case it just goes a bit floppy
1:13
So I'm cutting mine 1.5 inches wide, and 6.5 inches long. Now as I say, you could go a bit longer, you could go a bit shorter, but don't get it really floppy
1:27
Now those of you that are looking at me doing it like this and saying, why doesn't she use a wheel and her cutting board
1:33
I can do that, but I'm just trying to make these crafts really accessible. So if you haven't got one, you can just use ordinary scissors and a tape measure and a ruler, pen, whatever you need
1:44
So the next thing you're going to do is measure the height of your aerosol lid and make a note of it
1:49
Okay, so write down the height of your aerosol lid, because you're going to need that in a moment
1:55
You also need to measure all the way around your aerosol lid
1:59
Now you can just use an ordinary tape measure. I'm using this very nice fancy one that I got from Amazon
2:04
There's a link on the screen and a link below if you're interested in one. And there's also a little review video on this channel
2:10
But however you measure it, measure the distance around the circumference and make a note of it
2:16
Because we're now going to do a little bit of maths, apologies
2:21
You're going to cut a piece of fabric that is the height of your lid times two plus one inch by the circumference or the distance round plus three eighths of an inch
2:32
So in my case, that's going to be four and three quarter inches by seven and three eighths of an inch
2:37
So that's what you need to mark out on your fabric and cut out
2:42
Again, I'm doing it this way just so that you know everybody can do it
2:46
And then we're going to have two rectangles all ready to cut out
2:51
So I hope you're enjoying this. And if you are, please give me a thumbs up
2:55
So lots of people can make their pretty little baskets. They're great for fundraisers or little gifts for teachers or anything else you can involve children in making them
3:05
They're really quite sweet, I think. So what you should have now is the smaller rectangle for your handle and the larger rectangle to cover the lid
3:17
Now, if you're not putting potpourri or lavender in, you're going to jump ahead
3:21
But if you are, that's what we're going to do now. So what you're going to need is some netting or some very thin fabric
3:28
Do make sure it's thin. Netting is ideal. And you're going to cut a piece out that's a little bit bigger than your lid because we're going to stretch it over the lid and then glue it to the sides
3:42
So what I'm demonstrating here is you don't need to be precise
3:46
So long as it fits over and sticks down the sides, you're all right
3:50
You just don't really want it too big. Otherwise it just gets in the way
3:56
So just place it, check it. Decided it's a bit long that way
4:00
Cut a bit off. That should be fine. And then add whatever's going in there
4:06
So lavender, potpourri, just make sure you give it a tap, give it a push, get in there what you want
4:13
Because once you glue the top on, you won't be adding any more
4:17
So once you're happy with it, mine's full of lavender that I've grown, you're going to stick your netting down
4:24
I'm using an ordinary multipurpose glue. It's entirely up to you what glue you use
4:28
You could use a hot melt glue if that suits you. Just use whatever you have
4:32
I'm a firm believer in trying to craft with what you've got lying around
4:36
So once you've added some glue to the top of the lid, just stick your netting over
4:42
Yes, I got it all over my hands. I try not to worry about it
4:46
So just press it in place until it sticks down. Depending what glue you use might take a bit longer
4:52
So get that to stick down and then everybody needs to join us again
4:57
Now we're going to work on the handle. So that small rectangle for the handle, you're going to fold it in half so that the right side's on the outside and press it in place
5:09
And then open it up and you're going to take one side and fold it in to the centre
5:16
And again, press it in place. Now notice this iron is very close to my fingers
5:20
Do be careful and do not use steam. You'll notice I press the steam button once my hand is safely out of the way
5:28
Don't want to burn yourself. So not surprisingly, you're going to turn it round and repeat for the other side
5:37
Nice and carefully. And again, we're going to press it all the way along that length
5:46
And then you can fold those edges in, make sure they're in and then fold it back in half and press it again
5:53
And you've made a nice handle and all that you've got left to do is sew along it
5:58
I tend to just do one row of stitching just to hold it in place. You can do two if you want. Do it on the machine, do it by hand. It's entirely up to you
6:06
But there you have it, a completed handle. So let's turn our attention to covering the actual lid
6:14
So you have that larger rectangle. Just make sure you fold it with the right sides together
6:22
And you're going to run a little seam. So look at the measurements, look at the dimensions and make sure you're sewing it the way I have so that it's going to fit over your aerosol lid
6:37
Just do a little check when you've put those pins in. Just make sure you've folded it the right way and that you've got the right sides together
6:44
And then you can machine or hand sew it. A little tiny seam, about an eighth of an inch
6:50
And then it'll still fit over your lid OK. And then once you've sewn it, you want to press it open. Now it's tiny, so I don't tend to go to the iron
6:59
I just run my fingernail along it. Works really well just for opening the seam up
7:07
And then fold the whole tube so that now you're folding it with wrong sides together
7:14
And you're folding it in half. So those raw edges should meet
7:21
So where you've got your seams, just make sure they're both still pressed open and clip up in them together and work your way around doing the same thing
7:31
And then sew those raw edges together. It's just going to keep them nice and tidy and neat and stop anything moving
7:38
So just whiz a row of stitching nice and close to the edge
7:45
And then it's time to put it on the lid. Now, if you added netting, you'll find it's quite tight. Just persevere
7:51
If you didn't add any netting, it should slip nicely over without any problems
7:58
You'll see I'm just having to work mine down a little bit and that's OK. It means it fits really well once it's on
8:05
So you want to line that folded edge up with the top of the lid
8:09
So that looks really pretty. And then when you turn it over, you've got those raw edges
8:15
So just stick them to the bottom of the lid. Back to the old multipurpose
8:22
Just make sure you put some all the way around so that you can get those edges down
8:30
And what you might find is they want to spring up. So you might just have to hold them for a little while
8:36
And make sure you're not pulling the fabric down the side of the lid
8:40
It's really easy to pull it away from the top of your little basket
8:45
So just go back and make sure before it dries. And then once you're happy with it, it's time to cover those raw edges
8:54
And that's where that felt circle comes in. So just cover it with glue
8:59
Not so much it squeezes out, but plenty so it sticks down
9:03
And cover the bottom of your basket. Now you might want to put a weight on it while it dries and make sure everything goes nice and flat
9:11
And then you've got a little basket. And you could leave it like that, but I like to put a trim around the top
9:18
A nice little bit of lace or ribbon works really well. So in this one, I'm going to use a little bit of lace
9:25
So if you want to put a trim, just make sure you run it around the top to get the right length
9:32
And just cut it a little bit long. You want a little overlap so that you don't end up with a gap
9:38
And then you're just going to put some glue around that top edge
9:42
I don't recommend adding it to the trim because you just end up with trim and glue slopping everywhere and it gets messy
9:48
So just put your glue around the top and then add your trim to that
9:54
Now I'm positioning mine a little bit high because I like the effect where it just comes over the top
9:58
But you could put it flush with the top. You could even put a trim halfway up. It's entirely up to you. This is your creation
10:04
Then when you get to the end, you've got that little overlap. You'll just have to add a bit of glue just to stick that down
10:12
And all that's left to do is the handle. So I'd like to make sure that I've got a back to my basket, which is where the seam is
10:21
So I tend to put them at 90 degrees to that, but it's entirely up to you
10:25
Just add a little bit of glue to either end. And then you're going to stick it wherever you've chosen
10:34
You don't need to overlap it too far onto the lid. Quarter of an inch, three eighths of an inch
10:41
And then hold that until you're sure it's secure and then let it dry
10:45
So good luck and make your own baskets. Enjoy
#Hobbies & Leisure
#Crafts
#Crafts
#Art & Craft Supplies