Up next in 10

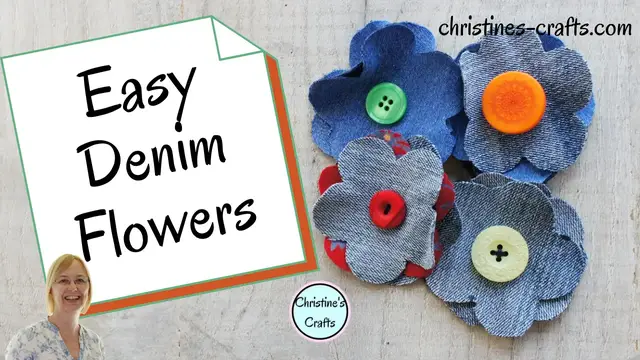
How to Make Shabby Chic Flowers from Old Jeans
Feb 16, 2022

Use those old jeans that are worn out or no longer fit to make these adorable shabby chic flowers.
This video will show you exactly how to make them either by sewing or gluing them.
Take a look now!
Show More Show Less View Video Transcript
0:00
In this video I'm going to show you how to make some shabby chic flowers
0:04
out of those old jeans that you've got lying around Why waste them? Why not make some cute flowers
0:10
You can see here you can make them with as many layers as you like You can attach a button, you can even use other fabrics
0:16
Lots of different ways to use them, how about sewing them onto clothes, making some hair bands
0:20
The world's your oyster So I'm Christine of Christine's Crafts and this channel is dedicated to crafting on a budget
0:27
So what are you going to need? The first thing you're going to need is this template. Don't worry. There's a link below the video where you can go to my website and download it for free
0:34
No strings attached. So once you've got your template, you're just going to need a button for the centre of your flower
0:39
or as many buttons as you need for your flowers. And you're going to need some fabric
0:45
So as I say, I recommend some old jeans. You can see I've got the leg off one here
0:49
Use the rest of the jeans for a different project. And that's all you need
0:54
So you've got the option of sewing or gluing. and I'm going to show you both in this video. So the first thing you need to do is cut out a
1:02
template. You can cut out all three, you can just cut out one, but you're going to need at least one
1:07
to be able to cut out your petals. You then need to take your denim, place your template on the back
1:14
of your denim and draw around it. Now I'm using a Sharpie so that you can see it really clearly
1:20
but you can use anything you like. You just need a pencil or a biro or even an air erasable pen
1:26
and just something that's going to mark it for you to cut out. In fact, you're better with something
1:30
that doesn't show up too much because then it won be there on your flower at the end of the day So once you drawn round it you just going to repeat for as many sets of petals as you like I do recommend at least three to make a nice
1:44
flower, but I've made some with five or seven and you get a really full flower then. So you experiment
1:51
and add as many as you like. So assuming you just want the three, once you've got them all done
1:57
simply cut them out. Now if you've marked with a strong pen you're going to want to make sure you
2:03
get rid of that pen probably so it's not obvious on the edge of your petals but other than that
2:08
don't worry too much about your accuracy. Nobody's going to be looking. Nobody's going to know if
2:14
one's slightly different to another. So get them all cut out and then we can start attaching them
2:21
So the next thing I'm going to show you on here is how to sew them and then glue them
2:27
So you've got the two different options. So you take one, place it on top of another
2:34
And you're just going to turn them so that they're not lined up perfectly. So they look more natural and more like a flower
2:40
Now obviously you keep layering up until you've used them all. And then your button's going on the middle
2:45
So if you're sewing, the thing we need to think about now is getting our needle and thread
2:50
And attaching the button and the three layers. I recommend just pinning through because sometimes they can move a bit when you're trying to sew
2:59
So just put a little pin through one side and get your needle and thread
3:03
Now I've used a double thread and I've put a knot on the end
3:08
And simply place that through from the front and make a little stitch And then you going to come up through one of the holes on your button and go back down diagonally opposite
3:21
and then back down through the petals. And you're just going to secure that button
3:30
and secure all the petals at the same time. So once you're down, you're just going to come back up
3:37
through all three layers and the button, through the first hole and back down the second hole
3:43
And repeat that for as many as you feel you want to make sure it's secure
3:48
I don't know, three or four times maybe, just so that you're happy it's secure
3:56
Once you are happy, you need to come up one of the other holes and then go back down the
4:01
one diagonally opposite that. So you're forming a cross on top of your button. It just makes a nice centre piece
4:08
Once you're happy it's all secure you just need to finish off your thread on the back
4:13
of your flower. So you can take your pin out now. It's all secure and you just take a little stitch and then put the needle through the
4:22
loop that forms and that will make a nice little knot. And it's up to you how many times you do this but it's sometimes a good idea to do two or
4:30
three just to make sure it's secure and it's not going to come undone
4:36
Now if you're going to sew your flower onto something, you could leave your thread attached
4:42
and then just use it to sew onto whatever you're sewing to
4:46
But if you going to use it later simply cut off your thread and you got a nice completed flower And there you go Mass produce them Make as many as you need Now if you really don like sewing
4:59
or you know you're not going to use your flower on something that's going to get washed, because
5:04
be careful if you're going to wash it, glue can be a problem. But if you're just going to stick it on to decorate the front of a notepad, for example, and you want to glue
5:12
it you just want some general multi-purpose glue and add a little bit to the center of all of your
5:21
petals bar one the top one i wouldn't add any glue to i just add some to the other so in my case just
5:28
two lots of petals and then you're going to position the petals just like you would do if
5:36
you're going to sew it but this time you're going to take one of the glued ones and place it on top
5:41
of the other glued one and then you're going to take the top one and place that on top
5:47
and that's because when it comes to the top layer and adding your button i recommend that you put
5:53
the glue on the back of the button so that you don't get too much glue and you don't get it
5:57
showing around the edge of the button if you try and apply it to the petals sometimes you might not
6:02
get it in quite the right place or you might apply a little too much if you're applying it to the the button you're likely to get your quantities right
6:09
And then simply press the button on to the centre, make sure they're all secure and leave
6:15
them to dry before you try and use them. And that's it, you've made your denim flowers
6:19
Now if you're still looking for other ways to make some fabric flowers, how about checking
6:23
out these silk flowers, they're also really quick and easy to make and great for many projects
#Hobbies & Leisure
#Crafts
#Flowers
#Art & Craft Supplies