Up next in 10

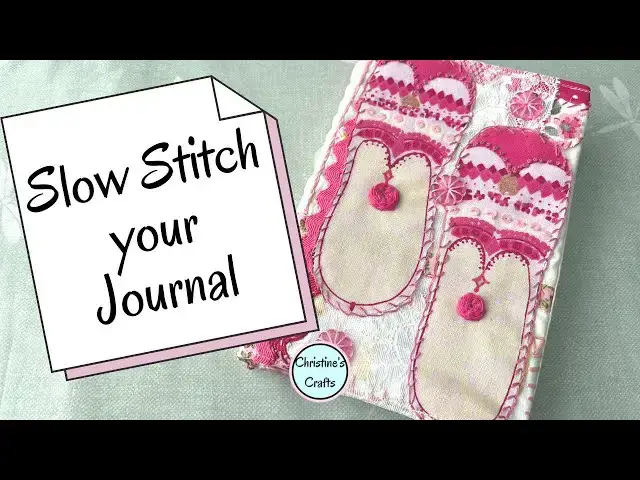
How I Made This Cute Fabric Journal Step by Step!
Jun 21, 2025

Learn how to create a unique journal cover with slow stitching! In this tutorial, we'll take you through a step-by-step guide on how to create a beautiful and unique journal cover using slow stitching techniques.
Learn loads of techniques and stitches to get creative with. Whether you're a seasoned crafter or a beginner, this video is perfect for anyone looking to unwind and get creative. So grab your needle and thread, and let's get started on this slow stitching journey!
--------------------------------------------
CHAPTERS
00:00 Introduction
01:05 Cutting out Fabrics
04:50 Running Stitch
08:40 Blanket Stitch
11:35 Chain Stitch
14:35 Stem Stitch
18:05 Arrow Stitch
19:40 Crochet Heart
22:00 French Knots
23:30 Sequins
24:54 Buttons
25:48 Embroidered Flower
Show More Show Less View Video Transcript
0:00
This video is going to show you exactly how to take those fabric scraps and turn them into a fabulous journal cover. Now,
0:07
there is a sister to this where we did it week on week earlier in the year. So, if you'd like to see all those separate
0:14
videos and do it really slowly at your own pace and take your time and listen to all the chitchat that we had, um,
0:21
please feel free. There's a link on the screen, the link in the description below. Otherwise, we're going to crack on. I'm going to show you all about slow
0:28
stitching, how to embrace your creativity, give you a few hints and tips and ideas, and ultimately show you
0:34
how to make it all up into a journal cover. So, here's some examples that I've done. This is my diary this year,
0:40
and you can see I've added buttons, lace, all sorts. Pink one you're going to see a
0:45
lot of in this video. She's got the shoes, buttons, sequins, lace, bit of
0:51
crochet work is all going on so I can show you various techniques. And here's one I did where I added a little
0:57
fastener. So, what we'll do is we'll get stuck in and we'll make your journal
1:04
cover. Take whatever journal you're going to use and we're going to cut out your fabric according to the size of
1:10
your journal. You can see I've just got an ordinary notebook that I picked up somewhere. So, the first thing you're
1:15
going to cut out is a piece of fabric. I'm just using a standard bit of calico or a bit of sheeting, just something
1:21
simple. and you're going to cut it out by these measurements. So, lay your fl
1:27
your foot your book down flat even and then cut your piece of fabric that
1:33
little bit bigger. So, you've got I'm just going to pop it into the corner there. The height of the book plus 1 and
1:40
1/2 in and the width of the book down flat plus 1 and 1/2
1:45
in. Okay. And that's so you've got that 3/4 of an inch all the way around when
1:50
you actually come to sew it. So you can see that's going to be the cover and
1:56
it's got enough on there for your seam allowances. The other piece of fabric
2:01
you need to cut is for the lining. So I've done it out of the same fabric. You don't have to. And this wants to be the
2:08
height of the book plus 1 and 1/2 in. And it wants to be the width of the book when it's down flat plus 8 in. So you
2:17
should have opened that book down flat and then add another eight inches on the width. And we're going to put that to
2:23
one side cuz we don't need that just now. We're going to decorate the cover. And that's what makes this a slow
2:29
stitching journal cover. The fact that we're going to do a whole design on here. And you can use whatever you like.
2:37
Now, I want to base mine on these shoes that I've cut out from a a piece of fabric. So, that's the whole thing. So,
2:45
I've looked through my scraps and bits and pieces and found all these bits and pieces that I think go with it. So, a
2:51
nice dark ribbon, light ribbon, rick rack. I do love rick rack.
2:57
Do you remember rick rack from years ago? Anyway, I think I'm going to be adding some of that. Perhaps some lace.
3:03
Oh, that's a nice ribbon. Buttons, maybe. sequins, who knows? Lots of things and
3:11
lots of pink embroidery threads. See, I've got some sequins in there with some old buttons and beads and bits and
3:19
pieces. And I'm just going to develop a whole design just by throwing everything
3:25
at it. And this is what you should do. You should think what you want to achieve and then start building it up.
3:32
Now, you can just sew a bit on, sew another bit on, and be completely creative as you go. I like to do a plan.
3:40
So, what I'm doing is just marking the middle of the cover so I know where the spine is so I know when I place things
3:47
on whether they're going to be on the front of the cover, the back of the cover, or along the edge. Um, and that's
3:53
just something I want to do. You don't have to, but I'm just giving you my tips. And then start layering up. So,
4:01
I'm just going to put that there. Try that there. And you can see what I'm doing is trying various things, seeing
4:08
what I think. I'm putting them in the right order so I know what layers need
4:14
to go on first. And that's also quite important. It'd be very easy to sew
4:20
something on and then go, should I put a bit of lace under that? So, for me, doing a bit of a design is the right way
4:26
to go. But if you're going to just free form and just keep going, you'll be able to move on past this bit. But you can
4:33
see what I've done. And then what I recommend is if you do get yourself a nice design, take a photo and then take
4:41
the elements off. But take a photograph first so that you can keep referring back to it. You can see I've added
4:48
rather a lot here. So let's go back to those first two and let's sew those on
4:53
first. So, what I'm going to do throughout this video is show you various techniques. So, I'm going to use
4:58
embroidery thread for everything. And you can use your embroidery thread as it is. You could use two threads. You could
5:05
use three threads. It's all entirely up to you. You can see I've got quite a mixed bag there. And a lot of them are
5:11
just short length bits left over from other projects. And this is a great use for them. So, if you want to divide it up,
5:19
you can. Or just use the whole thread. Don't worry about length of thread, just
5:25
however long you think. So, what I do recommend is get yourself threaded up
5:31
and then put a small knot in one end. I know a lot of people don't agree with using knots. And if you don't want to,
5:37
just do some little stitches. That's fine. But because this is going to disappear inside the the cover, no one
5:43
will ever see it. So, no one will know there was a knot there. So, all I'm going to do to sew this particular
5:50
rectangle down, and you'll notice I haven't pinned it in place because I'm not that fussy about where it goes. Um,
5:56
so I am literally just going to hold it there. You could pin it down and keep it where you want. And I'm just going to
6:02
come up in one corner and then back down a little way
6:08
along, however long you want your stitch to be. Um, again, this is another part
6:14
of your creativity is making the stitches the length you like. And you're just going to run along going in and out
6:20
and in and out. What I would say about a running stitch is you're supposed to make your stitches all about the same
6:26
length to make it look really nice and tidy. Um, but I really wouldn't stress
6:32
about it. Depends whether you want a nice and tidy look. So, just going to
6:37
keep going all the way along that edge. And then I could turn the corner and go all the way around the
6:46
edge of the rectangle or whatever shape you've got. But I'm not going to do
6:51
that. I'm going to show you a technique that I'm going to use for this piece and also for the large pieces of lace that
6:56
I'm going to add. And that is that I'm going to come along a little way, maybe a stitch length, maybe a little
7:04
more. And then instead of carrying on, I'm going to go back across that
7:12
rectangle. So I've turned it round so that's easier for me to sew. And I'm just going to work my way back across.
7:20
And then I'm going to keep doing that. Now, what this does do is make your piece of fabric or lace really secure.
7:27
It's holding it down across all of it. And that's really helpful if your
7:33
journal is going to get a lot of activity. If it's going to be dragged in and out of a bag or whatever, you want
7:38
to make sure things are nice and secure. You don't want those loose edges coming up. So, you can see you also get a nice
7:46
pattern on there. So, you could have done it with a really contrasting thread, which would look great. And then
7:51
when I've got to the other end, I'm just doing the same. and then through onto the wrong
7:58
side and a little stitch which you're doing behind the piece you sewed on so
8:03
no one will ever see it. So you see it's not gone through and then put the needle through the loop. And that's just a
8:10
little finishing off stitch. And you can do that with all your threads. And you'll notice I often do another one or
8:16
a couple of little stitches just to make sure it's nice and secure before I cut the
8:22
thread. I hope you like my little scissors. I do like my little stalk scissors. They're very sweet. So, you
8:28
can see that's nice and secure. And you could sew lots of other things on like that in exactly the same way. So, I'll
8:34
have a look at my plan. And that is the next one I'm going to put on. But I want
8:40
to share different techniques. So, we're going to put this one on using a blanket
8:46
stitch. Um, several different ways of doing blanket stitch. I have got a video
8:51
explaining blanket stitch and showing you very clearly and I will link to that below assuming I remember. I'm notorious
8:58
for forgetting. Do put me a comment and point it out if I forget and I'll add it in. But I will show you here. So I've
9:06
got my thread and I'm just going to come up partway along one side next to the
9:11
rectangle I'm sewing on. Okay. and then come in a little
9:17
way in through and back out where I started. So, I've just formed that
9:23
little stitch and then I'm going to move along a little way and do the same, but
9:29
I make sure the needle comes up in the loop. So, you'll see the key to blanket
9:35
stitch is putting your thread in the right place and then your needle will come up in just the right place. And you
9:43
just keep working along all the way around your shape. And don't worry about
9:48
how much thread you've got because you can finish off and start again whenever you like. So it's in through the piece
9:56
you're sewing on, out just off the edge of it, and it's literally just off the edge. And you end up with that lovely
10:02
length of thread running along the edge. So there's no way that anything's going to get under the edge of this
10:09
piece. obviously blanket stitch because it was traditionally done on the edge of
10:15
blankets. And you just keep going. And I hope you can see that's a really nice effect. It's great for sewing shapes on.
10:23
All sorts of fancy shapes can be sewn on with this. And they will not come loose and they will not get pulled up at the
10:29
edges. So, obviously this is all about slow stitching, and I'm speeding mine up because I want to show you so many
10:35
different things in one, which might not seem all that short, but actually quite a short video for the amount I'm going
10:41
to squeeze into it. So, you can see my thread wasn't long enough, having to finish it off.
10:48
Doesn't matter, except you see me battling threading my needle. And then round we go again. And
10:56
we'll get all the way back to where we started. If you're enjoying the video, please really give me a thumbs up below
11:01
because that's what makes YouTube spread it to more people. And I do think it's a
11:06
really nice thing to do a bit of slow stitching, bit of hand stitching. So, you can see what I've done there. And
11:13
then I'm going to put some more bits and pieces on, but I'm not going to bore you with it because I'm going to use the same techniques. So, they're just going
11:19
to appear. And I'll keep doing that throughout the video. Put things on and
11:24
then show you before we move on. So, you see what I've done there? some running stitches, some blanket
11:29
stitches, and let's add the next thing because we're going to move on now to
11:35
use chain stitch. It's a traditional embroidery stitch, but it's quite nice
11:40
for holding things down. Gives you another texture. So, I think I'm going to do it on this um black ribbon. It's
11:48
black and pink. It's quite dramatic compared to the other things I've chosen. It's not like me at all. Anyway,
11:55
let's get going. I'm going to use this really rich pink, I think.
12:01
Um, but I might use half of it rather than all of it. So, you can see I'm
12:06
splitting it. I've actually got a very short short a short short showing you
12:11
how to split your threads. Again, I'll link assuming I remember. So, as before, we're going to
12:18
do a knot and we're going to put it through from the back at the start. So,
12:24
we're going right at one end of our ribbon. And up we come. And then what's
12:31
going on here? All right. Okay. The usual melee when you don't want it to cuz you're recording. I'll just sort
12:37
that out. There we go. It's pulled through just fine now. So, what you want
12:44
to do is take your thread and loop to the left. This is assuming you're right-handed. You're going to put your
12:51
needle back down and bring it up a little way further on inside that loop you've
13:01
made. Just get it through. This ribbon's quite thick, so I'm just having a little bit of trouble with
13:07
it. I've got it hooked on the pin. So, you can see it's through the loop, and that's forming a little
13:15
chain. Okay. So then you want to go back down just outside that loop and then up
13:22
further on. Make sure it goes around your needle
13:28
if you haven't put the loop in the right place. And on we
13:36
go. So every time you go back down, you're securing the last chain and
13:43
you're starting the next one. Now, you could do these as large or as small as you
13:49
like, and they can be really quite dramatic if you do larger ones. I've kept mine quite small because I think
13:54
that's in proportion to the ribbon. You'll see I'm running along the pink section, and I just want it to cover
14:02
that. And you can just keep going and secure anything you like. Or indeed,
14:07
just put it on the backing fabric. You could do a row of it on there or a circle of it. It's just a nice
14:13
decorative stitch, chain stitch, and has been used in lots of embroidery. So,
14:19
I've done it along both sides of my ribbon. And then just the usual finish off. And that's held it down really
14:26
well. And also very pretty. So, you see, I'm back to checking my design. I think
14:32
it might be the spine next. And I've chosen to put a piece of ribbon on the spine. But obviously, because it's going
14:38
to be on the spine, I want it nice and secure. And I want it secure over the edges. And I'm actually going to use
14:43
something called stem stitch. Yeah, let's go nice and light
14:49
with that. I mean, I could use a dark one and be dramatic, but no. I'm also going to
14:55
pin this in place because I want it exactly down the spine. So, when I've marked the middle of this fabric, I
15:01
should make the effort to get the uh ribbon exactly the right place, I think.
15:07
So stem stitch does literally just go over the edge of the ribbon. So like
15:13
your blanket stitch, it's going to stop there being an edge that can get caught, but it's just going to give us a
15:19
slightly different effect. Okay.
15:25
So, we're going to come up from behind on the ribbon and then go along a
15:33
little way and go back in just off the ribbon and come back on ourselves. So,
15:40
you go along a little way, just off the ribbon edge and in, come back on yourself a little way
15:48
onto the ribbon and back up. And you're just going over that edge. Now again,
15:54
I'm doing these nice and small, but you could do quite large stem stitch if you wanted. And you end up with a really
16:01
smooth long run of stitching. So you're basically putting an edge on that ribbon
16:08
that is also securing it to your base fabric. It's really effective. Actually,
16:15
I do like it. And once you get going, you get into a real rhythm. And so even
16:22
though you feel like you're sort of working a bit backwards because you your stitch is back all the time, you can
16:28
make really good progress. And just go along both sides to make sure it's nice
16:33
and secure. So again, I've added some more bits, including the lace, which I did the same way as the first panel,
16:39
doing a running stitch, backwards and forwards, backwards and forwards. Okay. So, yeah, I definitely think we
16:48
need to start looking at putting the shoes on and making that front as busy as the back. I'm going to put something
16:54
in there as well. And I've got some crocheted work in mind to go there.
17:00
Should be quite bulky, but I think it will work. So, let's get the
17:06
shoes. There we go. So, I'm just going to put one of them on
17:12
to start with, but I need them both to line them up and make sure they're how I want them to
17:18
be. They are rather sweet, aren't they? I'm not normally a very pink person, but
17:23
I do actually love this that I've made. Really pink. We all have our pink moments, I
17:31
think. So, because I've laid it out, I'm going to pin it in place because I don't want it moving around. It's also a large
17:38
piece of fabric, so it's likely to move quite a bit as I'm working on it. And
17:44
I'm going to secure these down with something called arrow stitch. Again, this goes over the edge
17:51
and makes it nice and secure. Um, just pick a
17:59
pink. It's very like blanket stitch and it's just a little variation on blanket
18:05
stitch. which I thought, you know, it'd be nice to
18:10
include. Let's just get a little knot and come up from the
18:18
back. So, like we did with blanket stitch, we can just start anywhere. We're just going to come up off the
18:24
edge of the shoe in my case. And this time, we're going to go
18:30
forward slightly. When we go in through the shoe, we're not just going in a straight line. We're going to move
18:36
forwards. And then we're also going to move forwards again to come out
18:41
alongside. But we are coming up through the loop like we did on the blanket
18:47
stitch. So it's the same technique as the blanket stitch. You need that loop,
18:52
but you're going to go in further along and then back out further along again.
18:57
So you're constantly moving forwards along the edge of your, in my case,
19:02
shoe. So on the blanket stitch where we were keeping our lines vertical sort of
19:09
to the perpendicular to the edge of our shape, we're now not doing that. We're forming little arrows by constantly
19:16
moving forwards. So when you're going in on the shoe, you're moving forwards a little
19:22
way. When you come out of the edge of the shoe, we're also moving forwards a
19:27
little way. And we just end up with all these little arrows. Just make sure your
19:32
needle always. So, I won't make you sit through that at real time. And then once it's
19:39
sewn on, I thought I'd come back to this crochet work I talked about. So, I have a lovely crocheted heart. They're really
19:45
quick and easy to make and they're brilliant for loads of projects. So, there's video again in the link below,
19:51
probably on the screen if I remember. They make your own. But if you have any sort of crochet or knitting work you
19:56
want to add, this is I think the easiest way of doing it. Leave the threads. Don't finish them off on your item.
20:03
Thread them up. Obviously, you need a needle with a large eye, but still has a point because you've got to get through.
20:09
And then just take it through where you want it. And then come back up a little
20:15
bit further along through another stitch. And then just keep working. So go down through a stitch right at the
20:21
edge of your crochet or knitting work. And then back up through the next one.
20:27
And just work your way right around the edge. Just keep repositioning and keep making sure you
20:33
are right on the edge because that really is what you want to do. It'd be very easy for something so
20:40
chunky to get caught on things and pulled off. So, just work your way right around the edge stitches. And you'll
20:47
actually find it's really quite easy. And you'll see I'm just doing it with a running stitch. Nothing
20:54
fancy. And if like me, you've got your two threads there, just take one of them
20:59
till you're well on the way around and you know the other one will reach to it. See, I'm just checking there. Yes, the
21:04
other one's a bit shorter. And then just take your thread through to the back. Finish it
21:10
off. And then repeat the whole process with the other one. So again, I'm just
21:16
doing a little stitch and then a little knot. Just got
21:22
to be a little bit careful because you could make it quite bulky because you've got yarn instead of just an embroidery
21:27
thread, but you should be okay. So then just repeat that whole
21:36
process with the other thread. This can actually be a great way
21:42
of making something build up and have a bit more texture, especially if you've done
21:49
something in a lot of the same color. can add a bit more interest. So, by magic, I've sewn the other shoe on. Hope
21:55
I hope you like that. Um, I've got buttons, sequins to sew on, but first of
22:00
all, we're going to look at French knots. These are another great way to add some texture. And I'm going to add
22:05
them around these little loops on these shoes. So, all you do is bring your thread up from the back. And I do
22:12
recommend using your full embroidery thread, wrap it around your needle. I
22:17
recommend three times, but some people do two, some people do four. And then put the needle back down through pretty
22:24
much the same place it came out. Certainly very, very close. And you end up with a little
22:30
French knot on the surface. So, let's do that again. Come up where you actually
22:36
want the French knot to be. Wrap the yarn around the
22:43
needle as many times as you like. can experiment with this, but I quite like
22:48
three. And then take it back down through approximately the same place.
22:53
Pull it tight and it'll just sit there nicely. And you can do those wherever you like. I'm doing a row of them. You
22:59
could do one of them. You can use them as little tiny flowers if you wanted to.
23:05
And you can see I'm just do them doing them as detailing on my shoes, almost
23:11
like stitch work around the shoe. And I will do loads of those and I won't make you watch them all. But that's another
23:18
technique you can use. So you can see I've put them on there and I will put them around the others to
23:25
match. So what we'll move on to now is sequins. I'm sure you're all aware of
23:32
sequins. So, all you do is bring your thread up, go through the center of the
23:38
sequin carefully, and then back down where you
23:45
want it to lie. Now, if you want them to flick about, which is a great effect to have, you're done. If you want them to
23:52
lie flat, just come back up through the center of that sequin, which can be a little bit
24:00
tricky. And then go back down on the opposite side of the sequin to the side
24:06
you went before. And that'll hold it nice and flat and stop it catching. So with sequins, it depends what effect
24:12
you're looking for. A lot of people like to just put the one stitch and have them flick about and catch the light. So,
24:18
you've got to decide for yourself there which effect you're going for. You can see I'm putting a couple of stitches in
24:24
mine. You could even put more stitches in if you wanted, but two seems to hold them nice and
24:30
flat. So, that's another way of getting light and texture into your slow
24:36
stitching. Great for little eyes if you do animals and creatures as
24:42
well. So, we've got our French knots. We've got our
24:47
sequins. What should we move on to next? Sewing buttons on. Yeah, why not? So, I've positioned
24:54
some buttons where I fancied them, and I'm just going to sew one of them on. Now, these are the strangest buttons
24:59
I've ever come across. They were in a set of vintage buttons, you know, big collection. They've only got one hole in
25:05
the middle. So, I don't know how you would ever use them as a button. If you know, please let me know
25:12
in the comments below. But all I'm going to do is sew them on um using a stitch
25:17
in each petal as I think that'll work really well. But normally you'd have a
25:23
button with one with one what am I saying? With two holes or four holes and just sew it on in the same way as you
25:30
would a button onto anything else and it'll just sit nicely and again add a
25:35
bit more interest. And then tie it off.
25:42
And then I think the only decoration I've got left that I want to show you is some embroidered flowers. Um, this is on
25:49
another video on the channel which I will link to. Gosh, there's a lot of linking going on in this video, but I
25:55
wanted to show you how to do it on here. Um, so just decide on the size you want
26:00
and draw a circle the size of the flower you want. Now, you really want to be a tiny bit smaller than the size of flower
26:07
you want. Um, because then you'll completely hide your pencil marks. So, I
26:13
could put them all over, but I think I'm just going to put one
26:18
here. So, just going to draw that circle. And you'll see I haven't drawn around anything. It's not perfect. It
26:26
doesn't matter. You could draw around a coin. Then, you need to mark the center of the circle and draw spokes out to the
26:32
edge. Now, you want an odd number of spokes. I'm doing seven. I think five is
26:38
the minimum. Depends on the size of your flower. And then you're going to use your embroidery thread to make each of
26:44
those spokes. So, you just come up through the center, then go out to the end of the spoke, back up through the
26:51
center, and you'll just form all the spokes you're doing. So, for me, that's
26:56
seven. All that matters is that you've got an odd number. And you'll see why when we carry on with
27:03
the flower in a moment, once the spokes are complete, you have to have an odd
27:10
number. So once you've got all of your spokes done, you're going to start
27:16
moving your needle under and over those spokes. So pick one and go under it. And
27:24
then go over the next one and under the next one. over the next one, under the
27:30
next one, and keep going round and round and round. Now, you can turn the work or
27:35
you can just work steadily round. You'll see I'm going to do both, but just keep going until you've completely filled
27:42
that circle right out to the end of those spokes and go really tight out to
27:47
the end of those spokes. And you should have a lovely flower appear. And I say go right out because you don't want
27:53
those spokes obvious at the edge of your flower. And then just put your needle through to the back and finish off like
27:59
we normally do. And then you've got a lovely flower. I'll put one on the other one as well. And then all we've got to
28:06
do is build. So remember that piece of lining we made right at the beginning,
28:12
which is the same size as your cover, plus 4 in on either end cuz it was 8 in
28:20
wider. Well, now we're going to sew those two bits together. So, you're going to place the cover you've made
28:27
face down onto your lining fabric, and you're going to sew each of the edges.
28:33
So, move it to one edge and either pin or clip it in
28:41
place, ready for sewing. Just keep checking that you're lined
28:46
up. And then you're going to do the same to the other edge, the other short
28:53
edge. In my case, it's the shorter edge. Depends on the proportions of your notebook or journal, of
28:59
course. And again, pin or clip it
29:07
together. And then you can hand sew that or you can nip over to the machine. So
29:13
if you want to make this whole project slow stitching, then you just do a nice back stitch. Otherwise, nip over to the
29:20
machine, do a little length and then a little reverse just to secure it and then sew
29:29
along where you pinned all the way along that edge. Now seam allowances are up to
29:35
you really. Depends how big or small it ends up being. Just don't go too wild because I haven't allowed for that. So,
29:41
a half inch is really what I'm expecting you to use. Um, and I'm just going to sew the
29:48
other side. So, yeah, a half inch is a good size to use if you've cut things the same as
29:54
me. It should work out okay. Now, once you've done that, we're
30:02
going to then sew those together. So you can see I've positioned it so that the
30:08
bit we sewed and did all our fancy work on is in the middle of the lining. So we
30:13
get that bit at the edge which is just lining. Now just wiggle it and measure it until you get it exactly in the
30:20
middle. So you can see I've got 2 in at that end. So that's in the right place.
30:28
So now I need to check 2 in at the other end. Yes. So it is in the center. So, I
30:34
can happily clip those together. But it's important that you take the time to make sure you're right
30:42
in the middle with your cover. And then you're going to do the same at the bottom. Now, hopefully it's just going
30:48
to line up because you've done a good job at the top and you've been sewing it nice and squarely and everything's
30:54
great. But if not, just tweak it a bit. Okay. Got a little bit sticking out
31:00
there. So, I'm just going to cut that off. and then just pin or clip all the way. Now, you'll see I'm using large
31:06
clips because that's going to indicate the bit we don't sew. You must leave a hole for turning this out. So, that's
31:13
where I'm leaving my hole between those large clips. Make sure your hole is big
31:19
enough to turn it out through. And just place your journal there now. And just check, yeah, don't want to make too big
31:25
a seam or it's not going to fit. So, my half inch seams will be fine. If at this
31:30
point you realize you need you need to make a smaller seam, do don't go to all
31:36
this work and then it not fit. So I'm back to the machine and I'm doing my little
31:41
reverse and working my way over to my large clips and then I forgot what I was doing and set off again and then
31:47
remembered. So I should have stopped. So I'll just do a little reverse there. Just make sure you do do your reverse to
31:54
secure it because you're going to be putting a bit of strain on this hole. Now, all I'm going to do is because I
32:00
forgot, I'll just go a bit further than the yellow clip, and I'll still end up with a hole big enough, but yes, I don't
32:07
know what I was thinking. Anyway, what you're going to do, of course, now I've got the clip jammed in, is another
32:14
little section where you go forwards, little reverse, and away
32:19
again, and sew right to the end. So, of course, at either end, you're
32:25
sewing a bit which is just lining to lining. And that's fine. That's how it should be. They're going to form the
32:32
pockets that are going to hold the journal in
32:38
place. So, before you turn it out, just tidy it up. Any bits that you've left
32:44
straggling over, any threads dangling, and then at each of the corners, just
32:49
cut off some bulk. Make sure you don't cut your stitches, but you just get rid of some bulk. It'll all just sit much
32:55
more nicely and it'll sew better to be honest. And then it's time to turn it
33:03
out. Now, I tend to use a chopstick because you want something that's quite pointy but not too sharp to get into
33:12
those corners. Just get a nice corner. And then you can press it or not. The choice
33:18
is yours. It's up to you whether you press it and it might depend on what you've used. But
33:24
then what we're going to do is top stitch the whole thing because we want a
33:30
nice crisp edge. So just keep working it, making sure you get a crisp edge and either clip or pin that
33:36
edge. And obviously where we've got a hole, you're going to have to make sure you fold those seams in nicely.
33:44
And what you might find is as you work along here, you haven't quite got a straight edge. You don't quite get that
33:50
hole done right. And if that's the case, just come back, redo it. Make sure
33:55
you're happy before you go to the machine. And then you're just going to top stitch along those edges. You can
34:01
see how this is going to work. When I top stitch, I usually use a
34:07
slightly larger stitch on the machine. So I do recommend that. And
34:12
just keep your stitching. top stitching really close to the edge. It's literally
34:17
a decorative touch and to hold it all flat and stop things wrinkling and moving
34:25
about. And you can see I still do my little reverse. So, we're doing that along the
34:32
top and all the way along the bottom.
34:39
And I'm hoping you're starting to get really excited about your journal because it should be looking pretty good
34:45
by now. And when we take it off the machine, we'll be able to wrap it around
34:51
the journal and see exactly how it's going to
34:57
be. So, want the lining facing up and you can see that's going to work beautifully on that journal. It's just
35:05
going to fit nicely by the time there's a tiny seam to hold it in
35:11
place. So, when we put the journal down flat, that should just fit nicely at
35:18
either end. So, I recommend that you pin or clip your flaps in place like that to
35:25
make the little pockets, but you need to do it right on the edge cuz we're going to sew really near the edge.
35:32
So, let's just do the other one. And you can see I'm folding it
35:39
exactly where the lining meets the cover. And
35:45
that's where it should work out at. Now, if anything's gone a little ary, you may have to do some adjusting. So, you'll
35:51
notice I'm putting the book in even though I haven't sewn it yet. And if your clips come off, just put them back
35:57
on once you've got it in. But really, I'm checking, does it fit? The answer for me is yes. If it doesn't
36:04
quite fit, just adjust your pockets a little bit until it does fit. It doesn't
36:10
matter if your cover goes inside a little way or a lining showing on the outside a little bit. I'm sure you'll be
36:16
all right. So, now we need to sew those in place with a little seam. Really need
36:23
the edge. And just make sure they're lying flat before you go and sew them.
36:30
So, I tend to start on the fold and just do a few
36:36
stitches. Sometimes you might have to lift the foot to help it. Remember, there's a lot of bulk in
36:43
there. Now, then I'm going to reverse a little bit. So, I want it nice and secure. This bit really needs to be
36:50
secure cuz it's going to be what gets pulled whenever you're moving your book around or trying to get the book in the
36:57
cover. and then just run along to the edge of the pocket. And you're probably
37:02
stitching in your top stitch line. So, you won't even see these stitches. You won't notice them. And
37:09
then when you get right to the edge, a little reverse and back to the
37:17
edge. And then you can cut your threads. And that should make a nice
37:25
secure pocket edge. And you do that with all of
37:31
them. And then you will have a completed journal cover. So take your time to make
37:39
sure you get right to the edge and you do a nice tidy job hiding it in your top
37:46
stitching and not making it too small that it won't fit on your
37:55
book. You can tidy all your threads off as well as you go and then when you're finished and you're excited, it really
38:02
will be finished. And all that's left to do is to put your book in your
38:10
cover. So, I'm just going to pop mine in. Slide it in. You have to bend it
38:16
back a bit and just slide it in the other side. And well done. You've got a slow stitch journal cover. I hope you'll
38:23
enjoy it. And please look at all my other videos. Well done.
#Crafts
#Fiber & Textile Arts
#Fiber & Textile Arts