Up next in 10


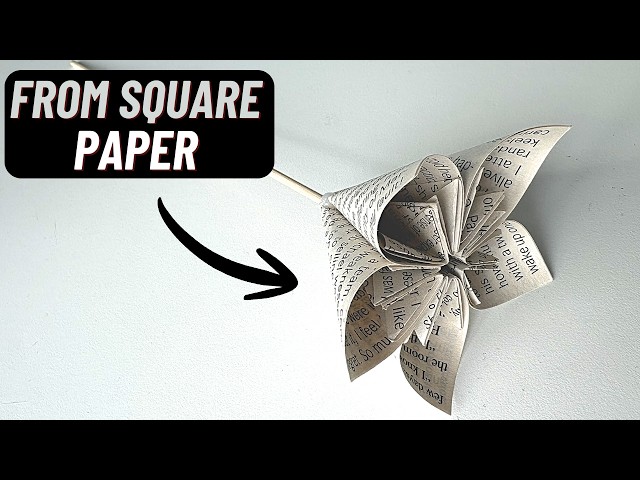
Learn how to make beautiful paper flowers from just squares of paper —
no special tools, no glue, no fuss! In this tutorial I'll show you how
to fold easy origami flowers using coloured paper OR old book pages
for a gorgeous vintage look. Perfect for home decor, gifts, or just
a relaxing crafting afternoon!
What you'll need:
✂️ Squares of coloured paper (or pages from an old book)
✂️ Glue
✂️ That's it!
These easy paper flowers are perfect for beginners and make stunning
DIY home decor or handmade gifts on a budget.
More Origami ideas 👇
https://www.youtube.com/playlist?list=PLJDvtpQDF0PdKXy3TQ-JGGlGPbhmPPX3a
#paperflowers #easyorigami #diypaperflowers #papercrafts #budgetcrafting
Show More Show Less View Video Transcript
0:00
What if I told you these beautiful
0:01
flowers cost nothing to make? All you
0:03
need is a square of paper, an old book
0:06
if you want to cut one up, and make
0:07
these stunning flowers. If you can fold
0:10
a piece of paper, you can make these.
0:12
And I'm going to show you step by step
0:14
how to make your own. So, let's get
0:17
started. So, you just need any old book
0:20
pages or bright colored paper. It
0:22
doesn't matter. Any paper you like, but
0:24
you need to cut up some squares. So,
0:26
you're going to need for each flower
0:28
five squares. Any size you like. Mine
0:31
are 4 in by 4 in. And it's just a really
0:34
nice size to work with. So, once you've
0:37
got your squares, the first thing you're
0:39
going to do is fold them in half. So,
0:41
we're going to run through what you do
0:42
with one and then you repeat. So, just
0:45
fold it in half along the diagonal.
0:48
Make sure you've got a good crease. You
0:50
can do that with your fingernail, the
0:51
back of a ruler, or a little tool like
0:53
I've got. And then fold each one of
0:57
those bottom corners up to the top
0:59
point. Again, getting a good crease.
1:02
Take the other one up to that top point.
1:06
So, you can see I'm just going to find
1:07
it easier by turning it. And that's
1:09
okay. You do it however it's easy for
1:12
you.
1:14
And give that a good press.
1:18
Now, take one side and open that little
1:22
flap. and then flatten it so that the
1:24
crease you made is up the middle. And
1:27
you'll end up with a kite shape.
1:31
And then the little triangle over the
1:32
top, fold it down in line with the
1:36
square that you started with. Again,
1:40
press it down nicely.
1:42
Fold along the crease that you'd still
1:44
got halfway across your kite.
1:49
And you've made that little shape, that
1:50
little flap. And then repeat for the
1:53
other side. So you open it up, flatten
1:55
it down so the creases up the middle,
1:58
make your kite shape, turn the top over,
2:02
and then fold it in half.
2:04
And you've got those two little flaps
2:06
now, one at either side.
2:09
So now we're going to form one petal of
2:12
our flower by gluing those together. Now
2:14
I'm just using an ordinary paper glue
2:16
stick. You can use any glue you like. My
2:18
philosophy is use what you've got and
2:20
see if it works. So just put it on one
2:24
side on one of those flaps and then roll
2:28
your shape round. We're not forming a
2:31
crease this time. We're forming a nice
2:33
curve and then squeeze those together.
2:36
So you can see I've put my fingers
2:37
inside to squeeze them together
2:40
so that I don't put a crease on the
2:42
other side. We're forming that nice cone
2:44
shape
2:46
which I'm sure you'll recognize from the
2:48
flower we had at the beginning. So you
2:52
can see we've got a lovely petal there.
2:56
And now what you need to do is get four
2:58
more squares
3:00
and repeat that whole process. So as if
3:03
by magic I will now appear with five.
3:07
And there we go. So now we're going to
3:09
glue those together.
3:12
So, back to the same glue. Take one of
3:15
your petals
3:16
and just put some glue along one side
3:19
against where they join together. The
3:21
two sides join together. And then take
3:24
another one. Doesn't matter which one.
3:27
Just pick one up. And glue that onto it.
3:32
Just so they line up. Just like that.
3:37
And that in the center there where
3:40
they're meeting,
3:41
that's going to be the center of our
3:43
flower. So, all we've done there is join
3:46
two petals together. And you can see
3:47
I've poked my fingers in again to
3:49
squeeze them together, get a good seam.
3:54
Now, if your glue takes a little while
3:55
to dry, you may have to keep waiting
3:57
between steps. That's a just trial and
3:59
error with your glue. But you're just
4:01
going to work your way around. So, we're
4:03
now adding the third one in exactly the
4:06
same way. Just take a moment to line up
4:08
so those centers meet exactly and you
4:11
get a nice point at the bottom of your
4:13
flower.
4:15
And then once you're happy those three
4:18
are all glued together,
4:20
it's time to take number four and glue
4:23
that on in exactly the same way.
4:26
Now, if you've been using book pages,
4:28
you may have also noticed I try and make
4:30
sure I've got plenty of writing on the
4:32
outside. So, it's worth looking at your
4:33
book pages before you start. It can also
4:36
be worth looking at what's printed on
4:37
the book pages. You can get caught out
4:40
there as well. So, when it comes to the
4:42
fifth petal,
4:44
I tend to just put a bit of glue on
4:47
either side of that petal and then feed
4:50
it in. There's no hard and fast rule,
4:52
but I've just found that's the easiest
4:54
way of getting that final one in
4:56
successfully.
4:57
So, then place it in. And this time
5:00
you're trying to line it up between that
5:02
first petal and the fourth petal. You
5:05
might just have to slide it a little bit
5:07
just to get it in. So this time you can
5:10
see I'm nipping both sides of the petal
5:12
to make sure it glues in properly.
5:16
And then that's it. We have a flower
5:20
completed just how you want it. And now
5:23
you can make as many as you like. How
5:24
about a dozen for a loved one or six to
5:27
go in a vase? It's entirely up to you.
5:30
But at the moment you've just got the
5:31
flower and you can use it like that. But
5:34
I'm going to show you two different ways
5:35
of turning them into flowers with stems.
5:38
So the first way is to take barbecue
5:41
skewers. So you just get a barbecue
5:43
skewer and put some hot melt or cool
5:45
metal glue on the end and poke it into
5:49
your flower. You could stick this in as
5:52
you're going, but I tend to put them in
5:54
afterwards. It's just the way I choose.
5:57
It's entirely up to you. And then you've
5:59
got a flower. And you can do them all
6:01
like that. But another way you can do
6:03
them is if you've got straws hanging
6:05
around, you could do them using a straw.
6:08
And the way I do these is to put a bit
6:10
of the glue onto the point of the
6:12
flower. And this time you're going to
6:14
need a little bit more glue. And I tend
6:17
not to put enough and have to add some
6:18
more. And then just place the straw onto
6:22
the base of the flower.
6:24
You'll have to wait for your glue to
6:26
dry, but it doesn't take long. And then
6:29
once it's secure, we can cover that
6:32
straw up if we want to. Now, if you've
6:33
used a green straw, you might be done.
6:35
But I like to wrap my brightly colored
6:37
straws. So, I've got some double-sided
6:40
tape, just a really fine one, and I'm
6:43
going to stick it from the top to the
6:44
bottom of the straw and just firm it on.
6:47
Now, remember, if you've got green
6:49
straws or even if they're bright colors
6:51
and you're happy with them, you're done.
6:53
But if you would like to cover those
6:55
straws so that no one can tell they are
6:57
straws,
6:59
then I do recommend just wrapping them
7:02
in something. So if you put some
7:04
double-sided tape on, you can wrap them
7:07
with pretty much whatever you like. So
7:08
you could use some twine or some ribbon
7:12
or anything you like. Now I'm going to
7:14
use florest tape and it's supposed to be
7:17
really sticky. I've got a batch from a
7:20
well-known online cheap shop that is not
7:23
very sticky at all. So, I've put my
7:26
double-sided tape, but if you're going
7:27
to put ribbon on, you're going to want
7:29
that double-sided tape anyway. And then
7:32
once you've got it secure on the base of
7:33
the flower, you're just going to keep
7:36
wrapping it around the straw all the way
7:39
till you get to the bottom.
7:42
Keep going. And then no one will ever
7:44
know there's a straw in there. It'll
7:46
just look like a stem. I get to the
7:48
bottom. I'm just going to cut it off
7:50
apparently really badly and just wrap
7:54
that end in.
7:56
So then that's how I've done them with
7:58
book pages, but also you can do them
8:01
with any paper you like. So I'm going to
8:04
show you some nice bright ones that I've
8:06
made. Some beautiful pink ones.
8:10
And you can see they look gorgeous in
8:12
any color and then maybe even some
8:14
lilacs and mix them together. They look
8:17
great in a vase, great in a little
8:19
bouquet to gift. So, I hope you'll enjoy
8:21
making your little origami flowers from
8:24
squares of paper.
8:26
Please let me know in the comments below
8:28
how you get on and what you're going to
8:31
do with
#Crafts
#Crafts
#Art & Craft Supplies