Up next in 10


There are all sorts of expensive home security systems with sensors, alarms, base units, and all sorts of complications. But what if you just want a single door sensor, perhaps for the front door of your apartment or storage unit? Tech expert Dave Taylor of https://www.AskDaveTaylor.com/ tests the standalone "Pumice" WiFi Door/Window Sensor with smarthome app and is surprised how well it does work... with some limitations.
Check it out on Amazon: https://amzn.to/2RsFdbh
Show More Show Less View Video Transcript
0:00
A standalone Wi-Fi door sensor? Let's have a look
0:10
Dave Taylor here and I'm looking at this. This is the Pumice Wi-Fi door window sensor and it's
0:16
actually really pretty simple. There's a control unit on the larger side. Let me pull it apart
0:21
And then there's a magnet on the smaller side. And basically when they're close enough that
0:26
the unit senses the magnet it considers it a closed position. If they come apart then it
0:32
becomes an open position. That's really kind of the core functionality. What makes this interesting
0:38
is there's enough circuitry inside here that it actually connects to your Wi-Fi network and
0:43
standalone without any base unit, without any control system. You don't need Z-Wave or Zigbee
0:50
or anything like that. By itself this is a Wi-Fi unit that you can then control from an app on
0:57
your phone and hook it up to your Alexa, Google Home or you can even use it with IFTTT which is
1:03
if this then that. So let's have a closer look. First off getting it all configured and set up is
1:10
not for the faint of heart. The instructions are okay but like so many of these devices there's a
1:16
little bit of experimentation involved. Here's what I found really weird is that this smaller
1:22
unit that just has a magnet has some very nicely designed little teeny tiny notches that with your
1:28
tiny screwdriver lets you make it easy to pop open. But why? You would never want to open that
1:35
The unit that you do have to open to put the two AAA batteries in does not have those notches
1:41
So you end up sort of struggling a little bit and hopefully not damaging it at all
1:46
But finally you do manage to get it open. Here's what the inside looks like and let me highlight
1:50
there's a little tiny reset button. You can see it in this photo and you're going to probably need
1:56
to push and hold that down until the little sensor light on the front flashes. Once it's flashing
2:02
then you can go into the app and the app is called Simple Home. Grab it for iPhone or Android and
2:09
once you get into the app and this is flashing then you can actually go and go through the steps
2:14
of actually pairing it and having the app know that the sensor exists. Once you've done that then
2:20
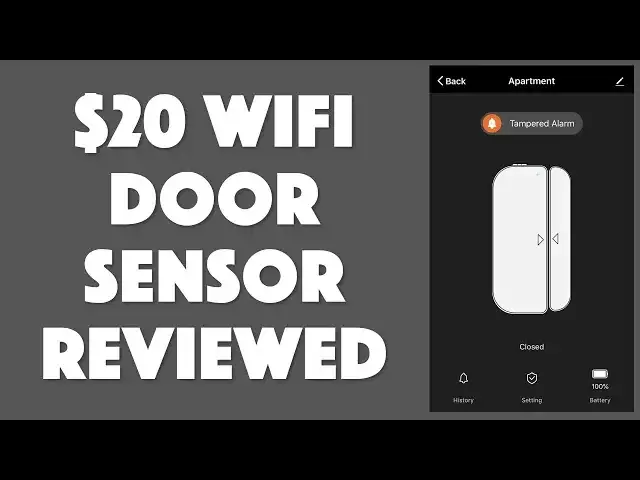
you can do nice things like rename it. So my usage case for this is my daughter lives in an apartment
2:27
near her college and I wanted to give her a door sensor that she would be able to know even if she's
2:33
in class if someone went into her apartment. Seems like a really good thing to know right? She lives
2:38
by herself. She doesn't need to have anyone else show up. So this would accomplish just that. So I
2:44
gave it the name apartment. Now here's what's really kind of nice is that once you're in the
2:49
app the app itself works pretty smoothly. So you can see when you're looking at the controller
2:56
it keeps telling me I have a tampered alarm. That's because on the back there's this little
3:00
sensor that if you push it's the equivalent of it sort of being stuck to a door or screwed onto a
3:06
door or window. So now it's not tampered but if someone were to pop it off because they don't
3:11
want that sensor to work anymore now it's in tampered state. So if I do this it is not tampered
3:18
Closed, open, closed, open. I mean that's pretty much what it does right? So also gives you a
3:25
history of all of these events. That's nice and of course the notifications pop up on your phone
3:30
so that's good too. Now it's really just a sensor. So it's funny I look on Amazon and people are
3:36
complaining it doesn't have a siren. It doesn't do this. It doesn't do that. It's not supposed to do
3:40
any of those things. It is literally just an open closed sensor. Heck you can put this on your fridge
3:46
if you're suspecting that your spouse is doing those midnight fridge runs. You would actually
3:51
have a record of that. Don't actually tell them I suggested this. I don't want to get in any trouble
3:56
there. But that's where these other tools like If This Then That, IFTTT come in really handy
4:03
So you could hook it up to something like that and you could say when sensor opens then turn on
4:10
lights in house or when sensor opens send me an email right. So there's a lot of different things
4:15
you can do if you want to change how it works and that's entirely legit. It's probably pretty smart
4:20
actually but just as a simple sensor is a simple way to know is someone in my house or did someone
4:26
open the door and close it. This is really really straightforward. Now one of the things that's
4:31
really important with these is how big a gap you can have because sometimes the way that doors or
4:36
windows work is you end up having things be a little bit off or maybe they're off on the
4:41
horizontal plane right. So that might be because if you have an angled window edge or something
4:47
and this lets you go within 10 millimeters. A 10 millimeter gap is fine. That's not much of its gap
4:54
but it's better than having to have them literally touch. So when you're installing it that turns out
5:00
to be really important. Otherwise that's pretty much all there is. Now I bought this. It's all
5:07
hooked up or it will be shortly all hooked up. It's all configured now to hook up but I will tell you
5:12
that this exact unit is listed as unavailable on Amazon. So the good news is that there are other
5:19
units that look so similar that they're probably from the exact same assembly line and they're all
5:24
in the same price point. But before we get to the price let me ask can you go ahead and click on
5:28
that subscribe button. I really appreciate when you subscribe to my channel and you know lets us stay
5:34
in touch. Let's us continue. Let me know that you're actually plugged in and you're paying attention
5:39
All good right. So this is the pumice wi-fi door window sensor and by the by I should point out
5:48
that in its little teeny tiny box it does come with both screw mounts and 3m two-sided tape
5:56
Now I'm a big fan of just using the tape to mount it onto something but you might want to actually
6:01
screw it on if you're so inclined. On the back there are little holes you can punch out. They
6:06
are sort of pre mostly punched and you can punch them out and you can use those for screwing it on
6:10
and I assume that's why in fact you would want to open up the smaller unit. But seriously guys
6:16
make the bigger unit easier to open because I'm going to have to deal with batteries right. So
6:22
okay this is the pumice wi-fi door window sensor available on amazon.com for $19.88
6:31
If you can't find this particular unit there are plenty of other units that offer exactly
6:35
the same functionality and it's a nice addition to a simple wi-fi I would argue security system
6:41
Even if it's just giving you notifications on your phone that still lets you know something
6:46
happened. Someone walked into your house. Someone opened your door. Someone opened a window
6:50
It might be you. You might be home at the time right but this way you'll know. So I'm a fan of
6:56
these. This one's a little tricky to get configured. I never did get it to work with Alexa or Google
7:01
Assistant. So it goes. I imagine with a little bit more trial and error I would have succeeded at
7:06
that. So that's all I got and I will say see you later and I'll catch you in my next video
#Home Safety & Security
#Home Automation
#Other
#Home Alarm & Security Systems