Up next in 10

Make stunning Images, Videos, & Audio with AI - https://lanhive.com
Show More Show Less View Video Transcript
0:00
In this video, you're going to learn how
0:02
you can make your first animation with
0:03
AI. Even if you have never made one
0:06
before, we are going to start from
0:07
scratch. And by the end of this video,
0:09
you'll be able to make something like
0:11
this.
0:11
Grandpa,
0:14
how is even hard to sit down these days?
0:16
Really
0:18
have some.
0:46
What's happening?
0:53
Do you have another one?
0:54
Fro, all the energy you need.
0:58
So to get started, you need a story. I
1:00
was inspired by Framer on Twitter. He
1:03
did something similar. So I wanted my
1:05
animation to be an advert like as you
1:07
saw. So the first thing I did was to
1:09
generate the initial image that is the
1:11
grandfather and the grandson. To do
1:14
that, you can use an image generator of
1:16
your choice. In my case, I'm using
1:18
Nanhive because it has all the tools
1:20
that I need for video generation, image
1:22
generation, and image editing. So once
1:25
you're on Nanhive, you just scroll down
1:27
to the image section. Then here you can
1:29
click on create photos. So I used Nano
1:32
Banana for the first image. So when you
1:34
go on the models here, there are a lot
1:36
of models you can use. In my case, it's
1:38
Nano Banana. Then for the aspect ratio,
1:40
I went with landscape and I used 2K.
1:43
This is the prompt that I used. I'll
1:45
leave all the prompts in the description
1:47
below. Basically, it's just the
1:49
grandfather and the grandson in the
1:51
living room about to hug and the style
1:54
is pixel style. So once you do that, you
1:57
just click generate. After doing that,
1:59
this is the image that I got. This is
2:01
the image that I liked. There are many
2:03
other images that I generated, but this
2:05
was the one that I liked. And in many
2:07
cases, this is going to happen. The
2:09
first image you generate might not be
2:11
the one that you end up using. So I'd
2:13
suggest generating a couple so that you
2:16
can choose from there. Once we have our
2:18
first image, we can use this image to
2:20
generate other assets. So for the other
2:22
images, I decided to go with a
2:25
storyboard workflow. So this is where
2:27
you generate multiple images in a grid,
2:29
then separate them from here. Let me
2:31
show you. So to do this on Nanhive, you
2:34
go to the images here, then you click on
2:36
edit photos. And I'm still using Nano
2:39
Banana. and the resolution is 4K because
2:41
you want the highest resolution as
2:43
possible because we're going to be
2:45
cropping these images. If you want, you
2:47
can generate a 2K then later on upscale
2:49
to 4K, 8K or something like that. Then
2:52
for the image, we're going to upload the
2:54
initial image that we generated, which
2:57
is this one here. Then for the prompt,
2:59
this is what we're going to use. So I've
3:01
used the JSON prompt here. Again, I'll
3:03
leave it in the comment section below.
3:05
And basically, we just want to generate
3:06
nine frames out of one image. And each
3:09
frame should be 16x9 aspect ratio. So
3:12
this prompt is going to describe each
3:14
frame. So you can see we have frame one
3:16
here, the things that are going to
3:17
happen in frame one. Then you have frame
3:19
two all the way up to the last frame
3:22
which is frame nine here. And once you
3:24
do that, you can just scroll down and
3:26
click edit photo. And after doing that a
3:29
few times, this is the image that I got
3:31
and this is the one that I liked. So you
3:33
can see we have nine frames here. So
3:35
we're going to extract each one of these
3:37
nine frames so that we can unmet them.
3:39
Now there are many ways in which you can
3:41
extract each one of these frames. One of
3:43
the ways you can do it is just to upload
3:45
your generated image here, the one that
3:48
has all the frames. Then ask Nano Banana
3:50
to extract this frame. Then you download
3:52
that one. Then you ask it again to
3:54
extract the second frame, the third one,
3:57
until you have extracted all the nine
3:58
frames. I found that this produces good
4:01
results. the quality is very high but it
4:04
consumes a lot of credits and it's a
4:06
very slow process. So instead what I do
4:08
is just to crop each one of these one by
4:10
one. So to do that on Lanhive you can go
4:13
to the image section again here scroll
4:16
down and click where it says crop image
4:19
here you can upload that image. Okay
4:21
that's our image there. Then you can
4:23
choose the target resolution. Since
4:25
there are a lot of them here and our
4:27
image is only in 4K we can just go with
4:29
1080p. Then make sure the aspect ratio
4:32
is 16 to9. Then here you can just adjust
4:35
your crop. And once you are happy with
4:37
the positioning, you can just click
4:39
export. Then you can just drag this one
4:42
for the second one. And you click
4:44
export. You go to the third one. Click
4:46
export. And all the way until you do the
4:49
last one, which is this one, and you
4:51
click export. So after doing that, you
4:54
end up with all the nine images that
4:56
came from this one image. So in our case
4:58
these are all the images that we have
5:00
extracted. At this point if you feel the
5:03
resolution is low you can go to images.
5:06
There's an option here to upscale the
5:08
image. But in my case I was happy with
5:10
the images. So I proceeded to the next
5:12
step. So we have our images. We have
5:14
everything we need. Now it's time to
5:16
turn those images into videos. And there
5:19
are number of ways in which we can do
5:21
it. So first of all on Landhive you go
5:23
to the video section here. You just
5:25
click on it. Then choose create video.
5:28
Here there are a lot of models that you
5:30
can use. And for this admission I used a
5:33
mix of models because each one has
5:35
different weaknesses and strengths. So
5:37
for high action you either use high low
5:40
or clean. So most of the times I was
5:42
using V3 solidance
5:46
1.5 and high low. And in most cases
5:49
these five will be enough. Whenever you
5:51
get a bad generation you can switch
5:53
between these to see which one gives you
5:54
the best results. So, we're going to
5:56
animate our frames one by one. For the
5:59
first one, we're going to upload our
6:00
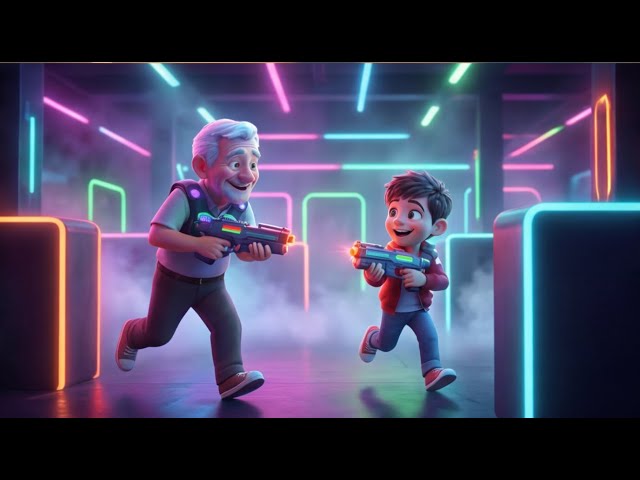
first frame, which is this one here. The
6:03
grandpa is about to sit down and the boy
6:05
has the drink in hand. Then, this is the
6:07
prompt that I used. The grandfather is
6:09
struggling to sit down. Then he says,
6:12
"Oh, how I miss the old days. Even hard
6:14
to sit down these days." Then he sits
6:16
down and sides. So since there's not
6:19
much going on in here and we're just
6:21
interested in the words that they're
6:23
going to say. I find that Sidance 1.5
6:25
Pro is very good with audio. So here on
6:28
the model drop down you just scroll down
6:30
and choose Cance 1.5. Then for the
6:33
duration just put it at 10 seconds. Then
6:36
here you can choose the options that you
6:38
like and also make sure that the aspect
6:40
ratio is 16 by9. So once you are okay
6:42
with all the settings you just click
6:44
generate. And after doing that, this is
6:47
the result that I got.
6:49
How is even hard to sit down these days?
6:51
Then using the same image and the same
6:53
model, I just change the prompt. So
6:55
using this prompt and the same model,
6:57
this is the result that I got.
7:00
Really
7:02
have some.
7:05
Oh.
7:05
Then after that, I repeated the same
7:07
process. This time now the grandfather
7:09
is dancing. So for this, I switched the
7:12
model to Sora 2. I think I used 8 second
7:15
on this one. And this is the prompt that
7:18
I had. M cutscenes of the old man doing
7:21
break dance while his grandson watches
7:23
in amazement. I had difficulties in this
7:25
one. So you can see the generations that
7:28
I tried. There's this one, that one
7:30
there. About five generations. So it
7:32
took me a while to get it right. What
7:34
ended up happening is that I got a cut
7:36
from this one and another cut from this
7:38
one. Combining them, I got what I want.
7:41
So I did the same for all other images.
7:44
You can see here my generations until
7:46
the last one. So at this point I had
7:49
animated all the images. It was time to
7:51
put them together. But before I could do
7:53
that I wanted to show the actual drink
7:55
that brought about this energy. So some
7:58
time back I made this imaginary drink
8:00
called Fruto. And here I wanted to
8:02
animate it. So just upload the image
8:04
here. Then in here I just want it to
8:07
drop on the fruits and make a splash. So
8:10
this is the prompt that I used. The Kent
8:12
drink falls on the fruits with a splash.
8:15
These are the settings that I used. And
8:17
once I was okay, I just generated and
8:19
this is the result that I got.
8:27
Then to accompany this video, I just
8:29
generated a short voice over. So I went
8:32
to audio here, then text to speech. So
8:35
this is the text that I want to turn
8:37
into speech. And I use Minimax 2.6 6D
8:41
here. For the voice, I used casual guy
8:43
here and everything remained as it is.
8:46
Once I did that, I just click convert to
8:48
audio and this is the result that I got.
8:52
Frutoo, all the energy you need.
8:55
So now that I have all the assets that I
8:57
need, it's time to put them together. So
9:00
you can do this using any video editing
9:02
software of your choice. In my case, I
9:04
used Cap Cut to put all of my assets
9:07
together. I added some music and some
9:09
simple effects. And after doing
9:11
everything, I exported and this is what
9:14
I got.
9:15
Grandpa,
9:18
how is even hard to sit down these days?
9:20
Really?
9:22
Have some.
9:24
Oh.
9:50
What's happening?
9:57
Do you have another one?
9:58
Frutoo. All the energy you need.
10:02
So that's how you can make your first
10:04
animated AI film. You start with the
10:06
best image. Then you turn your image
10:08
into multiple frames. In our case, we
10:10
did nine frames. Then you animate each
10:13
one of those frames and you put them
10:14
together using any video editing
10:16
software of your choice. So if you want
10:18
to try it, I'll leave all the links in
10:20
the description and the prompts that
10:22
I've used. And if you want to see how
10:24
you can generate your own song from your
10:26
own lyrics, that video is up here. I'll
10:29
see you over there.
#Comics & Animation
#Online Media
#Online Video