Up next in 10

React.js Firestore Project to Build Instagram Grid Image Gallery Using Cloud Storage & Framer Motion
Dec 22, 2025
Buy the full source code of application here:
https://procodestore.com/index.php/product/react-js-firestore-project-to-build-instagram-grid-image-gallery-using-cloud-storage-framer-motion/
Show More Show Less View Video Transcript
0:07
Uh hello friends today in this tutorial
0:09
I will be building a image gallery kind
0:12
of application inside uh reactjs.
0:15
So for the database side of the things
0:18
we will be using Firebase at the back
0:21
end and we will be using the realtime
0:23
database which is the latest fire store
0:27
and we will also be uploading images
0:29
here. You will see this is kind of a
0:31
Instagram grid like of structure image
0:33
gallery. So when you hover onto the
0:36
image you will see the image in a full
0:38
screen window. Here you can see the uh
0:40
image and then if you click outside this
0:43
it will go away. So there is a option to
0:46
upload the image to the database. So as
0:48
I reload the page you will see the
0:50
images will stay here. So we will have
0:54
this upload image here. Let's suppose I
0:57
upload this image. So there will be a
0:59
slight animation out there. You will see
1:01
that this is animation which is a
1:03
progress bar and this is uploaded here.
1:06
You will see all these images will be
1:07
there. Let me select this image. So once
1:11
again this will have this progress bar
1:13
and once again it will have some
1:15
animation and now your image is uploaded
1:18
here. So basically we are uploading this
1:20
image inside our firebase database. So
1:23
we are using the fire firebase cloud
1:26
storage for storing these images. So if
1:28
you refresh the page here inside your
1:31
reactjs application this is kind of a
1:33
image gallery kind of application. So we
1:36
are storing all these details inside
1:38
this uh images section here. If I
1:40
refresh it, you will now see we are
1:43
storing all these images inside this
1:46
array. 1 2 3 4 5. So also inside fire
1:51
store we are storing the links here of
1:54
each of the image files. Here you will
1:55
see that 1 2 3 4 5 6. So all these
2:00
images we are storing it the path of the
2:02
image. And after this we are just
2:05
iterating through inside our application
2:07
like here and we are displaying it. So
2:10
we will be building this application
2:11
guys from scratch.
2:13
So in ReactJS. So for building this
2:17
application I have written a complete
2:19
blog post on my video tutorials. So the
2:22
link will be there inside video
2:24
description. This is my blog post on
2:26
codings.com.
2:27
This is the blog post reactjs fire store
2:30
project. step-by-step instruction is
2:32
given with all the source code. So if
2:34
you want to follow along with the code,
2:37
you can go to the video description link
2:38
to get all the source code. So now get
2:41
let's get started guys. So before this
2:44
we need to simply stop this project and
2:47
create a brand new project.
2:50
So we will make a directory which is
2:52
React Firebase
2:55
project. I will go into this project
3:03
which is React Firebase
3:07
project.
3:10
So just open this inside your favorite
3:13
text editor. I'm using Visual Studio
3:15
Code Text editor. So right here guys the
3:17
very first thing you need to do is that
3:19
you need to initialize the npx create
3:22
react app and then you can give the app
3:25
name anything. Let's suppose in this
3:27
case I give here
3:30
test app.
3:32
So whatever name that you give here it
3:34
will create a reacts application inside
3:36
this folder. You will see that now it is
3:38
installing all these dependencies which
3:40
are ventured inside package.json. So
3:43
this will hardly take 5 to 10 seconds
3:45
guys depending upon your internet
3:47
connection. So it is just installing all
3:50
these dependencies which are needed for
3:52
the project. So just wait. It is
3:54
installing it.
4:02
So now node modules file has been
4:05
created guys.
4:18
So now it is installing these uh
4:20
ReactJS. You will see that it has
4:23
installed it.
4:25
So inside the source attribute we have
4:27
app.js.
4:29
So instead of this we need to simply
4:31
delete this all this stuff. We don't
4:33
need this. We also need to delete the
4:35
logo. So this logo this file setup file
4:39
we need to delete here. This is for the
4:42
testing purpose but we will not be
4:44
testing the application. So just delete
4:46
this app.t test.js file also. And inside
4:49
index do js you need to remove this line
4:51
which is bringing report vital and also
4:54
this one.
4:56
That's it. Now to start the application
4:58
it is very simple. We need to cd into
5:00
the folder and uh we will simply say
5:03
that npm start. So this will start a
5:06
local host server which will
5:08
automatically refresh whenever we make
5:10
any sort of changes. So it is saying
5:14
yes. Let me open this at
5:18
3001.
5:30
So nothing is there guys. We haven't
5:32
written anything here. So right here if
5:35
you see here app dot js. So nothing is
5:37
there. So nothing is printed out. So now
5:39
we will attach the first component which
5:42
of the application which in this case
5:44
will be title. So this will be the title
5:46
of the component. So as you know inside
5:48
source we will create another component
5:50
which will be called as coms for
5:52
shortcut. And then inside this we will
5:55
create a title.js file. So right here
5:58
guys what we need to do is that
6:02
inside the title if you see we need to
6:06
import the react dependency
6:13
and after this we need to make this
6:16
function which is con title
6:23
we need to return.
6:34
So we will be giving a class name to it
6:36
of title. So we will style all these
6:39
classes in the CSS. So
6:43
I will not write the CSS but I will copy
6:45
paste it and explain to you at the end
6:47
of the tutorial. So this will be the
6:50
having this H2 heading which is
6:52
fireground and after this we will have
6:55
the another heading which will be your
6:57
pictures which are uploaded.
7:02
So that's all that you want to do inside
7:04
this uh title component. Now you just
7:07
need to export this so that we can use
7:10
it inside another file. Export default
7:13
title.
7:15
So just close this file guys. So now we
7:17
can include this simply if you just
7:20
write the title here.
7:26
So if in the main file if you need to
7:29
import this it is very simple.
7:37
So we will simply say that
7:40
import
7:45
um title.
7:48
So which file we are talking about? We
7:50
are talking about this file. So
7:54
spelling a mistake here.
7:59
So we need to import the title method
8:04
from this file which is dot dot slash
8:11
sorry dot / components/title.
8:15
So from this file guys we need to import
8:17
this. So we have successfully imported
8:20
this. So now we can use this. So you can
8:23
simply say title
8:27
close it. That's it. Now basically if
8:30
you refresh it hopefully you will see
8:32
some change out there. Fire diagram your
8:35
pictures. So right here guys we need to
8:39
add the second component which will be
8:41
in this case will be upload form.
8:44
So right here inside coms folder we need
8:47
to create a second folder which will
8:49
allow the user to upload the form.
8:51
Sorry. Upload the file. So this will be
8:53
upload
8:56
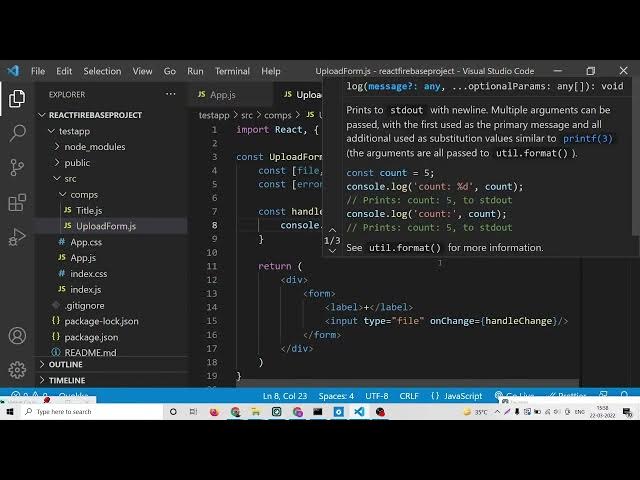
form js
9:00
upload
9:08
upload form.js. So right here guys once
9:10
again we need to import the react
9:13
library from the react framework like
9:16
this.
9:18
And after this guys inside upload form
9:23
there will be quite a number of things
9:24
which will be happening here. So first
9:27
of all we will create the function which
9:29
will be upload form.
9:35
So right here guys what we need to do is
9:36
that
9:40
we will declare some variables here for
9:43
file we will have set file
9:47
and the initial value we will use state
9:49
hook it will automatically gets imported
9:51
from react library and the default value
9:54
will be null guys. So basically we will
9:57
set the file which is selected by the
10:00
user the current value will be null and
10:02
then similarly we will have the error
10:05
message
10:06
and set error. This is again we we will
10:10
be having the use state hook.
10:15
So
10:17
we again pass the null here. Initial
10:19
value will be null.
10:22
So right here guys inside the return
10:24
statement if you see here we need to
10:26
return something to the user. So right
10:29
here
10:31
inside this div section
10:36
we can have a simple form.
10:41
So inside this form guys we will have a
10:44
simple label.
10:47
So the label
10:50
will be simply plus sign which will if
10:52
you click the plus sign you will able to
10:54
upload the files using a pop-up window.
10:57
So right here we will have a input type
11:01
of
11:03
so this
11:05
type file type attribute would be file
11:08
because we are uploading file here.
11:11
After this we will have a close this. So
11:15
now basically guys we are including this
11:17
in app dot js. So we can simply say that
11:20
import
11:23
upload form
11:26
from
11:28
coms upload form.
11:37
So it is saying that export default is
11:40
missing here. So basically if you see
11:42
here we haven't written the export
11:43
default statement at the very bottom of
11:47
this component. So right here we need to
11:49
write this statement. So we will say
11:51
export default
11:54
upload form. That's it. So now if you
11:57
write this line guys you will see upload
11:59
button here. Simply if you click this
12:01
button you will be able to see here. So
12:05
guys if you're watching the channel for
12:06
the very first time then please hit the
12:08
like button subscribe the channel as
12:09
well.
12:10
So
12:12
now what we need to do is that we need
12:14
to upload this file. So right here
12:17
inside our component we will give it a
12:19
on change. So when the file change
12:22
inside this component we will execute a
12:26
method which will be handle change. This
12:29
will be a custom method that we'll write
12:30
here write here at the top.
12:33
So this method will basically check
12:37
which file has been selected by the user
12:40
handle change. So this will have the E
12:42
parameter. So first of all we will say
12:45
E.prevent default.
12:49
This will prevent the autosubmission of
12:50
the form
12:56
or we don't need this. We are not
12:58
working with forms. So we will simply
13:02
console lock
13:04
e dot in order to get the selected file
13:07
we will simply say that e.target
13:10
this is a format e do.target dot files.
13:14
So files is the array. So we only need
13:16
the first file which is stored inside
13:19
indexing as you say starts from zero. So
13:22
we will put here zero. So we are just
13:24
console logging it just to check if it
13:26
is working or not. So basically if I go
13:29
to my inspect element click on choose
13:31
files select this file. So now you will
13:35
see that guys it will have all this
13:37
information of this file here which is
13:39
uh type which is PNG file here size name
13:43
all this information is there. So now we
13:45
can simply get this information and we
13:48
can display it. So right here we can
13:51
store this information some somewhere.
13:54
So we can simply say that uh
13:59
let selected
14:01
we have given a value to it. So now we
14:04
can process this value accordingly.
14:07
First value I will sec that check it
14:10
that if
14:12
selected
14:17
if selected
14:20
if the file exist and also
14:24
the second condition is very much
14:26
important guys
14:28
for this condition we we do need to
14:30
create a extension so we will only allow
14:34
images to upload
14:37
allow specifically PNG and JPG. So now
14:40
to construct this selector it is very
14:41
easy without you having to use any sort
14:43
of third party library. So right here if
14:47
you see we will declare a const types
14:51
array.
14:54
So if you give this to this uh
14:58
code here so we can simply say that uh
15:01
the type for PNG is image/png
15:05
and for the JPEG it is image
15:08
dot jpeg. So these are the two types
15:12
here which we need to compare it. So
15:14
right here guys we will simply say that
15:16
uh if selected and also
15:24
the second condition will which comes
15:26
out to be is types
15:31
include
15:33
includes
15:36
types doinccludes selected dot
15:39
dot type.
15:42
So that's it. That was a thing guys. So
15:45
basically it is checking if the file
15:47
exist if it is not null and also it uh
15:52
is only a image file either a JPEG image
15:55
or PNG image. So it is just checking it
15:57
after we can simply set the file
16:02
to the selected file
16:05
in the else block.
16:08
Now we can simply say that uh set file
16:11
will be null.
16:20
So we can console log this uh
16:25
file here
16:32
and also we can simply say error message
16:36
will be gone. Set error to nothing.
16:42
And if any sort of error take place we
16:45
can simply say set file to null and we
16:47
can simply say set error.
16:52
So inside this alert message guys we can
16:54
simply say to the user please select
16:57
only an image file.
17:02
So that's it guys. This is the function
17:04
which allows you to upload the
17:09
the images inside the firebase database.
17:12
You will see this is only interface out
17:14
there. We haven't touched the back end
17:17
code up till now. So what we can do is
17:20
that if I check here
17:23
so now you can see
17:26
we can different take inside this
17:29
pictures. So after this component guys
17:32
now it is working here. Now we will need
17:35
to create a folder here inside source.
17:38
So just create this folder guys and this
17:41
folder will be having a file called as
17:43
config.js. This is the information
17:46
related to your firebase project guys.
17:49
So in order to create a new Firebase
17:51
project you need to be having a Google
17:53
account and after that you need to go to
17:55
project settings and right here you will
17:58
see this is a web app
18:01
or you can click on add app and select
18:03
web application and you can give it a
18:06
simple name to your web application
18:09
test application.
18:14
Click on register app and after that it
18:17
will.
18:22
So now this gives you this uh very
18:25
critical code whenever you're building
18:26
for deploy application. You did not have
18:29
to use it.
18:35
So let me just copy paste this code
18:37
guys. So
18:40
copy and paste it.
18:43
So inside this config.js file, let me
18:46
paste it guys. So you will see that at
18:49
the very top we need to include some
18:50
dependencies here which will be Firebase
18:53
authent.
19:06
So we are talking a file called as
19:08
firebase.js guys. So I'm just seeing
19:11
this file where it was. Yeah. First of
19:14
all guys we need to import the firebase
19:18
actual library which is from
19:25
/ firebase
19:28
or we can simply say dot slash.
19:33
Oh, sorry. Here we just need to include
19:37
from Firebase SL
19:41
compat
19:44
slash
19:47
app.
19:51
And after this guys, we need to import
19:56
actual another module which is
19:58
firebase.compact.
20:00
If you see we need to surround this
20:02
inside
20:03
compact flash
20:06
storage.
20:08
So for this guys if you see here we do
20:11
need to install a module guys. So just
20:15
stop this server. So we need to install
20:18
uh firebase which is very much important
20:21
for this application for uh as a
20:23
database which is fire store. So just
20:26
install this. It will hardly take 5 to
20:28
10 seconds and it will install it. So if
20:31
you're watching it for the very first
20:32
time guys then please hit the like
20:34
button subscribe the channel
20:39
and one other dependency guys we are
20:41
using it if you in the title itself I
20:44
have written this library name which is
20:46
framer motion. So basically it is
20:48
helpful for animating uh applications
20:51
from different properties.
20:55
So you don't need to be having graphical
20:57
skills. You can just use this framework
20:59
inside your ReactJS application to make
21:01
the application even more standout.
21:04
So
21:07
the command is simple npmi
21:12
and the name I think I have given this
21:15
name framer motion framer fashion.
21:22
So, npmi install this also and uh it
21:27
will hardly take 5 to 10 seconds. So,
21:29
now it has installed it. So, once again
21:31
I can run the application.
21:40
So now if you just uh see here we have
21:44
the drop-down firebase/compact/
21:48
storage. Similarly, we need to import
21:51
Firebase.compact/fires
21:54
store the database.
21:57
So, these are the three three lines that
21:59
we need to import guys. After this, this
22:01
is your SDK. This will be different for
22:03
you. So, don't copy my information. This
22:06
is API key, authorization, domain,
22:08
database, URL, project ID. This will be
22:10
different for you. after you initialize
22:12
your app inside this.
22:16
So here we can simply say that uh
22:20
Firebase
22:24
dot
22:26
initialize app and then we can pass the
22:28
options which are present here which is
22:31
Firebase config.
22:35
So after doing this guys it is very easy
22:38
we can simply
22:43
yeah after doing this
22:47
we need to create a project storage
22:53
variable which will get the reference to
22:55
the firebase storage which is present
22:58
inside firebase dots storage method.
23:02
That's it. Similarly, we will get the
23:05
project fire store reference of the
23:08
realtime database. So, this is contained
23:10
inside firebase.fires store.
23:14
So after getting references to cloud
23:17
storage and fire store, now we need to
23:19
export these values guys to different
23:23
functions to so that we can use it and
23:26
also we need to give a time stamp. So we
23:29
will have a time stamp here.
23:33
So every event occurred which will be
23:36
captured. So we will simply say that uh
23:40
this is equal to fire store
23:45
dot
23:46
field value
23:52
field value
23:58
dot
24:01
server
24:03
server time.
24:06
If you see here server time stamp.
24:11
So with the help of this code guys, we
24:13
are getting the time st time stamp of
24:16
every snapshot second of the database.
24:19
So whenever the database returns some
24:21
values to it, it will also contain the
24:23
date whenever those data will created.
24:26
So now we simply need to export these
24:28
three methods sorry
24:30
three variables which is project storage
24:33
project fire store and timestamp
24:39
and now we can include this application
24:43
inside the component folder. So this
24:45
upload form is complete
24:52
and right here in the output itself guys
24:54
if you want to print out the output it
24:56
is very easy.
25:02
So if you see here
25:06
what we can do is that we don't need to
25:09
close here. So right here we can just
25:12
give it a
25:15
close right here just surround this
25:18
input field and here we can give a label
25:21
which is plus.
25:25
So if you refresh it now guys you will
25:26
see that
25:29
there will be a plus icon. So now we
25:33
were writing whenever what happens.
25:38
So if I try to
25:42
select a wrong file, I need to show the
25:44
message to the user. So first of all
25:46
inside curly bracket we will check if
25:49
the file is present
25:52
then we need to show.
25:58
So
25:59
we can show this inside a output class.
26:07
output.
26:09
So inside this output guys, we will
26:12
simply say if the error still exist
26:18
and also
26:23
we will show
26:27
the error message if any sort of error
26:29
message has been there. So here we can
26:32
simply say that uh
26:36
we will give it a class
26:42
error. So div class name error. So
26:47
inside this we will display the actual
26:49
error inside double curly brackets.
26:55
So this simply means that if any sort of
26:57
error take place then display that error
27:00
in the screen. The second thing that we
27:02
need to display guys if the file exist
27:06
then we need to
27:08
show the full case of
27:13
so here you will see we will have a div.
27:19
So now to
27:22
display this image it is very simple.
27:25
We only need to get the name. So we can
27:28
say file.name.
27:30
So this will get the name of the image.
27:34
So now basically if you refresh the
27:37
application you will find out what I'm
27:38
saying right here.
27:42
So we need to run this application at a
27:44
particular port number which is 30001.
27:47
So you will see as I refresh it, it is
27:50
just starting the server.
28:02
Some super chat
28:05
has come here which is Justin Vargas has
28:10
given 20 rupees. So thanks very much bro
28:13
for
28:15
for super chatting it. Highly
28:17
appreciated it. So we will make projects
28:21
like this. So thanks once again. If
28:23
you're new to the channel then please
28:25
hit the like button. You will see guys
28:26
if I choose a file here it will show my
28:29
show me the
28:32
name of the file here which is this one.
28:34
If I select a different file, this name
28:37
will change.
28:40
And uh if I select let's suppose a wrong
28:44
file, let's suppose I select a video
28:46
file.
28:49
Uh
28:53
this file I select you will see please
28:55
select only image file. If I select now
28:58
let's suppose uh image file.
29:02
Now this error will change. So now this
29:05
is working guys. So we are successfully
29:07
checking for the image file. The
29:09
validation is complete. Now we need to
29:12
add a progress bar here. Simple progress
29:14
bar. So basically guys I will copy paste
29:17
the CSS part. I don't need to write the
29:20
CSS full CSS because this will waste
29:22
your time. So you can go to the video
29:25
description link. I have written all the
29:26
source code and you will find this CSS
29:29
file here which you need to simply copy
29:31
paste inside your
29:34
first go to app dot CSS app dot CSS
29:37
simply paste this code
29:40
which is there and then you need to go
29:42
to our index dot CSS file for copy
29:46
pasting the CSS code for the
29:50
application. Let me paste it.
29:53
This is a code here index dot CSS. This
29:56
is the actual code CSS code of the
29:58
application styling purposes. So right
30:02
here go to index dot
30:05
CSS and paste it.
30:08
So this is the code guys. So now if you
30:10
refresh it.
30:16
So you can see this is the
30:19
the button is styled here. You will like
30:21
this. You can see button is styled.
30:25
It has got a orange background color. So
30:28
if you hit this button this will show to
30:30
you. So now basically we need to have a
30:32
progress bar which is shown to the user.
30:35
So now to have the progress bar we will
30:37
inside our upload form. So basically
30:40
whenever we see this
30:43
when the file exist
30:45
once again we will have a condition
30:47
here. So when the file exist then only
30:50
we need to show the progress bar to the
30:52
user which will be
30:55
progress bar we will make a new
30:57
component here which will be called as
30:59
progress bar. So we will make a new
31:01
component with the name of this and we
31:03
will pass this as a file prop.
31:08
So in react you can pass information
31:10
from one component to other component
31:12
using props.
31:14
We will pass two information. First is a
31:16
file and the second one will be the set
31:18
file method.
31:22
Set file. That's it. So now close this.
31:25
So right here we need to create this uh
31:28
component which is progress bar.
31:33
So right here inside this component guys
31:35
we need to import the react dependency
31:40
and uh
31:43
as you see we are sending this two
31:45
information to this pro uh component
31:47
which is the file actual file which is
31:48
uploaded and the method which is set
31:51
file which allows you to set the file
31:53
status
31:56
set file. So we are sending all this
31:58
information guys. So now we need to
32:01
write this progress bar.
32:04
So first of all
32:07
we will write this which is const
32:11
and this will be progress bar.
32:14
So this will contain this will be a
32:17
function and this will have the two
32:20
things that is given to us. First is a
32:23
file and second is set file. like this
32:26
we can catch this inside our component.
32:29
So after this guys we can simply
32:35
uh if you see here we will have a simple
32:39
return statement.
32:41
Inside the return statement
32:44
we will have a div
32:48
with a class name of progress bar.
32:54
So this will have a class of progress
32:56
bar. That's it.
33:00
And uh we will give it a style parameter
33:03
to it. So style will be equal to.
33:10
So right here what we need to do is that
33:12
guys we need to create a service which
33:15
will actually upload the file first of
33:18
all and show the progress to us. So
33:21
first of all we need to upload this
33:23
image to our uh Firebase project. Then
33:25
we will get the progress how much
33:27
progress is made. For doing this we need
33:30
to create a inside the source uh
33:33
property source folder we need to create
33:36
another folder which will be hooks. This
33:38
inside this hooks folder we will create
33:40
uh use storage
33:44
use storage dot js. So just create this
33:49
file guys which is use storage.js.
33:53
So right here
33:57
we will
34:03
uh uh we will first of all
34:09
make the service which is const storage.
34:16
So inside this file guys we will
34:18
actually get the file
34:22
so which the user needs to upload. So we
34:25
can send this file using our component
34:27
here progress bar. So right here we will
34:29
first of all call this
34:32
inside our progress bar. We need to
34:35
include this file here. Let me see.
34:40
So
34:44
we will call here this U storage later
34:46
on
34:49
use storage we will call here. So just
34:52
make sure that we first of all need to
34:54
upload this to the Firebase storage. For
34:57
uploading this we have written some
34:58
methods inside our Firebase file here.
35:03
If you see config we are exporting these
35:06
three variables. So now we need to
35:07
import this inside this file which is uh
35:11
progress bar sorry this uh use storage.
35:15
So right here we will import these three
35:17
variables from the file
35:22
which is dot / firebase
35:30
dot dot firebase
35:34
config. So inside this file guys we need
35:37
to get these three variables that we
35:39
have declared if you see
35:42
project storage project fire store and
35:45
this one.
35:47
So first one project storage
35:53
project fire store and time stamp.
35:56
So these are the three variables guys we
35:58
are importing it at the very top.
36:01
So right here inside this
36:05
we need to upload this image to the
36:08
Firebase storage.
36:11
So for doing this we will first of all
36:14
declare the hooks variable. First for
36:18
this storing the progress we will say
36:20
progress and we will set the method
36:23
which will set the progress to its and
36:26
here we will use the ustate hook. Use
36:28
state
36:31
sorry use
36:34
state
36:37
this is a hook that we will use
36:38
automatically it will be imported from
36:40
the react library so use state
36:44
so the current value will be zero of the
36:46
progress bar the second value we will
36:49
declare is the for the error if any sort
36:52
of error take place
36:56
set error
36:59
And the initial value of this will be
37:01
null.
37:07
And thirdly guys you will get the actual
37:09
URL downloaded URL of uh the uploaded
37:13
image. So basically once you upload the
37:15
image you will get the downloaded URL.
37:18
So similarly yes this will be null also
37:21
set URL.
37:24
So right here guys basically now we will
37:27
write our used effect
37:30
hook. So we will call use effect. It
37:34
will automatically gets imported right
37:35
here. You will see that and inside our
37:38
use effect hook guys.
37:42
So this function will automatically
37:44
trigger. And now the second property we
37:46
need to provide here the dependencies.
37:48
So basically whenever these dependencies
37:51
are fulfilled then only this function
37:53
will execute. So right here inside this
37:55
array you can provide the dependencies
37:57
for which you need to. So we only need
37:59
the file here. If the file is set if the
38:01
file has some value then only we will
38:03
upload this file here to the database
38:06
sorry storage. So here we will upload
38:08
the file to firebase storage especially
38:13
not file we are uploading image. We are
38:16
working with images. So upload the image
38:18
to firebase storage. So this code is
38:20
will be very easy guys. So
38:24
first of all we will have the storage
38:27
reference.
38:30
So storage reference and here we will
38:32
simply say project storage dot
38:37
and inside this there is a method which
38:39
is reference and here we will put the
38:44
name of the file which is contained
38:46
inside file dot name. So this will
38:49
create a uh reference inside the storage
38:52
reference. Here you can see that after
38:54
this
38:57
we need to put the file. So storage
38:59
reference dotput this is a method inside
39:02
firebase and uh then we will put this
39:05
file and after this guys this will have
39:08
a on method this is a trigger happens
39:11
automatically whenever you upload a
39:14
file. So now there's event called as uh
39:18
state changed in firebase. So basically
39:23
with the help of this you can get the
39:24
progress bar value how much progress is
39:27
made. So as a third argument there is a
39:29
snap object which is returned to you
39:31
which is snapshot. So Firebase
39:34
automatically take is takes the snapshot
39:36
every second and it returns to you. So
39:39
we will calculate the percentage or how
39:41
much percentage the download has
39:43
happened. So this can be equal to
39:48
the snap
39:50
dot bytes transferred
39:54
divided by by sorry snap dot total
39:59
bytes and we will divide sorry multiply
40:02
this by 100 to get the percentage. After
40:05
getting the percentage guys we can set
40:07
the progress
40:09
set progress and we will pass the
40:11
percentage. That's it. This is the thing
40:13
we need to do is that
40:16
and also if any sort of error take place
40:19
we can simply say that this uh error if
40:23
any sort of error take place then we can
40:26
simply say that set the error to error
40:31
like this and lastly we will have a
40:35
third function which will be a async
40:37
function.
40:41
So this will be a async function. So
40:43
after this it returns a call back
40:46
function when it is automatically
40:49
complete
40:51
uh uploading the file. This
40:53
automatically calls it. So images
40:58
finished
41:02
uploading to
41:04
Firebase storage. So that's why you see
41:07
this notification message sorry
41:08
notification function which is a call
41:10
back function which automatically
41:13
triggers automatically whenever image is
41:15
uploaded. So right here we can get the
41:17
URL of the image which is uploaded by
41:20
simply saying con URL and here we will
41:23
use the await keyword as this is a async
41:26
function. So we will simply say storage
41:29
ref dot download URL get download URL.
41:33
After getting the URL guys, we can also
41:35
create another field which will be
41:37
created at this will be equal to
41:43
timestamp.
41:47
So after this guys we can simply
41:53
set the URL which is set URL to URL.
41:57
That's it.
42:02
So just delete this for now. And
42:04
basically we are setting the URL here.
42:07
You will see that we are passing it.
42:11
We are setting the URL.
42:14
So this has successfully uploaded the
42:16
image to us. So you will see that
42:20
after you set this
42:22
now you need to return something back to
42:25
the user.
42:27
So after this let me just uh format the
42:31
document.
42:33
We need to return something to the user.
42:35
So for returning it
42:39
we will use our this curly brackets.
42:44
So we will write return.
42:48
So we will uh return three things. First
42:50
is the progress. How much progress is
42:52
made? Put a comma and the actual URL of
42:55
the downloaded image. Sorry. Uploaded
42:57
image and the actual error if it has
43:00
taken place. That's it. So now this is
43:04
complete guys. So we can move to the
43:05
progress bar component. So right here
43:08
inside this we can call this simply.
43:12
So if you see this
43:15
so
43:18
we only need the
43:21
we are sending here. If you see we are
43:23
sending three things here but we only
43:25
need the two things which is progress
43:27
and URL. How much progress is made and
43:29
the URL
43:31
and we will use the use storage
43:39
sorry use I think there is
43:43
method here which is
43:47
used storage.
43:49
Oh, I think we haven't exported this.
43:52
That's why the error has taken place.
43:54
So, right here at the bottom of the
43:56
screen, you need to export this also.
43:59
So, I really forget this thing to do
44:02
this. So, this is my fault here. So,
44:06
export default and then you need to type
44:09
here U storage.
44:13
That's it. So now we can import this
44:15
here inside our progress bar use
44:19
storage.
44:21
So this will automatically gets
44:23
imported. You will see dot dot /hooks
44:25
use storage. So right here guys we need
44:28
to
44:32
if you see here
44:34
use storage if you see which is a file
44:37
here progress bar. JS.
44:42
So after getting this guys we will pass
44:46
the actual file which needs to be
44:47
uploaded. So we will pass the file here
44:50
like this. So we also need to export
44:53
this component. So export default
44:57
progress bar. That's it. So now guys
45:00
inside this progress bar we need to show
45:03
the progress. It is very easy.
45:06
Uh but before that we need to set the
45:08
progress. So we will again use the use
45:11
effect hook. This will get automatically
45:15
imported from react.
45:18
So this function will automatically
45:20
triggers whenever your component loads
45:21
for the very first time. And first of
45:24
all it will check that if URL does exist
45:27
then only. So this dependency which will
45:30
be there
45:31
in arrays we need the actual URL of the
45:35
uploaded image and also set file method.
45:39
So basically once the
45:42
image is successfully uploaded we need
45:44
to hide the
45:47
or we need to reset it reset the form
45:50
once again. So for resetting it we will
45:53
simply say that set file
45:56
and we will pass the value null. That's
45:58
it. So now inside this progress we
46:02
simply need to I have given the progress
46:05
bar class and uh also you can give it a
46:12
style also.
46:18
So inside the style property
46:21
you can give the width property.
46:26
So this will be
46:29
go to the progress
46:35
I think this is a width property you
46:37
will see that so the width property will
46:40
be equal to
46:43
the progress and we will concatenate
46:46
percentage that's it
46:50
so
46:52
this will increase the width dynamically
46:54
you will see that.
47:00
So I think this is the way by which we
47:03
are assign if you see in this way we
47:07
assign styles to any selector here I
47:12
think. Yeah.
47:16
So we are attaching this progress here.
47:18
You will see dynamically. Let me now
47:20
test it. So it is saying that progress
47:23
bar is not defined. So right here
47:28
inside our
47:30
app dot CSS sorry app.js,
47:36
so so
47:41
where it is saying that pro upload
47:44
form.js progress bar is not defined.
47:49
So if you oh sorry it doesn't exist. So
47:53
let me write it once again progress bar.
47:58
So now if you write this it will
47:59
automatically gets imported here. You
48:01
will see that guys dot / progress bar.
48:06
So now basically if I refresh it it is
48:10
saying that fire store is not defined.
48:22
Uh where is the issue coming here? Let
48:24
me see guys. So
48:28
fire store is not defined.
48:32
Config.js in the this line.
48:42
Uh uh let me see.
48:46
This is the value here which is
48:56
just wait guys I'm seeing this why it is
48:59
happening here.
49:10
Oh fire sorry this needs to be firebased
49:13
guys. So that's why there was a problem.
49:16
So this needs to be firebase dot fire
49:19
store dot field value dots server time
49:23
server time stamp. So this needs to be
49:25
firebase.fires store dot field value
49:27
dots server time stamp. So just make the
49:29
slight modification.
49:31
So now if you refresh it, it will once
49:34
again say
49:36
fire store is not defined.
49:48
uh firebase.com
49:52
compat fire store.
49:57
So if you go to the video description
49:59
link guys I have written a complete blog
50:02
post here. Let me copy paste some code
50:04
here. So if you see here
50:14
I have written this code here. Yeah I
50:17
think I making a mistake out there. Let
50:19
me paste this code once again.
50:42
So now you can see guys it is compiled
50:45
successfully. Now no error is there. So
50:48
sometimes it can occur typing mistake.
50:52
So now basically if I hit this uh
50:56
now you will see some progress bar is
50:58
there. So if you see here, I think the
51:04
file will be uploaded. It will
51:05
automatically go down. You will see it
51:07
will let me now check here inside my
51:10
dashboard.
51:14
If you see my storage here, let me
51:17
delete all the files which are there
51:19
here. Let me delete this. Click on
51:22
delete.
51:25
So there are no files out there. Let me
51:27
upload a file here from this
51:30
application.
51:32
So click on this. Click on upload. So
51:35
this is a progress bar which is shown
51:36
here. You will see automatically set it
51:38
is uh I mean this. So now let me check
51:43
here. If you refresh it your Firebase
51:46
storage it will upload this file here
51:48
inside the dashboard. You can see this
51:51
is your file here. Screenshot 4.png. It
51:55
is successfully uploaded.
51:57
So now we simply need to display this
51:59
file guys inside our
52:04
so what we can do is that
52:09
uh right here if you see here
52:14
this is the upload form
52:18
and here we are showing our progress
52:22
bar. So now we need to display this file
52:25
which is very much easy. So for
52:28
displaying it we need to insert this
52:31
into fire store database. You will see
52:34
fire store database. We need to insert a
52:36
collection inside the table which will
52:38
store all the links. Let me delete this
52:41
collection which is images.
52:47
So now there is no collection out there.
52:49
So first of all guys you need to go to
52:51
the rules section and uh here you need
52:54
to give all the rules to read and write.
52:59
This is a rule here just enable your
53:01
fire store database.
53:03
And now
53:05
once your image is uploaded inside this
53:09
use storage.js JS you will see that
53:13
once you do this
53:16
so right here
53:18
once you upload the image to fire
53:20
storage we also need to get the
53:22
reference to the
53:24
firebase
53:26
fire store reference also so I this is
53:29
the file which is storage
53:32
let me go to this file just wait is
53:40
uh use storage. So the second line guys
53:44
you will see that we need to get the
53:46
collection ref collection
53:48
ref
53:50
and this for this one we will use the
53:53
project fire store and we will get the
53:57
reference to it
53:59
which is dot collection and we will
54:01
create a collection called as images.
54:04
You can call this anything but I will
54:06
call this images it will automatically
54:08
create create this if it doesn't exist.
54:11
So after this guys once it is once the
54:15
file is published once the image is
54:17
published here you will see if you get
54:19
the download URL so now we can insert
54:23
the link
54:24
inside
54:26
fire store database.
54:29
So for this we can simply say that uh
54:34
we can first of all create create
54:37
created at so this will be equal to
54:43
the time stamp variable which we have
54:46
exported. So this will uh hold the
54:49
current day and time of the uploaded
54:51
image
54:53
in a formatted way. After this we will
54:57
add this. We will use await
55:00
and then we will say collection ref dot
55:06
add. We will add a ref collection to it.
55:09
So this will be equal to the actual URL
55:11
of the image and comma and then we will
55:15
pass the second parameter which is
55:17
created at which is timestamp value.
55:20
After adding this guys we can simply set
55:23
the URL. That's it. So now if you do
55:27
this it will once again if you if I show
55:30
you here. So let me delete this uh
55:36
image here from the storage.
55:39
Let me delete this image. Click on
55:42
delete.
55:44
So once again start from scratch.
55:47
So if I
55:51
upload this image. So now if you see
55:54
here inside your Firebase storage this
55:57
image will be uploaded and also inside
55:59
the database the link of the image will
56:02
be there. If you see here fire store
56:04
database if I refresh it images
56:06
collection will be there and one
56:08
collection will be there and this is the
56:10
actual Firebase URL.
56:13
If you open this URL inside
56:17
if you open this this is the actual URL
56:20
where the image is hosted. So we are
56:23
successfully inserted this URL which is
56:25
automatically generated inside our fire
56:28
store database which is realtime
56:29
database and this is the created at
56:32
field here which is holding the current
56:34
day and time March 22, 2022 time is 4:41
56:39
p.m. which is the current time.
56:42
So in this way guys we are inserting the
56:44
URL also inside the database.
56:50
So after doing this guys,
56:55
so what we need to do is that
56:59
now we need to display this images
57:02
inside our screen.
57:05
So for displaying it, it is very easy
57:07
guys. What we need to do is that
57:11
after doing this,
57:15
we will move to the parent component
57:17
here which is app.js. You will see that
57:19
this is a component. After upload form,
57:22
we will add another component called as
57:24
uh if you see
57:29
uh
57:33
I will add another component which will
57:35
called as image grid. So we will be
57:39
having this component which is image
57:41
grid.
57:44
image grid.
57:48
So we will create this component inside
57:50
our uh this components folder which will
57:54
be image grid dot js. So in this the
57:58
images will be displayed in a Instagram
58:01
gridl like structure that is three
58:02
images per page sorry three images per
58:05
line followed by next three images in
58:08
the next three line. So right here we
58:10
will include this inside this if you see
58:15
image
58:19
grid.
58:24
So first of all we need to export this.
58:26
So that's why it is not coming here.
58:31
So if you go to the image grid component
58:33
guys let me write this image grid. So
58:35
basically this component will be used to
58:38
display the images.
58:43
Uh uh sorry image grid. Yeah. So first
58:46
of all we need to import the react
58:48
dependency guys inside this at the very
58:52
first line
58:53
and then we will make this function
58:56
which will be image grit
59:00
and the very first thing we will do is
59:02
that we will export this. So export
59:04
default image grid. So just do it and
59:08
now we can include this
59:11
inside of a parent component image grid.
59:14
So this will get automatically imported
59:16
from with this here you will see that.
59:19
So right here guys what we need to do is
59:20
that we need to pass some information to
59:22
it which will be the
59:28
so here we need to pass the
59:31
selected image. So right here if you see
59:34
here
59:37
we will declare a const inside our
59:40
parent component which will be selected
59:42
image
59:45
selected image comma
59:49
set selected image
59:54
set selected image
59:58
and we will use the ustate hook guys. U
1:00:01
state
1:00:04
U state
1:00:06
so it will automatically get imported
1:00:08
from the top here. So the current value
1:00:11
will be null guys. So you can see that
1:00:13
current value is null. So right here we
1:00:16
will pass
1:00:18
this method to this component which as a
1:00:21
prop. So this method will be set
1:00:25
selected image.
1:00:28
So we'll pass this method like this.
1:00:31
Set selected image is equal to selected
1:00:33
image.
1:00:39
And uh after this guys what we need to
1:00:42
do is that inside image grid we are
1:00:44
passing this method. Here you will see
1:00:46
selected image. So now we need to catch
1:00:48
this method. It is very simple.
1:00:53
So we will simply say this inside curly
1:00:56
brackets which is set
1:00:59
selected image.
1:01:03
So basically this is the method we are
1:01:05
extracting here.
1:01:08
So now we need to
1:01:13
display this image on the screen. So now
1:01:15
to display this it is very simple.
1:01:22
We will declare
1:01:25
con docs and inside this
1:01:29
sorry we will get this docs from a
1:01:32
service which will be returning all the
1:01:34
data to us which will be equal to use
1:01:36
fire store. We will create this service.
1:01:39
So use fire store and we will pass the
1:01:42
collection name here which is called as
1:01:44
images. So basically it is just saying
1:01:46
that give me all the images which are
1:01:48
contained inside a collection name as
1:01:50
images. So this is the images here. So
1:01:53
now we will use this service which will
1:01:56
we will create it inside the hooks here
1:01:58
the hooks folder. So we will say use
1:02:02
fire store
1:02:06
fire store.js
1:02:11
fire store.js shares.
1:02:14
So basically this service will be
1:02:17
responsible for uh fetching all the
1:02:20
images from the database. So this is
1:02:23
very much useful. So we will be
1:02:25
extracting inside the docs variable. So
1:02:28
now we need to create this service. It
1:02:30
is very much useful. If you see here
1:02:36
use storage. So the first thing we need
1:02:40
to do is that once again we need to
1:02:42
import
1:02:44
all the things that we imported from
1:02:48
this firebase doconfig file. So inside
1:02:51
this we got our use storage
1:02:55
use storage
1:03:00
use.
1:03:03
If you see here inside this we will just
1:03:09
copy this line
1:03:12
and paste it.
1:03:16
So we have imported all these three
1:03:17
variables which we have defined inside
1:03:19
this file. So you will see that.
1:03:22
So that's all we are doing here. After
1:03:24
this guys, we need to instantiate our
1:03:29
which is called as use fire store I
1:03:33
think
1:03:38
uh where it is called let me see
1:03:43
use fire store this one. So we need to
1:03:46
create a method here which is called as
1:03:48
use fire store
1:03:52
and this will
1:03:55
be having the collection name passed to
1:03:57
it. So basically the collection name
1:04:00
will be passed to this uh pro component
1:04:04
as a prop here you will see that. So
1:04:07
right here we will first of all declare
1:04:10
a
1:04:13
docs set docs. So this is the u use
1:04:18
state hook we will use here and
1:04:21
basically inside this guys we this will
1:04:24
be currently be empty. So this will be a
1:04:28
array of records which will be returned
1:04:30
and right here we will use the use
1:04:32
effect hook guys which will
1:04:33
automatically run
1:04:37
Whenever you have this dependency which
1:04:39
will be inside this array.
1:04:42
If you see here the state hook
1:04:47
if the collection is there if the
1:04:48
collection name is passed here if the
1:04:51
collection is set then automatically
1:04:53
this ustate hook will trigger.
1:04:57
So now the very first thing we need to
1:04:59
do is that
1:05:02
we need to surround this using a
1:05:04
variable here which is you can give any
1:05:07
variable name here.
1:05:09
So we will use the project fire store
1:05:11
variable and then use the collection
1:05:14
method here inside this and uh we will
1:05:18
pass the collection name which is
1:05:20
collection here like this which is
1:05:21
passed to us in the component
1:05:25
and uh
1:05:27
you can just
1:05:29
write like this. So if you just see here
1:05:33
just make it like this.
1:05:36
After this I will initialize to the
1:05:38
variable. So this is the collection
1:05:41
here. It's the actual collection. We
1:05:44
will also order order by by descendency
1:05:48
because we want the latest pictures to
1:05:51
be shown first. So we will order it by
1:05:54
created at this is a date field here and
1:05:57
this will be equal to descending order
1:06:03
and there is a on snapshot. So basically
1:06:06
it will give you the whole snapshot of
1:06:08
the table. So snap.
1:06:14
So inside this guys what we need to do
1:06:16
is that we will declare a documents
1:06:18
array which will be empty by default
1:06:22
and here we will use the for each loop.
1:06:25
So we will use the for each loop. The
1:06:27
array in this case is map.
1:06:31
So here we will say that for each
1:06:34
document
1:06:38
for each document we will get the data.
1:06:42
So we will simply say that documents
1:06:46
dot push
1:06:49
and we will push to the previous entries
1:06:51
which is simply we will have a object
1:06:54
here
1:06:56
dot dot dot this is
1:06:59
return operator here which is doc dot
1:07:03
data which will actually get the data
1:07:06
and then the id which is id is equal to
1:07:09
dog do ID that's it.
1:07:14
So after this guys simply you need to
1:07:20
set the documents here which is set docs
1:07:22
which is a use state method and here we
1:07:26
will simply pass the documents.
1:07:30
We will initialize it to the document
1:07:32
say that's it. That's all you need to do
1:07:35
guys inside this simple method. We are
1:07:38
fetching the whole connection here. We
1:07:40
are ordering it by descending order.
1:07:42
Then we are taking the full snapshot. We
1:07:44
are using the for each loop. Taking the
1:07:47
actual data, taking the ID of the data.
1:07:50
And then lastly setting it to the use
1:07:52
state function here like this. So once
1:07:54
again we need to surround this in using
1:07:56
a method here sorry field here like this
1:08:00
variable name. And lastly,
1:08:04
if you see
1:08:07
after this, we just need to say return,
1:08:11
you just need to write this line. It is
1:08:13
very much useful.
1:08:16
You need to call this function right
1:08:18
here. Unsubscribe.
1:08:20
So what you call this variable name?
1:08:22
Just call this function. That's it. This
1:08:25
is very much important. So now this file
1:08:28
is complete guys. So at last we need to
1:08:32
return something. So we can return the
1:08:34
documents actual documents
1:08:36
which is return docs. That's it. We are
1:08:39
returning the actual docs here like
1:08:41
this.
1:08:45
And now guys we are getting this inside
1:08:48
our you will see that we are getting
1:08:51
this inside uh the image grid component.
1:08:55
So image grid. So we have successfully
1:08:58
got our docs here.
1:09:03
So you will see that image grid
1:09:05
component
1:09:09
after getting this docs here we will
1:09:13
return something here we will show the
1:09:15
images on the screen. So here
1:09:20
we will have a div
1:09:23
which will have a class name of image
1:09:25
dash grid. So all these classes are
1:09:28
already styled here inside the CSS file.
1:09:31
You can just find out the styles
1:09:33
and uh here we are checking if the docs
1:09:37
are set. Then we will display our uh we
1:09:42
will map we will make sure we will use
1:09:45
the maps operator.
1:09:48
As this is a array for each document
1:09:53
we will show
1:09:55
a div
1:09:57
which have a class name of
1:10:01
image dash wrap.
1:10:09
So just close this div here.
1:10:13
We also we need to give it a key
1:10:15
parameter which will be the actual id
1:10:18
that we have doc id. That's it.
1:10:27
And uh basically it is saying that when
1:10:30
we click it.
1:10:40
So
1:10:42
yeah after this div here inside this div
1:10:46
or you can say that inside this div we
1:10:48
will have a image tag.
1:10:56
So you can put this tag here like this.
1:11:02
So inside this we will have a image tag.
1:11:05
The source will be equal to
1:11:11
doc dot url.
1:11:15
So that's it. So we can give it a alt
1:11:18
parameter to it of uh uploaded pick
1:11:25
and uh that's it. Just close this. So
1:11:29
now if you see here if you just see open
1:11:33
your uh
1:11:36
browser you will see some error is there
1:11:38
which is saying used fire store is not
1:11:40
defined.
1:11:42
Imaggrid.js JS it is saying use fire
1:11:45
store is not defined.
1:11:49
Image grit use fire store. Oh sorry we
1:11:52
need to
1:11:55
use fire store. We need to export this
1:11:57
also. So every time I forgot this line
1:12:00
to add export default use fire store.
1:12:07
So now we can use this. Simply type for
1:12:10
use fire store.
1:12:13
That's it. This is the actual service
1:12:16
which is deployed here.
1:12:18
Use fire store. It is not. Let me
1:12:21
refresh it once again. Sometimes it can
1:12:23
happen. So now you can see no error is
1:12:26
there. So if I now refresh.
1:12:33
So it is uploaded.
1:12:40
Let me see here.
1:12:47
Some error is there. Let me see.
1:12:51
Image grid. Nothing was returned for
1:12:54
from render.
1:13:01
Uh let me see return.
1:13:19
If you see the set selected image, if
1:13:23
you see that
1:13:29
this is the return statement.
1:13:47
uh just wait guys I'm just seeing this
1:13:49
why it is taking this error I think
1:13:52
there is some kind of error out there
1:13:54
inside the loop
1:13:57
so if you see here.
1:14:03
I think I got this error.
1:14:05
This needs to be
1:14:14
uh
1:14:19
parenthesis parenthesis
1:14:30
So what can I do is that guys I can
1:14:32
simply copy paste this code here which
1:14:34
is given for image grid tag. If you see
1:14:38
I have written all the source code in
1:14:39
the video description. I think some kind
1:14:42
of typing mistake is there. So that is
1:14:44
why it is taking this. I don't want to
1:14:47
waste your time. So I just need to
1:14:51
I think this is the problem here. So let
1:14:55
me paste it here.
1:15:01
This is a return statement.
1:15:03
Yeah, let me paste it.
1:15:06
So right here and right here. Paste it
1:15:09
here.
1:15:11
So
1:15:13
this needs to be a div here.
1:15:17
im.
1:15:24
So now hopefully it will. So let me
1:15:27
remove all this.
1:15:38
So now let me see if it is working or
1:15:41
not.
1:15:47
So now guys you will see it will display
1:15:49
this image here automatically when you
1:15:51
load the page for the very first time.
1:15:53
It is grabbing all the images which are
1:15:54
there inside the database. So you will
1:15:57
see only one image is there. If I
1:15:59
refresh it.
1:16:07
So if you see two images are there. Let
1:16:09
me just delete all this collection here.
1:16:11
Start from scratch.
1:16:14
So he let me delete this. So delete
1:16:18
and the storage here also I delete all
1:16:21
the images which are present. Click on
1:16:24
delete and uh
1:16:28
start from scratch.
1:16:32
So basically if I now upload image here
1:16:36
it will have this progress bar animation
1:16:38
here. You will see that.
1:16:42
So now this image will be uploaded.
1:16:46
Just wait.
1:16:48
Image is uploaded. If you refresh now
1:16:51
this image will stay because it is
1:16:53
coming through database. Once again I
1:16:56
select the second image. It will upload
1:16:58
this.
1:17:00
So now there will be two images out
1:17:02
there.
1:17:06
Uh
1:17:07
why it is showing only one image? Let me
1:17:10
see.
1:17:21
Uh why it is showing only one image? Let
1:17:25
me see.
1:17:37
Uh let me paste this code also guys. I
1:17:40
think some kind of mistake can be
1:17:43
happen. If you see use store method, use
1:17:47
fire store. Let me paste it this method
1:17:51
here.
1:17:59
So paste it.
1:18:03
And this image grid also let me paste it
1:18:05
once again. is image grit.
1:18:16
So the link will uh link of all the
1:18:18
source code will be there inside video
1:18:20
description. So let me
1:18:32
delete this. So
1:18:46
if I refresh it,
1:18:49
use fire store.js does not match the
1:18:51
corresponding name of disk.
1:19:03
Use fire store.
1:19:06
Use fire store.
1:19:17
Use fire store.
1:19:24
Use fire store.
1:19:35
use fire store.
1:19:40
So now let me see.
1:19:43
So now you will see that guys
1:19:44
automatically these two images are shown
1:19:46
to the user because if you see inside
1:19:49
the database if I show you the database
1:19:53
exactly two images are there you will
1:19:54
see that two images are there. So
1:19:57
basically if I add one other image here
1:20:01
third image the progress bar will be
1:20:03
there automatically this image will be
1:20:05
added here. If I add the fourth image,
1:20:10
it will once again add this image, the
1:20:13
fourth image like this. So now basically
1:20:16
I need to click on the individual image
1:20:18
to open it inside a model
1:20:20
window. So this will be very easy. We
1:20:24
need to create a simple component for
1:20:26
this which will be model.js.
1:20:30
So just create this. We will once again
1:20:35
import the React library
1:20:38
from React
1:20:40
and also
1:20:43
basically we will create this
1:20:45
which
1:20:47
we will create this uh component
1:20:50
function and right here inside this
1:20:53
component section guys we will
1:20:57
receive two properties which will be set
1:21:00
selected image
1:21:02
and selected image.
1:21:06
So these two methods which we'll be
1:21:09
receiving. First is this is a method and
1:21:11
this is the actual image which is
1:21:12
selected. So basically here inside this
1:21:15
component we will
1:21:19
return a
1:21:22
basically we will return here a div
1:21:27
which will have the class name
1:21:30
backdrop.
1:21:32
So these are all the bootstrap or sorry
1:21:34
CSS classes which we have defined. So
1:21:37
basically when you
1:21:40
inside this we will have a image
1:21:45
and uh the source will be equal to the
1:21:48
selected image
1:21:52
selected image. So close the image tag.
1:21:59
That's it.
1:22:02
And now
1:22:04
basically if you click this div tag
1:22:07
here, if you click on click,
1:22:10
we will say handle
1:22:13
image click. So what here we need to
1:22:16
create this function here at the very
1:22:18
top here.
1:22:20
const handle image click. This will be a
1:22:24
function.
1:22:25
So right here guys, this has the e
1:22:28
parameter automatically passed to it
1:22:30
which is event parameter. So basically
1:22:33
we will check
1:22:35
that uh if the div is clicked or not. So
1:22:38
we can check it inside e.target
1:22:41
dot class list
1:22:44
and uh dot contains.
1:22:48
So we need to uh just
1:22:51
search for the class called as dot
1:22:53
backdrop.
1:22:55
So basically it will exactly tell me
1:22:57
that if this div is clicked or not. So
1:23:02
if the div is clicked then only
1:23:06
we need to set the selected image to
1:23:10
null. We need to close the window the
1:23:14
pop-up window.
1:23:16
That's it. So now this component is
1:23:19
ready. We need to export this component.
1:23:21
So export default model.
1:23:25
So right here we need to include this
1:23:28
inside of uh our image grid.
1:23:33
So inside our if you see here where we
1:23:37
need to include this
1:23:43
I think we need to include this
1:23:54
uh this component we need to include
1:23:56
this in the parent component I think.
1:23:59
Yeah I need to include this inside
1:24:01
parent component. Just go to the app.js.
1:24:06
This is app.tjs. So right here after you
1:24:10
upload it inside the image grid, we will
1:24:14
first of all check that if the selected
1:24:16
image is selected,
1:24:19
then only we will show this model
1:24:21
window. And so the component name is
1:24:25
simply
1:24:31
so we will say that model.
1:24:36
So this will get automatically included
1:24:38
here. You will see model from components
1:24:41
model. So here we need to give two
1:24:43
properties to it. First is the which is
1:24:45
the image selected. So we will say that
1:24:48
uh selected image
1:24:54
and also we will pass the method which
1:24:56
is set selected image
1:24:59
which is equal to set selected image.
1:25:01
That's it.
1:25:04
That's all guys. If I think the
1:25:07
application is now complete. Hopefully
1:25:09
if I test it now. If I click on the
1:25:12
individual image.
1:25:17
Let me see if it is working.
1:25:27
It is not showing it properly. Let me
1:25:30
again do it.
1:25:44
uh set.
1:25:47
I think if you see we have passed this
1:25:52
set selected image here also.
1:25:58
Set selected image to set selected. Oh,
1:26:01
sorry. Here we need to pass set selected
1:26:04
image. We have passed it set selected
1:26:07
image. Just make the slight
1:26:09
modification. We are passing this set
1:26:11
selected image. And right here we
1:26:14
haven't
1:26:16
this needs to be
1:26:20
let me go to the image grid component
1:26:22
here. If you see
1:26:24
we haven't made this modification.
1:26:30
uh this one if I go to my source code in
1:26:34
the video description you will see that
1:26:36
what I'm talking about
1:26:40
uh this one
1:26:43
where is the file let me see
1:26:49
let me see image grid
1:26:55
so here
1:26:59
this is the file guys. So right here.
1:27:06
So yeah. Yeah. When we click this, so we
1:27:09
need to bind this
1:27:13
URL here. So when we click this image
1:27:15
here
1:27:19
inside on click inside this div here, we
1:27:24
need to bind this on click here like
1:27:27
this.
1:27:31
like this. So we are uh setting the
1:27:35
selected image whichever image is
1:27:36
selected here we are putting the URL of
1:27:38
the image here that's it.
1:27:43
So after this so whatever is the
1:27:46
selected image we are opening it in the
1:27:48
model window.
1:27:50
So now if you refresh it now hopefully
1:27:53
this should this should work.
1:27:57
Now the image is opened in a model
1:27:59
window. You will see if I click the
1:28:01
image nothing will happen. If I outside
1:28:03
outside click here this will hopefully
1:28:06
it should close but it is not closing
1:28:08
it.
1:28:11
Uh let me see why it is not closing it.
1:28:17
Set
1:28:19
selected image.
1:28:24
This is the model one.
1:28:32
Backdrop
1:28:37
handle image click.
1:28:45
I have written this code here guys. So I
1:28:48
think let me paste it code.
1:28:55
This is the model. I think this is
1:28:59
model.js
1:29:09
where is the model.js. Let me see.
1:29:48
If you're watching this video for the
1:29:50
very first time guys, then please hit
1:29:51
the like button, subscribe the channel
1:29:53
as well. So you will see that
1:29:58
I think we are making some kind of
1:30:00
mistake out there which is
1:30:17
so once again if I refresh it
1:30:34
Uh let me see guys what is the problem.
1:30:36
Let me match the code here step by step.
1:30:40
Handle click
1:30:44
uh if e.target Target
1:30:49
class list dot contains
1:30:52
the backdrop. Then
1:30:57
the selected image will be
1:31:01
set. Selected image will be null.
1:31:43
Let me paste this code guys. I have sent
1:31:45
this code.
1:31:48
I have this code written here. Let me
1:31:52
I will take some time of yours. So
1:31:57
this is a code I have written here. So
1:31:59
you will see this
1:32:01
full code. This is uh for the
1:32:05
model here. Let me paste this code here.
1:32:17
Sometimes typing mistake can happen. So
1:32:20
that's why you will see.
1:32:45
So now if you refresh it.
1:32:48
So now you can see now if I click on the
1:32:51
image it will not close. If I click
1:32:53
outside it will close.
1:32:56
So now guys the application is complete.
1:32:59
Now we can add some animation to it. So
1:33:01
for animating the application we are
1:33:03
using a application sorry frame motion.
1:33:08
So this is the website we are using it.
1:33:11
So we have installed the library
1:33:14
framework motion. So to apply this it is
1:33:16
very easy.
1:33:19
So
1:33:21
first of all we will apply to
1:33:25
uh this uh
1:33:27
image tag. So we can apply to the image
1:33:31
tag very simply. If you just see here
1:33:35
right here we need to import this
1:33:36
library at the very top. Import motion
1:33:39
from framer motion. So now to make this
1:33:43
tag
1:33:45
we can change it to motion. this. So
1:33:48
just make the slight modification to
1:33:52
have this. There are some properties out
1:33:54
there which you can do this. The first
1:33:56
property which allows you to the initial
1:34:00
property
1:34:01
initial animation.
1:34:03
So this will take any CSS property that
1:34:07
you want to pass to. So we will take the
1:34:09
opacity property. we will in animate
1:34:12
from zero opacity to one opacity.
1:34:18
So opacity now will be one.
1:34:30
So that's it. And for the image we will
1:34:33
now
1:34:35
again do the same thing initial.
1:34:39
And this time I will target the y
1:34:41
property yaxis. And uh here we will give
1:34:45
a
1:34:47
minus 100 vh.
1:34:51
And then we will animate it to its
1:34:54
actual position.
1:34:58
Y
1:35:00
is equal to zero.
1:35:03
So now you will see some kind of
1:35:05
animation happening guys. So if I
1:35:07
refresh the application.
1:35:10
So basically if I click the button you
1:35:12
will see some animation is happened
1:35:16
like this. So in this way you can create
1:35:19
this animation.
1:35:23
So same thing we can do this for uh if
1:35:27
you see
1:35:33
same thing we can do it for uh all the
1:35:36
components we can have the image grid
1:35:40
component attach you can see you can go
1:35:43
to the image grid component.
1:35:48
So once again in include this line and
1:35:51
just again make this motion dot div
1:35:58
text
1:36:00
and also motion dot image
1:36:03
and for the this one
1:36:07
we can put a layout property here. So
1:36:10
this is a very good property which is
1:36:12
layout which makes it very much anim uh
1:36:15
which makes it very much smooth. So if
1:36:18
you add this also so what will happen is
1:36:21
that if you upload a let's suppose a new
1:36:24
image.
1:36:26
So now you will see how it automatically
1:36:30
have a a good animation very you see
1:36:34
this animation in Instagram also or any
1:36:36
sort of image gallery kind of
1:36:38
application. So a very subtle animation
1:36:41
happens. You will see that
1:36:46
like this. So by adding the single
1:36:49
property we can achieve this effect. So
1:36:52
the next one is very simple which is
1:36:55
when you hover onto the image while
1:36:58
hover all these properties are there. So
1:37:01
you can change the opacity level of the
1:37:03
image to one.
1:37:06
That's it.
1:37:09
So if you refresh it now.
1:37:13
So now basically if you hover onto a
1:37:16
image
1:37:18
so you will see opacity is changed here.
1:37:20
Some effect is there. You'll see that.
1:37:24
So another thing you can do this
1:37:32
on the images
1:37:34
part what you can do is that
1:37:39
we can have a initial property.
1:37:42
So this will be equal to the opacity
1:37:46
which will be equal to zero.
1:38:00
Initial property
1:38:04
opacity will be equal to zero.
1:38:09
Then we have our animate property. This
1:38:12
will animate to
1:38:14
opacity to
1:38:17
one. And we will have a slight delay.
1:38:20
delay here we will have a slight delay
1:38:23
which we can do this using transition.
1:38:28
So transition basically inside this we
1:38:31
will have a delay property which will be
1:38:34
having 1 second of delay. So now if you
1:38:37
see that guys
1:38:46
if you add a next image.
1:38:50
So slight delay and now you will see
1:38:52
that now it has automatically fades in
1:38:56
like this. This is a thing here. And
1:38:59
last but not least we will have the
1:39:01
progress bar animation. Basically you
1:39:02
will see there is no progress bar
1:39:04
animation.
1:39:06
typically has no progress for animation
1:39:14
you will see. So we will go to the
1:39:17
progress bar module here like this. So
1:39:19
once again what you need to do is that
1:39:22
inside the progress bar
1:39:27
if I see the progress bar where is this
1:39:30
progress bar?
1:39:36
Yeah. So once again we need to convert
1:39:39
this to a motion
1:39:42
div
1:39:48
like this.
1:39:51
So we can import
1:39:53
motion from
1:39:58
framer motion like this. So right here
1:40:01
what we can do is that instead of
1:40:03
writing like this
1:40:07
we can write
1:40:10
like this. So the initial will start
1:40:13
two.
1:40:16
So the width will be zero.
1:40:22
And this will animate up to
1:40:27
the width which will be dynamic. So in
1:40:30
this case it will be progress
1:40:34
plus
1:40:36
percentage. That's it. That's all guys.
1:40:39
This is whole application which is
1:40:41
there.
1:40:46
If you now see the progress bar
1:40:47
animation, you will see it has now got
1:40:49
this subtle animation.
1:40:53
So this is a fully featured uh image
1:40:55
gallery application that we have
1:40:56
developed inside Firebase and uh
1:41:00
uh ReactJS application. For the Firebase
1:41:03
we have used uh fire store database
1:41:05
realtime database and the cloud storage.
1:41:08
All the source code regarding the
1:41:10
application guys I have given in the
1:41:12
video description link. just go to it
1:41:14
and download all the source code. And
1:41:16
thanks very much for watching this video
1:41:18
and I will be seeing you in the next
1:41:20
video.