Up next in 10

How to Deploy React 19 Vite Project to Netlify With Domain Online For Free For Beginners
Mar 3, 2025
Watch My Visual Studio Code IDE Setup Video For Fonts,Themes & Extensions
https://youtu.be/Bon8Pm1gbX8
Hi Join the official discord server to resolve doubts here:
https://discord.gg/cRnjhk6nzW
Visit my Online Free Media Tool Website
https://freemediatools.com/
Buy Premium Scripts and Apps Here:
https://procodestore.com/
Show More Show Less View Video Transcript
0:00
uh hello guys welcome to this video so
0:02
in this video I will show you a new
0:04
platform where you can deploy your react
0:06
CH application uh this platform is
0:09
called as netlify it's very popular
0:12
platform I just created a simple uh free
0:15
account uh login with my Google account
0:19
so I am there inside the net netlify
0:21
dashboard so if you go to the netlify
0:22
website just login with your free
0:24
account it's totally free to try out and
0:28
now I will show you a simple re project
0:31
which is developed uh the react CH
0:34
project so now I will just create a very
0:37
simple react project npm create vat at
0:43
theate latest and then give it a project
0:46
name let me
0:50
say template will
0:52
be
0:57
react so let me zoom in the command here
1:00
so npm create V at theate latest and
1:04
Then followed by your project name and
1:07
then Das Dash template react so we are
1:10
developing a react CH application it is
1:12
telling me that need to install these
1:14
packages so create Fe simply press y now
1:18
it will select you ask your framework so
1:21
simply select your react framework and
1:24
uh select the typescript and then now it
1:27
has created a project here CD into that
1:30
folder and then just install these
1:33
modules by executing this command npmi
1:36
so this will install all the nodejs
1:38
packages which are required for building
1:40
this application so this will hardly
1:42
take 10 to 15
1:44
seconds and then I will show you how to
1:46
deploy this project to netlify so now
1:50
you can open this project inside vs code
1:54
so typical project here you will see
1:56
that we are using the latest version
1:58
which is react 19 if you see react 19
2:03
and now we need to deploy this
2:05
application so if I run this application
2:09
locally and PM run Dev this will start
2:12
the development server Local Host
2:18
5173 so now this project looks something
2:21
like this so now we need to deploy this
2:23
because it is running on the Local Host
2:25
environment so now come to netlify
2:28
whenever you sign in you will with
2:30
inside your dashboard so there are three
2:32
options where you can deploy either you
2:34
can connect your existing GitHub repo so
2:38
the first option is to actually deploy
2:40
this project to GitHub and connect that
2:42
second option is that you can start from
2:44
a template as well but there is a third
2:46
option which is there if you see deploy
2:49
manually click this option uh you will
2:51
see you can uh browse your entire folder
2:56
so now what this is doing is that we
2:57
need to first of all uh build this
2:59
project so there is a build command as
3:02
you all know in react which is npm run
3:06
build so what it will do is actually
3:08
build all the project assets and we
3:11
create a disc
3:13
folder in the left hand side you will
3:15
see all the project has been bundled and
3:18
it has created this disc folder and now
3:20
we just need to upload this disc folder
3:22
very simply so this is a very simple
3:24
option deploy manually process just
3:27
browse to the location where your folder
3:29
is stored right here
3:34
so this is the disc folder simply select
3:37
this location just click upload and it
3:40
will upload all the files from the disc
3:42
folder so click on upload and now it is
3:44
uploading your project or deploying it
3:47
once the you will get this notification
3:50
that deploy is successful great work and
3:54
now you can visit your actual project so
3:58
simply click on that and just it will
4:01
give you this unique link and now your
4:03
project is successfully deployed here
4:06
you netlify anyone can visit this by
4:09
going to this link so you can share it
4:11
with your friends so you can see you can
4:13
click the button here you will see the
4:15
app is perfectly working so now if I
4:17
want to make some changes right here
4:19
let's suppose I make some change here uh
4:23
I delete everything from
4:25
here and replace this with a Hello World
4:28
message so if you make any sort sort of
4:30
changes you need to redeploy the project
4:33
for redeploying it let me just delete
4:35
everything from here we don't need this
4:38
so now we have made some changes so now
4:40
what we need to do we again need to
4:41
rebuild the project so just run the
4:43
command npm run build so rebuild the
4:46
entire project and this will again
4:48
create this dis directory and now just
4:51
go to your netlify dashboard and right
4:53
here you will see this option which is
4:56
uh deploy
4:59
just click this option and now it is
5:02
saying need to update your website drag
5:04
and drop your side output folder here
5:06
again just select the location of your
5:08
disc folder simply click upload and now
5:11
it will update that website so you will
5:14
see your website has been successfully
5:17
updated if you refresh it you will see
5:20
Hello World message will be printed out
5:22
so in this way you can update the
5:24
content of the website so anytime that
5:26
you update just rebuild this build
5:29
command and then just entirely update
5:32
the folder just upload the folder right
5:35
here by going to deploys and just drag
5:38
and drop your folder dis folder again
5:40
and this will deploy update your website
5:44
and uh that's all that we need in this
5:46
you can even see the all these metrics
5:49
are available uh site overview so let's
5:53
suppose if you want to change your site
5:57
name there is an option right here if
6:00
you want to customize it basically uh
6:03
when whenever it is deployed it gives
6:05
you a random name but if you want to
6:07
customize this you can click this option
6:09
by going to this site configuration and
6:12
click this button right here change site
6:14
name if the site name is available then
6:17
it will show you the site name is
6:18
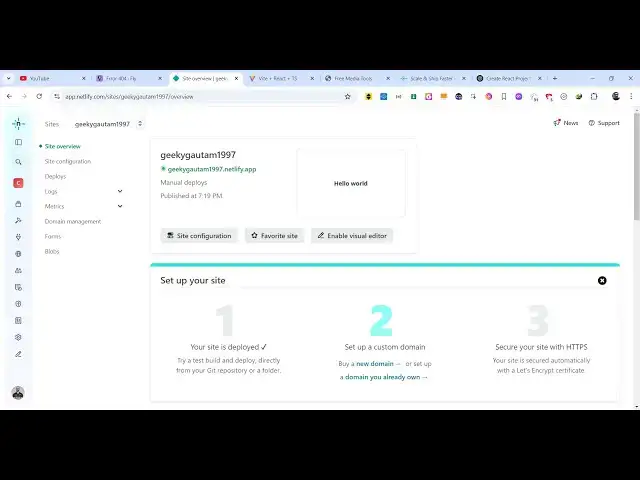
available let me say geeki Gotham
6:22
1997 and this will be your address here
6:24
if you see if the app is available click
6:27
on
6:28
save so now you can see my app is
6:32
deployed here to this URL which is geeki
6:34
goam 1997 at the netlify app so in this
6:39
easy way guys you can deploy a react
6:41
project to netlify very simply I showed
6:44
you step-by-step process very simply it
6:47
totally free netlify for trying out for
6:50
7 days and also it has a free plan as
6:52
well so up till you reach their
6:57
limitations you can perfectly use uh
6:59
netlify for demo purposes so it's very
7:02
good platform
7:05
so so this is my new address you will
7:07
see that so the app is perfectly
7:09
deployed so thank you very much for
7:11
watching this video and also check out
7:14
my website as well free mediat tools.com
7:16
uh which contains thousands of tools
7:18
regarding audio video and image and I
7:20
will be seeing you in the next video
#Programming
#Scripting Languages