live_tv
Livestream Starting Soon
00
Hours
:
00
Minutes
:
00
Seconds
Up next in 10

Build a React.js jsPDF Job Resume PDF Editor in Browser With Live Preview Using Html2Canvas in JSX
Jan 9, 2025
Buy the full source code of the application here:
https://procodestore.com/index.php/product/build-a-react-js-jspdf-job-resume-pdf-editor-in-browser-with-live-preview-using-html2canvas-in-jsx/
Buy Premium Scripts and Apps Here:
https://procodestore.com/
Show More Show Less View Video Transcript
0:04
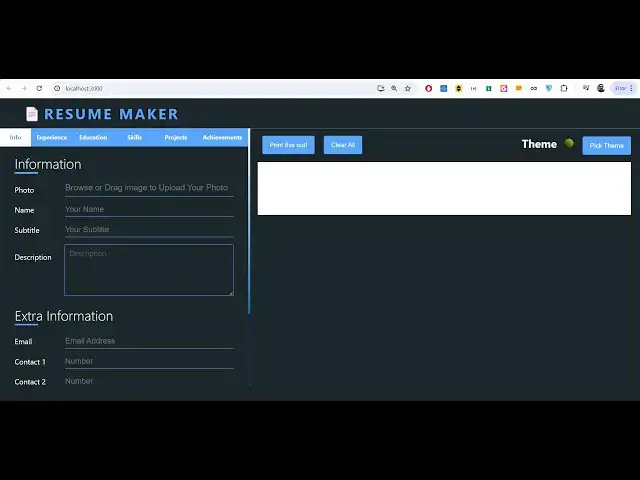
uh hello guys welcome to this uh live
0:06
stream so in this live stream I will
0:08
basically talk about a PDF resume editor
0:12
that I developed inside react Chas and
0:15
basically it works in the
0:18
browser and you will basically see I am
0:21
just opening this uh inside uh the
0:24
browser and it is running on Local Host
0:27
3000 so this is the actual react Chase
0:30
project which allows you to create
0:32
resume for any sort of job that you're
0:36
are applying so you can use this uh
0:39
project or software right in the browser
0:41
itself and then you can export this to
0:45
PDF or you can click this button to
0:48
print this resume right here so this is
0:51
a editor uh live preview is available
0:55
you drag and drop your image whatever
0:58
image is present you will simply select
1:01
your image and this will be reflected
1:03
right here in the let me restart the
1:05
project here npm Run start so as you
1:09
just uh execute this Command right here
1:13
it will actually start your react Chase
1:16
project and
1:18
uh now it will simply start on Local
1:22
Host
1:24
3000 and uh you can see that there is
1:29
also a button out there clear all you
1:31
will basically see as I just reloaded
1:34
the project the image still exist so
1:37
basically we are storing all this
1:38
information in the local storage so if
1:42
by mistake you close the application you
1:45
will not lose your work all the
1:47
information will be stored in local
1:49
storage and you will be able to recover
1:51
your uh work so if you want to delete
1:55
this you can simply click on clear all
1:57
and now all the data will be cleared out
1:59
and now you can select your image as I
2:02
select the image live preview will be
2:04
there on the right hand side in the
2:05
editor here you can type your name to be
2:08
there in the resume and then
2:11
the title of the job that you're are
2:14
applying let's suppose I say
2:18
here can put a short little description
2:21
right here as well
2:34
so you can put a short description this
2:37
this is actual live preview it will come
2:39
and uh you can even save it if you click
2:42
on print save as PDF you can save this
2:45
as a PDF document as well inside your
2:47
directory click on save so you can even
2:51
print print directly by using that
2:53
button if you open this now your PDF
2:56
file is ready right here you will see
2:58
the picture appearing this is actual
3:00
name this is a description short
3:02
description right here resum and then
3:05
extra information you can put here which
3:07
is your email address automatically you
3:09
will see the icon will appear for the
3:12
email and then the contact number you
3:15
can even add right here with country
3:17
code you'll see that on the right hand
3:19
side as you type it automatically the
3:22
live preview will come right
3:24
here so you can even add some more
3:26
numbers as
3:27
well so there is support
3:32
here so you can even add any sort of
3:35
address that you want
3:49
to so as you can see that you added the
3:52
address it will give you this nice
3:55
little icons as you basically write your
3:57
email address phone number and address
3:59
is automatically the resume is building
4:04
as you are typing this information in
4:05
this input Fields so it is actually
4:08
using react chers guys and we have built
4:11
this using react chers and we have used
4:13
these libraries which are jspdf and
4:15
html2 canvas so these are all the
4:17
packages that it uses it is using
4:19
material UI for this project for
4:21
building the UI user interface of the
4:23
application if you are interested guys
4:25
the link is given in the description of
4:27
the video you can directly purchase this
4:29
project from my website and you will
4:32
actually get the zip file after you make
4:34
the payment from Google Drive you can
4:37
simply extract the zip file and you will
4:39
actually get this directory structure
4:41
which you can simply start this using
4:44
npm Run start so this will start your
4:46
project in Local Host 3000 and you can
4:49
even build this project I will show you
4:51
later on so this is actual demo so the
4:54
link is given you can directly purchase
4:55
the full source code and this project
4:58
the link is given the description
5:00
payment link so here you can even
5:02
provide your GitHub LinkedIn portfolio
5:04
address as well let's suppose you just
5:06
need to provide the username or full
5:08
address you can even
5:11
provide this is actually
5:16
username and then you can even provide
5:19
full address
5:20
or you can even provide username as
5:28
well then you you can provide your
5:30
website any website that you
5:34
have like this so all these clicks uh
5:39
links are clickable so as you basically
5:41
click it will redirect you to the
5:43
website that you provided right here so
5:46
all these links are clickable so this is
5:48
the
5:49
GitHub so you can see that
5:52
so these are the things guys you will
5:55
see that it's a very
5:58
good uh uh
6:00
editor and after that what you will find
6:03
right here go to experience the next Tab
6:07
and here you can add some experience
6:09
that you have previously
6:15
worked can
6:21
see just add some experience right
6:25
here so you will basically also change
6:28
the col coloring things se you can pick
6:30
the theme right here by using this Color
6:32
Picker as you click this option you can
6:34
have various themes of colors you can
6:36
pick premade themes are also available
6:40
so you can pick any theme it will change
6:43
the icon color and the font color as
6:45
well depending you can even choose
6:48
primary color like this secondary
6:56
color so this totally is customizable
6:59
whichever color coloring theme you can
7:01
save a new theme and then apply it
7:04
automatically it will apply that and
7:08
uh you can even change the font as well
7:11
whatever font it is available right
7:26
here so you can see here
7:48
so you can basically add these details
7:50
right here and it will automatically
7:52
reflect and the right hand corner
8:08
so it becomes very much easy to do this
8:11
and automatically in
8:22
the can see it will add this experience
8:25
right here and then you can add more as
8:27
well if you have go to the education
8:30
right here and here you need to provide
8:32
school name you can see this is pre-made
8:36
everything is customizable as you type
8:38
right
8:52
here you can click this button to add
8:55
more education simply add some more
8:57
things that you have
9:01
now go to the skills so if you have some
9:03
skills right here you can add so it will
9:07
automatically add these Stacks right
9:09
here and
9:15
uh uh so any skills are very much
9:19
important in resumers to actually convey
9:21
to the hiring person that which skills
9:25
that you have which Technologies you're
9:27
comfortable in so basically
9:29
it is uh useful in conveying that
9:32
message so you will basically see it
9:34
will have a separate color and
9:38
is uh nice looking you can see that so
9:41
then we go to the project so if you have
9:43
make some projects you can name your
9:54
project they provide the link here to
9:56
that website
9:59
so this will come right here you can see
10:01
that this is actual link it will come
10:04
simply if someone clicks on that link
10:06
they will redirect to their website
10:09
these are the project and here you will
10:11
tell which technologies that you have
10:13
used so you can just tell
10:21
the and here you can provide a short
10:23
little description about the
10:26
project the online tool
10:31
website in nodejs Express and
10:35
fmpg which allows you
10:38
to
10:41
convert media
10:43
files so in this way you can provide
10:46
your projects and
10:50
just if you have some more projects as
10:53
well you can even
11:01
this information will be available for
11:04
you if you have projects you can add
11:05
them and then I'm just filling out
11:08
random data here
11:11
so this data will be yours
11:20
so so you can see that as you just type
11:23
here automatically all your work is
11:25
saved and you can clearly print this
11:28
information right here and it will print
11:31
this uh resume as PDF document or you
11:34
can print it at a physical sheet of
11:36
paper if you have a printer you can
11:38
click this
11:40
option uh select this
11:43
option paper size you can select letter
11:46
or anything background Pro Graphics it
11:49
will
11:51
uh make a colored printout you can
11:55
select the pages layout landscape if you
11:58
want to have a landscape layout scaling
12:00
you can select click on
12:09
save so now you can see that it has a
12:11
resume built in PDF and uh you can see
12:15
that all these things are clearly
12:16
mentioned right here this is a profile
12:18
picture name description this are
12:20
contact details these are the skills
12:22
number of projects that you added these
12:24
are the links right here these are all
12:26
clickable
12:27
links so if you someone clicks on that
12:31
they will go to that particular website
12:34
free media tools you can see that
12:36
so these are the experience that you
12:39
added uh education so it's a very good
12:42
project guys that I developed in job
12:44
Resume Builder in react Che and it uses
12:48
jspdf and HTML to Canvas Library if you
12:51
don't know about jspdf it's a open
12:53
source uh PDF generation library in
12:56
JavaScript and it has both node G
12:59
package and it has its official GitHub
13:02
repository you can read more about it in
13:04
the
13:05
documentation and HTML to Canvas
13:08
actually converts the it takes the
13:11
screenshot of
13:13
HTM and uh it converts the HTML to
13:16
Canvas so we have used these two open
13:18
source libraries to for this project and
13:21
uh you can actually see it in the screen
13:24
right here and it's a rade editor that
13:26
you will get after you make the payment
13:28
so so the link is given in the
13:30
description of the video
13:34
so lastly we have achievements as well
13:37
if you have make some ACH achievements
13:39
you can even do that as
13:49
well just add them as you can see it
13:53
will look something like this can list
13:56
of achievements here
14:06
you can just change the theme here
14:08
whichever colors you like red color
14:10
orange all the things are customizable
14:13
it works in the browser that's the
14:16
biggest Advantage because no server side
14:18
code is involved it runs entirely in
14:20
JavaScript and it runs offline if you
14:23
don't have internet connection still
14:25
this application will work and you don't
14:27
require internet connection for this
14:29
application so this is the biggest
14:32
positive of this application and now let
14:34
me show you the source code as well this
14:36
is actually the directory structure that
14:38
you will get after you make the payment
14:40
and
14:41
uh you will see that we coded this
14:44
application in jsx which is actually a
14:47
language derived from JavaScript so it
14:51
actually contains a react component
14:54
every react CH component consist of uh
14:56
CSS HTML and JavaScript you'll see see
14:59
that each component have some properties
15:02
right here and uh this overall
15:04
application is basically divided into
15:07
different jsx component so you will see
15:09
for each component in this application
15:11
we have a different jsx component
15:14
associated with this so we have
15:15
education experience homepage uh so if
15:18
you open the
15:19
application this is actual homepage
15:22
component you will see that homepage.
15:24
jsx and it you can see that uh it
15:27
contains the code for that
15:30
so it's a full react Chase project guys
15:33
and uh you can see that this is the
15:35
component for education so every tab
15:39
that you have here which is experience
15:41
where you will fill out the details for
15:43
experience education skills projects
15:45
achievements every component has a jsx
15:48
component right here and uh now I will
15:51
tell you guys if you want to deploy this
15:53
application to a real URL so let's
15:56
suppose you are deciding to build this
16:00
project into a minified code so that you
16:02
can deploy that into a hosting platform
16:05
so what you will do simply after
16:08
you want to deploy this simply go to the
16:11
com command line and uh if
16:15
you opening it for the very first time
16:17
you just need to install the modules
16:19
here first of all execute this command
16:21
which is npmi so this will actually
16:23
create a nodejs module folder right in
16:26
the root directory and it will actually
16:28
install all the modules which are listed
16:29
in the package.json files so it will
16:32
actually create the node modules folder
16:34
and uh after it creates you can start
16:37
your application by npm Run
16:41
start so I've already done that so now I
16:45
need to build this application so for
16:46
building this application there is a
16:48
separate Command right here which is mpm
16:50
run build so this will actually build
16:53
out this whole application and it will
16:55
actually create a build folder so as I
16:57
execute this command right here you will
16:59
see on the left hand side it will
17:01
actually create a brand new build folder
17:04
and uh it will actually create your
17:08
files which will be necessary so you
17:10
will simply copy this folder and paste
17:12
it inside wherever you are deploying
17:14
that it can be deployed to a very simple
17:16
hosting that you will purchase you will
17:19
need a domain name and a hosting and you
17:22
will simply deploy this application and
17:26
uh you can deploy them inside your own
17:29
application so it's a very good job
17:31
resume editor guys you will earn a lot
17:33
of Revenue as well you can put
17:35
advertisements and uh you can earn a lot
17:38
of Revenue advertisement Revenue as well
17:41
once you rank on Google and you will see
17:43
in inside the static webs folder we have
17:46
the CSS code minified code we have the
17:49
JavaScript code automatically generated
17:52
by this simple command and we have this
17:54
index.html so this file index.html you
17:57
need to upload simply
17:59
and uh in this way you can deploy this
18:03
resume maker so if you basically liking
18:06
this video guys please hit that like
18:08
button subscribe the channel as well and
18:10
uh if you need this source code if you
18:12
need this application the link is given
18:15
you can directly purchase it you after
18:17
purchasing it you will actually get this
18:19
source code from Google Drive and
18:23
uh thank you very much guys for watching
18:25
this video and I will be seeing you in
18:27
the next video
#Programming
#Jobs
#Resumes & Portfolios