Up next in 10

Build a React.js Excel xlsx Viewer & Renderer in Browser Using react-excel-renderer in JSX
Jan 9, 2025
Buy the full source code of application here:
Show More Show Less View Video Transcript
0:00
uh hello guys welcome to this video so
0:02
in this video I will show you a
0:04
Microsoft
0:05
Excel viewer inside uh the browser so if
0:08
you want to see your Excel files
0:10
directly in the browser and display it
0:12
in a table like structure you can use
0:14
this package and you can see on your
0:17
screen we have this choose file button
0:19
and where you need to select your XLS
0:21
file so let me this is my XLS file I
0:25
will need to display this data inside
0:28
the browser so what I will do I will
0:30
simply select this
0:33
file so this is my file here so I will
0:36
simply select it and now you will see
0:38
the data will Now display in a Tablo
0:40
structure very easily you can read the
0:42
content of any Excel file excels file
0:45
using this package so the actual package
0:48
name is react Excel renderer so if you
0:51
go to npmjs.com and just search for this
0:54
package react
0:56
Excel renderer so this is actually your
1:01
package so it's a
1:05
fairly popular package almost 6,000
1:07
weekly download so this is actually the
1:09
command I have already installed it so I
1:12
will just display a very simple
1:15
example so just make a simple functional
1:18
component and
1:24
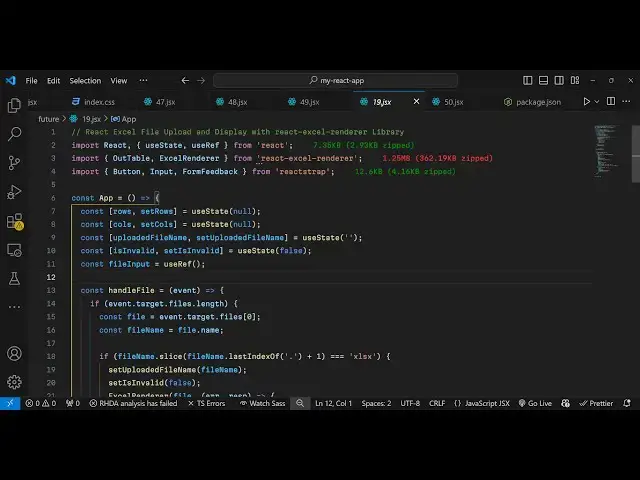
uh we need to first of all import the
1:27
package so it contains this this
1:30
function out
1:32
table
1:34
Excel renderer and it will be coming
1:36
from
1:38
this package that we have installed
1:40
which is react Excel renderer so it's
1:43
almost 1 Megabyte package so
1:46
it's quite a high back high size
1:51
package and now we need to declare some
1:54
State variables for the number of rows
1:58
that we want to display this will be
2:01
null and then same goes for columns as
2:04
well so this will be rows and Columns of
2:07
the Excel
2:09
file so you'll again use the UST State
2:13
hook and then we actually have a
2:16
variable for keeping track of which file
2:18
the user has
2:20
uploaded for this also we use the UST
2:23
State
2:24
hook initial value will be null and then
2:27
for showing if any sort of error is
2:30
there then we have
2:32
this
2:34
variable initial value will be
2:37
false and then we'll be having this
2:40
reference you'll use the use ref hook
2:43
inside react
2:46
CHS so all these variables are required
2:49
for this application so I've given all
2:51
the source code in the description so
2:53
now coming to the jsx we need to
2:56
actually show a simple form to the user
2:59
where they you can
3:01
pick the Excel files so you will have an
3:04
H1 heading which will say
3:08
react
3:11
Excel
3:14
renderer and after this we will have a
3:21
button so we'll have this button and it
3:24
will simply say browse file so when we
3:28
click this button uh we will execute a
3:31
function which will open the file
3:35
browser so you declare this function
3:39
open file
3:43
browser so we have the file input and
3:47
current do
3:51
click so right after this we will have a
3:54
actual input
3:57
field input type file and it by by
4:00
default it will be hidden and bind an
4:03
onchange event
4:05
handler so when the file is changed this
4:08
file will be ridden uh read by using
4:12
this function and we only be accepting
4:14
XLS files and it will be
4:17
required and be attaching this reference
4:19
here which is file
4:24
input and then we'll also be attaching
4:27
this onclick listener
4:29
which will actually read the
4:44
file so if you refresh your application
4:47
what you will see you will see this
4:51
uh I think it will say this handle file
4:54
change is not defined so we need to
4:56
Define this function so whenever the
4:58
file is changed
5:03
so this function will get executed so
5:05
this e parameter will be passed so using
5:09
this e parameter we can read the
5:13
file so if e. Target dot files.
5:18
length is greater than zero in that case
5:21
we need to read the file so we're
5:22
reading the
5:24
file we read the file like this
5:30
and then we extract the file
5:33
name after extracting the file name
5:41
we upload the file so we call this hook
5:44
function set uploaded file name to be
5:47
the actual file name set is invalid to
5:51
be
5:52
false and then we use this package which
5:54
is Excel renderer
6:01
so we are actually using this function
6:03
Excel renderer to read the content of
6:05
the file this returns a call back
6:08
function holding the
6:13
response and we can console log the
6:16
response and then set the columns to be
6:20
response.
6:22
columns so if you just refresh now you
6:25
will see this choose file button where
6:27
you select your Excel file
6:31
and you receive an object here which
6:33
contains these two columns uh Json
6:36
object which columns is reflecting of
6:38
the number of columns which are
6:41
there and then we have the number of
6:43
rows which is 46 so each row of data is
6:46
successfully read so now we just need to
6:49
display this data in the browser so we
6:51
are simply getting this object
6:55
so so we just need to set the rows as
6:58
well so set rows
7:01
it is response.
7:05
rows so that's all so now we need to
7:07
display this data in a tabular structure
7:10
so we will have this condition in the
7:14
jsx so if the rows and columns are
7:17
present in that case only we need to
7:21
show the actual data in the table
7:24
structure so
7:29
we'll give it a margin top of 20 pixel
7:32
so we use this component which
7:35
is out
7:43
table so this is out table so we are
7:46
importing it from this and using this
7:51
component and this component takes the
7:54
actual data that needs to be which is
7:56
contained inside rows and then we have
7:59
the
8:00
columns we are putting the
8:03
columns so if you refresh now select
8:07
your
8:09
file so you will see the data will Now
8:11
display so in this way you can read the
8:14
content of an Excel file and display it
8:16
directly inside a table like structure
8:19
using this package and one more two more
8:22
options it takes is you can attach the
8:25
table class name so it will be Excel
8:28
table
8:31
depending upon the version of Excel and
8:33
then you can even attach a header row
8:36
class as
8:37
well if you have made a custom class you
8:40
can attach it so essentially this is
8:43
actually the component it takes the
8:44
actual data columns and then you can
8:46
easily display the content of an Excel
8:49
file using this package so thank you
8:53
very much for watching this video and do
8:55
check out my website as well freem
8:58
mediat tools.com
9:00
uh which contains thousands of tools
9:02
regarding audio video and image and I
9:04
will be seeing you in the next video
#Programming
#Educational Software