Up next in 10

Angular 13 Zxing QR or Bar Codes Scanner in Browser Using ngx-scanner Library in TypeScript
Dec 22, 2025
Buy the full source code of application here:
https://buy.stripe.com/fZeaHY0gNdB67fy5Pv
Show More Show Less View Video Transcript
0:03
[snorts]
0:07
Uh hello friends, today in this tutorial
0:09
I'll be showing you that how to scan the
0:11
QR and the barcode inside your angular
0:13
application using a special library
0:15
called as uh zinc. Zync library is a
0:19
very special library inside Angular
0:20
which with the help of which you can
0:22
scan the QR code or barcode and you can
0:25
get the information inside uh whatever
0:28
information which is present inside the
0:30
barcode or QR code. So you can see that
0:32
this is the application we will be
0:34
building here. So if the application
0:35
loads for the very first time then it
0:38
will ask for the permission which of the
0:40
camera you want to select here. You can
0:42
select it from the drop-down whichever
0:45
camera you want to select here. So this
0:47
is my web camera which is the camera
0:50
from the laptop. So I will simply select
0:52
this camera. So you will see that the
0:54
camera has been selected. So now I need
0:57
to show the barcode. I need to scan the
1:01
QR code. So I will simply from the
1:04
mobile phone I will simply show it. Let
1:07
me show it to it.
1:10
You can see that now I am showing it.
1:13
Just wait.
1:18
So now you can see that guys I am
1:20
scanning this live QR code with the help
1:23
of this library. So it has extracted me
1:26
the text which is present inside this QR
1:28
code. So you can see that it has
1:31
successfully scanned this QR code. So
1:33
with the help of which you can
1:35
scan any sort of QR code that you want
1:38
or barcode from your mobile phone, from
1:41
your laptop anywhere and it will tell
1:43
you this information which is present
1:45
inside this. So it's a simple link which
1:47
will go to the WhatsApp web. So you can
1:50
see that.
1:52
So we will be building this demo
1:54
application guys in this tutorial. So if
1:57
you are like this video then please hit
2:00
the like button, subscribe the channel
2:01
as well. So for the building this I have
2:04
already told you we will be using this
2:05
library zinc. So basically if you just
2:08
search for this library you will be
2:10
knowing this zinc library QR code and
2:14
just search for npm.
2:16
So this is called as ngx scanner and
2:20
it's a angular barcode and QR code
2:23
scanner component library. It has got
2:25
19,292
2:27
weekly downloads and it's a very popular
2:30
library. Many developers use it. So uh
2:34
in order to install it, it is very
2:35
simple. Just uh install this by using
2:38
this command. So let's start building
2:40
this application guys. So we will go
2:42
into my projects folder and simply I
2:44
will make a new directory here. So which
2:46
will be scanner. I will cd into this
2:49
scanner library. And we will initialize
2:52
a new project scanner. So this will ask
2:55
some questions to you that if you want
2:57
to include routing. I will say no.
3:04
and then [snorts] we will use the CSS.
3:07
So now it will install these packages
3:09
guys. So just wait for in in just making
3:11
this angular project. So after it makes
3:15
we will install the library and we will
3:17
make this uh step by step. Now in order
3:20
to copy all the source code guys if you
3:22
want the source code you can refer my
3:23
blog post. I have written step-by-step
3:25
instruction inside this with the images.
3:28
So I've shown you completely step by
3:30
step how to do this inside blog post
3:32
like structure. So if you follow along
3:34
with the video you can go to the video
3:36
description link to copy all the source
3:38
code. So the I have given this source
3:41
code in the video description. Simply go
3:43
to the video description and copy all
3:46
the source code. So now let's get
3:48
started. So it is just making this uh
3:52
angular project. So just wait.
3:55
It is just uh
3:59
installing the packages. So just wait
4:02
here.
4:05
So now you can see that guys it has
4:07
successfully
4:10
uh
4:14
now we can open this inside visual
4:16
studio code. So the very first thing we
4:19
will do is that we will install this
4:21
library.
4:25
So if you just go to its documentation
4:27
page, you will realize how to do this.
4:29
Simply copy the command and simply paste
4:33
it. So this is your uh npmi ngx scanner.
4:39
So this will install this library here.
4:42
And after that what you need to do guys
4:44
simply go to your app domodule.ts file.
4:47
Simply you need to in uh include this
4:49
module. So we need to import this. So
4:52
right here we will write the line to
4:54
import this. So uh Z
4:59
zinc scanner module which will be
5:02
imported from this automatically VS code
5:05
has already done for me. And now include
5:08
this inside your imports array which is
5:10
simply Z sync scanner module. That's it.
5:14
So this is all that you need to do
5:16
inside this file. Simply close it. And
5:18
now you need to go to app.component.ts
5:20
TS file and right here guys what you
5:23
need to do is that you need to import
5:25
two libraries. First is the Zing scanner
5:29
component library and the next one is
5:33
the result. So whichever result it will
5:36
be shown you need to
5:39
result
5:41
from at the rate
5:45
zing ngx scanner. That's it.
5:55
Oh, sorry. This needs to be coming from
5:58
add uh / library.
6:02
So that's it. After declaring this guys,
6:05
what we need to do is that
6:07
uh we need to go to first of all
6:09
app.component.html
6:11
file and right here you need to declare
6:13
some HTML just to know what we are
6:16
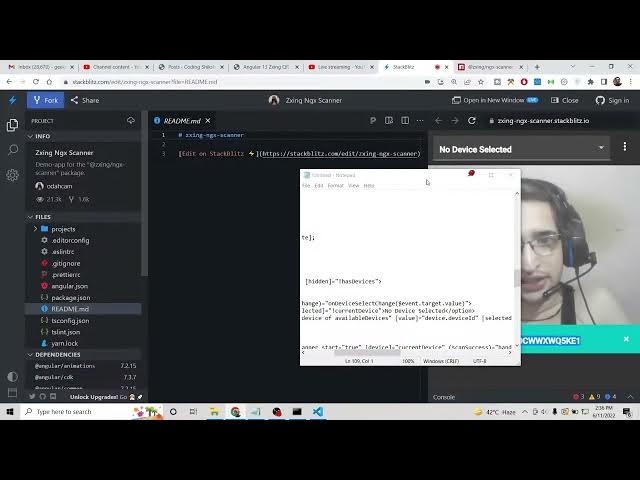
doing. So we inside this div
6:20
we will have a simple class to it of
6:23
scanner shell
6:26
and basically we will hide it whenever
6:29
there is a boolean parameter we will
6:31
attach it inside app.component.ts file.
6:34
So basically we will check that if the
6:36
user has access to the devices. So which
6:40
is the camera in order to scan the QR
6:42
code. So if the value is true then only
6:45
we will show it. If the value is false
6:47
then we will hide this section. So
6:50
inside this section guys what we will be
6:52
doing is that we will simply asking the
6:54
user to select the camera. So inside the
6:57
header we will have a simple select
6:59
field [gasps] where the user will select
7:01
whichever camera that he wants to select
7:04
and here we will attach a onchange. So
7:07
whenever the user selects the camera
7:09
this function will fire which is on
7:11
device
7:14
select change. So you can name this
7:17
function accordingly. This is not
7:19
mandatory that you need to name this
7:21
like this. And here you will pass the
7:23
event object. This is an important
7:25
thing. You need to pass it the
7:27
information whichever event dot target
7:31
dot value. So this is the camera that
7:35
the user has selected from the
7:36
drop-down. So this is very much useful.
7:40
And inside this select field guys where
7:42
there will be various options.
7:45
The first option will be simply
7:49
this is simple HTML not very complex.
7:53
The first option will be the value will
7:55
be nothing and the selected will be
7:58
equal to the parameter which is uh
8:02
current device. This variable we will
8:05
also declare
8:07
and here we will simply show the label
8:09
that no device selected to the user that
8:12
whenever you load the application for
8:14
the very first time then the text will
8:15
be shown to the user that no device
8:17
selected. So we are just letting the
8:20
user know that you need to select the
8:21
device and then we will have the list of
8:25
cameras installed inside the computer of
8:27
the user. So this is very much useful
8:30
where here we can use the ng4 loop which
8:32
is ng4 directive
8:35
and here we will we can show all the
8:38
devices of users let device of available
8:45
available
8:48
devices
8:51
and here the value will be simply
8:59
So this needs to be surrounded by square
9:02
bracket and this will be device dot
9:06
device id. So
9:11
so the devices that you uh seeing right
9:14
here you will see that in the drop-down
9:16
we will be populating all these devices
9:19
with their unique device ID. So this is
9:22
meant by this. So you need to do this in
9:25
order to show that dropdown.
9:27
So
9:30
after that guys, you also need to write
9:32
this complex code. Let me write it. Copy
9:35
this. So
9:38
so whichever device you select, this
9:40
will be selected right here inside this.
9:42
you will see that
9:51
I think it is very complex code. Let me
9:53
paste it. So
9:56
you just need to understand that it is
9:58
just populating the entries of the
9:59
devices which are installed on the
10:01
computer device. So that's all it is
10:04
doing. So I think this is uh yes this is
10:08
the option.
10:11
copy it
10:13
and paste it.
10:18
That's it.
10:21
So after this guys, uh this is over
10:25
and then
10:28
inside the second section if you see
10:31
here we will display the info which is
10:34
parsed of the QR code after this header.
10:38
So this is the actual library tag here a
10:41
directive we will attach the scanner
10:44
like this start is true device whatever
10:47
device the sele user has selected and uh
10:50
if the scan is successful then we this
10:52
function will fire and holding the event
10:55
object.
10:56
So these formats are supported QR code,
10:59
EN's code, the data matrix all these
11:01
codes which you know [snorts] and
11:04
section in this section we will display
11:06
the result simply this value is if the
11:10
value is set then this value will be
11:12
shown to the user that's it guys inside
11:15
the app.component html. Now moving on to
11:18
this uh app.component.ts
11:20
the TypeScript file where the actual
11:22
logic will reside. So for this we will
11:25
need to declare some variables. So for
11:29
this we will actually need the view
11:31
child library of angular to actually
11:34
bind the scanner.
11:39
The scanner will be an object of zinc
11:42
component.
11:49
So it is saying that
11:52
quick fix.
11:56
So you [snorts] just need to put this
11:58
like this has devices
12:03
it will be a boolean. So again you need
12:05
to put this symbol
12:10
that's it. And also QR result string.
12:18
This will be of type string.
12:21
QR [snorts] result.
12:25
This will also be of type uh result.
12:38
Two more variables we need to declare
12:39
which is this one which is available
12:42
devices and the current device.
12:46
Available devices are the less list of
12:48
devices which are installed on the
12:50
computer like this and the selected
12:53
device whichever you uh device the user
12:56
selects like this.
13:01
So after you declare all these variables
13:03
guys we will now be attaching a simple
13:06
method which is ng on init. This method
13:08
you know it's a life cycle method. So
13:11
when you application loads for the very
13:13
first time this function automatically
13:15
executes. So here inside we will
13:18
initialize our cameras
13:21
found. This is a method we need to
13:23
subscribe to it. It will have the list
13:26
of devices which are installed on the
13:28
computer.
13:33
So this will be of the type uh media
13:36
devices.
13:47
If you see media device info,
13:52
this will be a array of that type.
13:55
We have declared this. I think we
13:58
haven't
14:03
ss
14:10
This will be arrow function.
14:14
[snorts] So inside this function guys
14:16
what we need to do we need to initialize
14:18
this dot has devices to true
14:23
and this dot available devices to also
14:25
true.
14:27
And now guys what we need to do is that
14:30
sorry this needs to be equal to devices
14:32
number of devices. And now we need to
14:35
loop through of each device each device
14:37
which is found we will use the for loop.
14:40
So const device of devices.
14:44
So for each device we will have uh this
14:47
if condition which is back rear this is
14:52
front camera and the environment
15:00
GI test. This code you need to write
15:03
guys. So this is just the boiler plate
15:05
code for getting all the devices.
15:13
This dot scanner dot change device
15:18
change device
15:22
to actual device.
15:26
this dot current device
15:29
is equal to device and break. [snorts]
15:36
Uh I think we have written
15:39
let me paste it this code.
15:56
This needs to be device
15:59
change, I think.
16:44
>> [snorts]
16:55
>> So we can simply now what we can So
17:00
after this we can simply copy all this
17:34
So these are the three functions which
17:35
will be responsible for handling the QR
17:38
code uh scanner. So let me write this.
17:41
So you will see that
18:03
I think locally this library is not
18:05
working here because you can see various
18:07
uh things are present here which is not
18:12
allowing is so what you can do is that
18:15
you can refer to this example that I've
18:17
shown you at the starting of this video
18:18
this example is working and you can just
18:21
troubleshoot which uh angular version
18:23
they are using by going to package.json
18:26
because uh many of times these libraries
18:28
will not work with the latest version.
18:30
So what you can do is that you can
18:32
simply look at the version that they are
18:33
using and simply change the version to
18:37
whichever version you are developing. So
18:39
that way this library will work. So I
18:42
will strongly recommend this going to
18:45
stacks.com and going to this example.
18:48
And uh here they have this is a working
18:50
example. And looking at this you can
18:53
also develop it locally as well if you
18:55
want to.
18:58
And thanks very much guys for watching
19:00
this video. If you like this video then
19:01
please hit the like button subscribe the
19:03
channel and I will be seeing you in the
19:05
next video.