Up next in 10

Angular 13 Google Pay UPI Payment Button Integration in Popup Window Using TypeScript in TypeScript
Dec 22, 2025
Buy the full source code of application here:
https://buy.stripe.com/cN2aHY1kRbsYczS0mr
Show More Show Less View Video Transcript
0:08
Uh hello friends today in this tutorial
0:09
I will be telling you that how to
0:11
integrate the Google pay UPI payment
0:15
button inside your angular 13
0:16
application. So from that you will be
0:19
able to pay the payment using Google
0:22
pay.
0:23
So as you know that Google pay is a UPI
0:26
payment gateway uh which is developed by
0:29
Google here. If you just search for
0:31
Google pay you will see that uh
0:35
Google pay it is released by Google in
0:38
uh 26th May 2011 and the developers is
0:41
Google. Here you will see that
0:45
and we will try to integrate it inside
0:47
our Angular application Angular 13
0:50
application. Let me show you a short
0:52
little demo. So you will see this is
0:54
Google pay angular project created by
0:56
this person. Let me run this project.
1:03
So now basically you will see this
1:05
interface running here.
1:09
Let me show you the project. Just wait.
1:26
So this is actual project guys. You will
1:28
see that this is the URL which is
1:30
deployed. We will be building this
1:31
application from scratch in Angular 30.
1:35
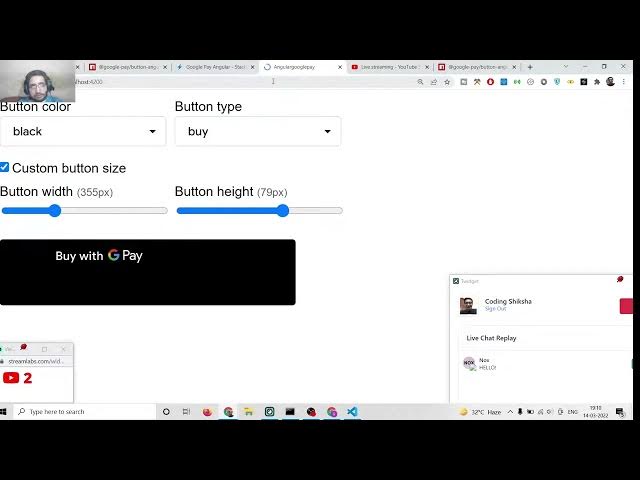
So you can change the background color
1:37
of the button like this.
1:40
You can change this to donate button,
1:42
plain button like this. You can also
1:44
change the width of the button by simply
1:47
doing this. The height of the button are
1:49
also like this.
1:58
So like this.
2:00
So you can change the background color.
2:02
And if you click the button, you will
2:03
see that uh this pop-up window will
2:06
appear asking for the payment
2:07
information. And then
2:11
if I now open this right here.
2:36
So we will try to build this application
2:38
from scratch guys. So just wait. I'm
2:41
just building it.
2:46
So let me wait for the viewers to join
2:49
in. So basically two people are watching
2:52
the stream guys. So we are using this
2:55
module for building this uh angular
2:58
13 kind of application. You will see
3:00
that if you just search here Google pay
3:04
angular
3:05
and if you search it right here you will
3:07
see this module which will be coming in
3:10
which will be called as Google pay
3:12
angular
3:14
Google pay/button/angular.
3:17
So this is the module we will be using
3:19
to build this uh Google pay button.
3:24
Inside this we will be
3:27
you can see this is the actual module.
3:29
It has got uh
3:32
1,00
3:36
uh 42 weekly downloads. So we will try
3:38
to use this module in order to build
3:40
this application.
3:44
So
3:45
this we have made a last video using
3:48
ReactJS but in this video we will be
3:50
using the angular framework to build
3:53
this awesome little application that you
3:55
can see here on your screen.
4:00
So we will try to do this. So
4:05
in order to build this application
4:08
we will use the angular project. So let
4:11
me delete
4:13
the ReactJS project and start from
4:15
scratch. Let me stop the server.
4:24
And uh
4:30
after this what we need to do is that we
4:33
need to
4:37
inside this project what we need to do
4:39
is that
4:41
we need to make a just go out of this
4:44
directory just make a new directory here
4:46
which will be called as angular
4:53
uh Google Okay.
4:55
And we will cd into this angular Google
4:58
pay.
5:00
And I will open this inside uh
5:06
visual studio tech code texture editor.
5:09
And now to make a new Anglo project we
5:11
will say ng new angular
5:14
google pay.
5:17
So this will make a new project. Here
5:21
inside you will see it is asking me that
5:23
would you like to add angular routing.
5:25
So I will say no. So I will only have
5:28
the CSS. So this will create this
5:31
project here inside a folder. You will
5:33
see angular Google pay. So it is just
5:36
creating this angular project. So just
5:38
wait here and uh we will be
5:43
creating the project after it completes.
5:54
So it is just uh creating this project
5:57
here. After it completes we will able to
5:59
build this application.
6:21
So now it is completed guys. So we can
6:23
move into this directory which is
6:25
angular
6:27
Google pay.
6:30
So inside this directory you will see
6:32
that we have the actual
6:36
angular project here which is a hello
6:39
world project.
6:41
So basically if I launch this if I want
6:44
to ng serve this is a command to open
6:49
the project.
7:13
So it is starting this angular
7:15
application. You will see that.
7:26
So now it has started this application
7:28
at localhost 4200. You will see that
7:34
if I see here nothing would be present
7:36
here. This will be just be a hello world
7:38
project of angular. You will see that.
7:41
So now we need to install this module
7:43
which is present here which is Google
7:46
pay/button-angular.
7:50
So we need to copy this. So three people
7:54
are watching the stream guys. So we need
7:55
to copy this module
7:58
and uh inside this our node chase
8:01
project we need to paste this line.
8:04
So npmi
8:06
google pay/button angular. So install
8:09
this module.
8:17
So this has successfully installed this
8:19
module. You will see that.
8:22
So now once again we can start this
8:24
application ngserve.
8:27
So right here we can say we can delete
8:30
all this code. Instead we will simply
8:32
have a div which will say hello world.
8:41
So it is just starting this application.
8:51
So now it has compiled it. So once again
8:54
if you refresh it you will see this
8:56
hello world text printed out on the
8:58
screen. So now we need to move to our
9:01
app.component.ts
9:03
file.
9:05
So right here we need to
9:08
write some code here. So first of all we
9:11
will move to the app.component.ts
9:13
file and write here. First of all, we
9:16
need to include this module inside app
9:19
domodule.ts
9:20
file and right here we need to write
9:23
this statement import
9:29
Google pay/button angular and inside
9:32
this we need this module which is Google
9:36
pay button module. So include this line
9:40
and after that inside your imports array
9:42
just put a comma
9:45
Google pay button module.
9:48
So include this and close this file. And
9:51
now after this open the app dot
9:53
component.ts file. And right here you
9:56
need to import the
10:00
Google pay button.
10:03
Google pay button
10:08
from
10:10
and this needs to be imported from at
10:13
the rate Google pay button angular put a
10:16
semicolon.
10:21
So it is saying that it is declared but
10:23
its value is never used. So first of all
10:26
we will
10:27
use this. So we will just declare a
10:30
payment request object.
10:36
So this will be a object.
10:40
So here we will simply say API version.
10:43
This will be equal to
10:46
two.
10:48
API version
10:52
minor will be equal to zero.
10:56
So it is saying that
11:01
export default.
11:04
Let me make it export default
11:08
function
11:14
app.
11:19
This will be a function here like this.
11:21
So remove this property here from this.
11:27
Put a comma. And the third property will
11:29
be simply allowed payment methods.
11:39
So inside this allowed payment methods
11:42
we can have uh
11:45
basically it's a array here and inside
11:47
this it can be either have pan only
11:53
and you can put a comma here and the
11:55
second property will be
11:59
cryptogram_3ds
12:11
put a comma and then we have the allowed
12:14
card networks.
12:26
So inside this you will have the master
12:28
card and the visa card. So various other
12:33
cards networks are there but we will
12:35
choose this card only.
12:38
So if you're watching it for the very
12:39
first time then please hit the like
12:41
button subscribe the channel as well.
12:44
So after you put again a comma
12:50
and after this we will have a
12:53
tokenization
12:58
token.
13:06
So this will be a object
13:15
type will be payment gateway
13:18
because it is kind of a payment gateway
13:21
and you put a comma and after this we
13:23
have the
13:26
parameters
13:31
object. So inside parameters object we
13:34
provide the gateway to simple
13:40
gateway to example because this is a
13:42
test mode
13:46
gateway to this.
13:54
So if you want to get the full example
13:57
code guys I can also give you the full
13:59
example code.
14:02
So if you just see here,
14:07
if you just see the module here where I
14:10
am just copy pasting the code from so
14:13
this is a module I'm basically
14:21
so this is actual module and if you just
14:24
go to the app.component.html
14:27
file you will just copy paste this code.
14:30
So basically this has some properties
14:32
which is environment. This can be either
14:34
test or production. You can also replace
14:37
here production.
14:39
If you are building for production but
14:42
we will be using test here. Button type
14:44
will be buy. This can be anything using
14:46
donate, subscribe, any value it can
14:49
have. But this can be we will have the
14:53
button with which will be
14:56
this can be only let me have the buy
14:59
button.
15:01
So buy button. So for this we need to
15:03
make this function which is onload
15:05
payment data
15:07
right here inside this file.
15:12
So we will have this function.
15:15
We need to make this function here. So
15:18
what we can do is that.
15:34
So we can declare this function here
15:36
which is uh I think this function is
15:38
called as
15:42
Onload payment data.
15:58
So here we can say console log.
16:03
So if you see we are passing the
16:06
this event here. So we can simply get
16:08
the data.
16:13
and console log the data.
16:19
So we can fix this problem by having any
16:22
here. So now if you load the application
16:25
it will be compiled successfully. If you
16:27
run this you will see there will be a
16:29
buy with Google pay button. So this is
16:32
the angular 13 application. Google pay
16:34
UPI payment integration. Yes, this is
16:36
the application which we are building in
16:38
Angular 13 and this is nice. Thanks. And
16:43
if you click this button, you will see a
16:44
pop-up window will appear. And uh
16:48
so here it is just saying it is unable
16:50
to verify it. Let me open this in this
16:53
browser.
16:58
So now it will automatically detect. You
17:01
can see we have passed the master card
17:03
or visa card. So if I click this payment
17:05
will be done here. You will see that
17:10
if I continue it you will see we will
17:12
get a response here back to us that
17:14
inside the console. We will get this
17:17
custom event which will be passed to it.
17:20
So which will have all the properties
17:22
which is in the target source element
17:25
which is a path here like this.
17:28
The detail this is a property detail
17:31
property which will get all the
17:33
information master card details
17:35
tokenization.
17:38
So token will be returned to you. You
17:40
can see example payment method token.
17:43
This is actual token which will be
17:44
required for the payment purposes.
17:47
So you can see that. So this is the
17:50
simplest of the ways by which you can
17:52
embed the Google pay UPI integration.
17:56
Bro, what is your laptop configuration
17:58
if you can tell us? This is the Asus
18:02
gaming Asus tough gaming kind of laptop.
18:06
If you want to see my specifications,
18:08
you can see it.
18:18
If I show you the properties of the So
18:22
this is the configuration
18:23
specifications. You will see that this
18:26
is processor which is Intel Core i5 103
18:31
CPU.
18:33
RAM is 8 GB and device you will see
18:36
system type is 64-bit operating system
18:39
act 64-based processor
18:42
and uh you can see this is the Windows
18:45
10 home single language.
18:49
So processor which is running on this
18:52
laptop
18:54
and it has a RAM of 8 GB. So it's a very
18:58
nice computer for gaming and
19:00
programming. So
19:03
you can run advanced programs on this
19:05
laptop. So definitely it's a good buy.
19:11
So this is the Google Pay integration
19:14
guys. So if you want to have the
19:16
advanced example, you can go to my
19:18
description link. I have given the link
19:20
in the video description. This is the
19:22
blog post. All the source code of the
19:25
tutorial will be given here. So this is
19:27
a advanced example. If you want to do it
19:30
like this, you can simply copy it inside
19:33
this file.
19:53
and paste it inside the HTML file. Here
19:55
you will see that now you will
19:59
uh it is saying that uh button size
20:09
Some kind of error is there. Let me see.
20:32
So here you will see that now it is
20:34
generating the setup file.
21:01
So if you're watching it for the very
21:02
first time guys, please hit the like
21:04
button, subscribe the channel as well.
21:06
So basically guys, you can see you can
21:07
go to the example which is hosted here
21:09
which is tack blitz example
21:13
and this is a file which is there. So
21:15
try to copy the code here from this
21:18
I have given in the video description
21:20
link if you want to.
21:45
So thanks very much guys for watching
21:47
this video. In this video we have talked
21:49
about that how to embed.
21:52
Sorand is asking how to start in front
21:54
end. Sir, can you suggest proper node
21:58
map? So definitely you can start with
22:00
the JavaScript projects, vanilla
22:03
JavaScript, then you can learn ReactJS.
22:06
Vue.js is also an great framework and
22:08
Nex.js. I talked about Nex.js is quite a
22:12
good framework if you want to learn the
22:15
front end. But if you are a beginner,
22:18
start with JavaScript, vanilla
22:20
JavaScript project.
22:23
So that's the road map.
22:31
So thanks very much friends for watching
22:33
this video
22:36
and I will be seeing you in the next
22:37
stream.